
User manual

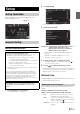


Table Of Contents
- Operating Instructions
- PRECAUTIONS
- WARNING
- Features
- Getting Started
- Accessory List
- Location of Controls
- Turning Power On or Off
- Turning the System On
- Initial System Start-Up
- Inserting/Ejecting a Disc
- Adjusting the Screen Viewing Angle
- Adjusting the Volume
- Lowering Volume Quickly
- Common Operations
- Using My Favorites
- User Registration
- Setting My Favorites
- Easy Sound Setup mode/BASS ENGINE SQ mode
- Access to iDataLink Mode
- Applying TuneIt
- Settings When Switching Users
- How to Input Characters and Numbers (Keypad)
- Top banner and Bottom banner Fade Out Setting
- Switching Sources
- Rear Entertainment Function
- Switching the Dual Screen Display
- Touch operation
- Selecting an Item in a List
- About the Indicator Display
- Radio/HD RadioTM/RBDS
- Listening to the Radio
- Presetting Stations Manually
- Presetting Stations Automatically
- Tuning to Preset Stations
- Forced Analog Mode
- Receiving a Multicast (HD Radio mode only)
- PTY (Program Type) Tuning (Analog Broadcasts only)
- Displaying Radio Text
- Storing the tag information (HD Radio mode only)
- About the Feature Logos
- CD/MP3/WMA/AAC
- DVD
- Playing a Disc
- Stopping Playback (PRE STOP)
- Stopping Playback
- Fast-forwarding/Fast-reversing
- Finding the Beginnings of Chapters/Tracks/Files
- Playing Still Frames (Pausing)
- Forward frame-by-frame Playback
- Slow Motion Playback
- Selecting Folders
- Repeat Playback
- Searching by Title Number
- Searching Directly by Chapter Number
- Searching for a Desired Video File
- Switching the Angle
- Switching the Audio Tracks
- Switching the Subtitles (Subtitle Language)
- About DivX®
- Setup
- Setup Operation
- General Setup
- Sound Setup
- Sound Setup Operation
- Setting the Balance/Fader/Subwoofer
- Setting the MX (Media Xpander)
- Equalizer Presets
- Adjusting the Parametric Equalizer Curve (Parametric EQ)
- Adjusting the Time Correction (Time Correction)
- Adjusting the Crossover Settings (X-Over)
- Setting Defeat
- Volume Setting
- Setting the Volume for Each Source
- About Time Correction
- About the Crossover
- Source Setup
- Bluetooth Setup
- Bluetooth Setup Operation
- Setting Hands-free Connection of iDataLink
- Bluetooth Setting
- Displaying Bluetooth Information
- Registering the Bluetooth Device
- Automatic Connection setting
- Setting the Passcode
- Changing the Character Code of the Phone Book
- Selecting the Output Speaker
- Adjusting the Caller Volume
- Adjusting the Microphone Level
- Adjusting the Ring Tone Volume
- Deleting All the Histories
- Camera Setup
- Bluetooth Operation
- Setup Before Using
- Hands-Free Phone Control
- Bluetooth Audio
- Playing the iDataLink- Bluetooth Audio
- Auxiliary Device (Optional)
- Camera Operation (Optional)
- SiriusXM Satellite Radio Operation (Optional)
- Receiving Channels with the SiriusXM Tuner
- Tuning Channels by Category
- Changing the Display
- Checking the SiriusXM Radio ID Number
- Storing Channel Presets
- Tuning Channels using Presets
- Tune Start Function
- Tune Scan Function
- Search Function
- Selecting the Channel directly
- Storing the desired Song/Artist
- Receiving and Tuning to an Alert
- Replay Function
- Parental Lock Function
- Using Jump Memory and Jump Recall function
- Storing the Tag information
- Playing the iDataLink SiriusXM
- Flash Memory (Optional)
- iPod/iPhone (Optional)
- HDMI Device (Optional)
- Pandora® internet radio (optional)
- Information
- Installation and Connections
- LIMITED WARRANTY

48-EN
Installation Setup
[Installation] is selected on the General setup menu in step 3. See
“General Setup Operation” (page 43).
Setting item: Installation
The Installation check screen is displayed.
Setting the External Audio Processor
On/Off
[External Audio Processor] is selected on the General setup menu in
step 3. Refer to
“General Setup Operation” (page 43).
When a compatible external audio processor is connected, please set
this item to “On”.
Setting item: External Audio Processor
Setting contents: Off (Initial setting) / On
• Some items of Sound Setup cannot be adjusted from this unit when
External Audio Processor is set to On.
• Press and hold
AUDIO button is invalid when External Audio
Processor is set to On .
Setting the Digital Output
[Optical] is selected on the General setup menu in step 3. Refer to
“General Setup Operation” (page 43).
To connect an audio processor using optical digital output, set to “On”
by the following procedure.
Setting item: Optical
Setting contents: Off (Initial setting) / On
• This setting is available only when External Audio Processor is set to
On. Refer to “Setting the External Audio Processor On/Off”
(page 48).
• If Optical is set to On, the Optical ( ) indicator appears.
• ,
and buttons are invalid when Optical is set to On.
Sound Setup Operation
1
Touch [Setup] icon of Top banner.
The Setup main screen is displayed.
2
Touch [Sound].
The Sound Setup screen appears.
3
Select the desired item.
Setting items: Balance/Fader/Subwoofer*
1
/ Media Xpander*
1
/
EQ Presets
*
1
/ Parametric EQ*
1
/
Time Correction
*
1
/ X-Over*
1
/ Defeat*
1
/ Volume /
Source Volume Setup
*
2
Off: The connected audio processor is not
recognized by X009.
On: The connected audio processor is recognized
by X009.
Sound Setup
To display the Sound Setup Menu screen:
Your vehicle must be parked with the ignition key in the ACC or
ON position. To do this, follow the procedures below.
1 Bring your vehicle to a complete stop at a safe
location. Engage the parking brake.
2 Keep pushing the foot brake and release the parking
brake once then engage it again.
3 When the parking brake is engaged for the second
time, release the foot brake.
• For automatic transmission vehicles, place the transmission lever
in the Park position.
Now, the locking system for the Sound mode operation has been
released. Engaging the parking brake can reactivate the Sound
Setup Menu, as long as the car’s ignition has not been turned off.
It is not necessary to repeat the above procedure
(1 through 3) of “To display the Sound mode screen.”
Each time the ignition is turned OFF, perform the procedure of “To
display the Sound mode screen.”
The following steps 1 to 5 are common operations to each
“Setting item” of Sound Setup. Refer to each section for details.