
User manual
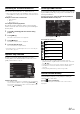

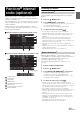
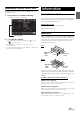

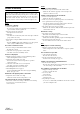
Table Of Contents
- Operating Instructions
- PRECAUTIONS
- WARNING
- Features
- Getting Started
- Accessory List
- Location of Controls
- Turning Power On or Off
- Turning the System On
- Initial System Start-Up
- Inserting/Ejecting a Disc
- Adjusting the Screen Viewing Angle
- Adjusting the Volume
- Lowering Volume Quickly
- Common Operations
- Using My Favorites
- User Registration
- Setting My Favorites
- Easy Sound Setup mode/BASS ENGINE SQ mode
- Access to iDataLink Mode
- Applying TuneIt
- Settings When Switching Users
- How to Input Characters and Numbers (Keypad)
- Top banner and Bottom banner Fade Out Setting
- Switching Sources
- Rear Entertainment Function
- Switching the Dual Screen Display
- Touch operation
- Selecting an Item in a List
- About the Indicator Display
- Radio/HD RadioTM/RBDS
- Listening to the Radio
- Presetting Stations Manually
- Presetting Stations Automatically
- Tuning to Preset Stations
- Forced Analog Mode
- Receiving a Multicast (HD Radio mode only)
- PTY (Program Type) Tuning (Analog Broadcasts only)
- Displaying Radio Text
- Storing the tag information (HD Radio mode only)
- About the Feature Logos
- CD/MP3/WMA/AAC
- DVD
- Playing a Disc
- Stopping Playback (PRE STOP)
- Stopping Playback
- Fast-forwarding/Fast-reversing
- Finding the Beginnings of Chapters/Tracks/Files
- Playing Still Frames (Pausing)
- Forward frame-by-frame Playback
- Slow Motion Playback
- Selecting Folders
- Repeat Playback
- Searching by Title Number
- Searching Directly by Chapter Number
- Searching for a Desired Video File
- Switching the Angle
- Switching the Audio Tracks
- Switching the Subtitles (Subtitle Language)
- About DivX®
- Setup
- Setup Operation
- General Setup
- Sound Setup
- Sound Setup Operation
- Setting the Balance/Fader/Subwoofer
- Setting the MX (Media Xpander)
- Equalizer Presets
- Adjusting the Parametric Equalizer Curve (Parametric EQ)
- Adjusting the Time Correction (Time Correction)
- Adjusting the Crossover Settings (X-Over)
- Setting Defeat
- Volume Setting
- Setting the Volume for Each Source
- About Time Correction
- About the Crossover
- Source Setup
- Bluetooth Setup
- Bluetooth Setup Operation
- Setting Hands-free Connection of iDataLink
- Bluetooth Setting
- Displaying Bluetooth Information
- Registering the Bluetooth Device
- Automatic Connection setting
- Setting the Passcode
- Changing the Character Code of the Phone Book
- Selecting the Output Speaker
- Adjusting the Caller Volume
- Adjusting the Microphone Level
- Adjusting the Ring Tone Volume
- Deleting All the Histories
- Camera Setup
- Bluetooth Operation
- Setup Before Using
- Hands-Free Phone Control
- Bluetooth Audio
- Playing the iDataLink- Bluetooth Audio
- Auxiliary Device (Optional)
- Camera Operation (Optional)
- SiriusXM Satellite Radio Operation (Optional)
- Receiving Channels with the SiriusXM Tuner
- Tuning Channels by Category
- Changing the Display
- Checking the SiriusXM Radio ID Number
- Storing Channel Presets
- Tuning Channels using Presets
- Tune Start Function
- Tune Scan Function
- Search Function
- Selecting the Channel directly
- Storing the desired Song/Artist
- Receiving and Tuning to an Alert
- Replay Function
- Parental Lock Function
- Using Jump Memory and Jump Recall function
- Storing the Tag information
- Playing the iDataLink SiriusXM
- Flash Memory (Optional)
- iPod/iPhone (Optional)
- HDMI Device (Optional)
- Pandora® internet radio (optional)
- Information
- Installation and Connections
- LIMITED WARRANTY

100-EN
In Case of Difficulty
Basic
No function or display.
• Vehicle’s ignition is off.
- If connected according to the instructions, the unit will not
operate with the vehicle’s ignition off.
• Improper power lead connections.
- Check power lead connections.
•Blown fuse.
- Check the fuse on the battery lead of the unit; replace with the
proper value if necessary.
• Internal micro-computer malfunctioned due to interference
noise, etc.
- Press the RESET switch with a ballpoint pen or other pointed
article. (Only for GMC/Chevrolet or other model.)
No sound or unnatural sound.
• Incorrect setting of volume/balance/fader controls.
- Readjust the controls.
• Connections are not properly or securely made.
- Check the connections and firmly connect.
Screen not displayed.
• Brightness/Contrast control is set at the minimum position.
- Adjust the Brightness/Contrast control.
• Temperature in the vehicle is too low.
- Increase the vehicle’s interior temperature to operation
temperature range.
• Connections to the DVD are not securely made.
- Check the connections and firmly connect.
• The Parking Brake Lead is not connected.
• The Parking Brake is not engaged.
- Connect the Parking Brake Lead, then engage the Parking
Brake. (See page 111)
Movement of displayed picture is abnormal.
• Temperature in the vehicle is too high.
- Allow the vehicle’s interior temperature to cool.
The optional remote control is inoperative.
• The remote control sensor setting of “Remote Sensor Setting”
(page 44) is not set to this unit (“Front”).
- Set for “Front”.
Radio
Unable to receive stations.
• No antenna, or open connection in the antenna cable.
- Make sure the antenna is properly connected; replace the
antenna or cable if necessary.
Unable to tune stations in the seek mode.
• You are in a weak signal area.
- Make sure the tuner is in DX mode.
• If the area you are in is a primary signal area, the antenna may
not be grounded and connected properly.
- Check your antenna connections; make sure the antenna is
properly grounded at its mounting location.
• The antenna may not be the proper length.
- Make sure the antenna is fully extended; if broken, replace the
antenna with a new one.
Broadcast is noisy.
• The antenna is not the proper length.
- Extend the antenna fully; replace it if it is broken.
• The antenna is poorly grounded.
-
Make sure the antenna is grounded properly at its mounting location.
• The station signal is weak and noisy.
- If above solution does not work, tune in another station.
Disc
Disc playback sound is wavering.
• Moisture condensation in the disc Module.
- Allow enough time for the condensation to evaporate (about 1
hour).
Disc insertion not possible.
• A disc is already in this unit.
- Eject the disc and remove it.
• The disc is being improperly inserted.
- Insert the disc correctly. (See page 19)
Unable to fast forward or backward the disc.
• The disc has been damaged.
- Eject the disc and discard it; using a damaged disc in your unit
can cause damage to the mechanism.
Disc playback sound skips due to vibration.
• Improper mounting of the unit.
- Securely re-mount the unit.
• Disc is very dirty.
- Clean the disc.
• Disc has scratches.
- Change the disc.
• The pick-up lens is dirty.
- Do not use a commercially available lens cleaner disc. Consult
your nearest Alpine dealer.
If you encounter a problem, please turn the power off, then on again.
If the unit is still not functioning normally, please review the items in
the following checklist. This guide will help you isolate the problem
if the unit is at fault. Otherwise, make sure the rest of your system is
properly connected, or then consult your authorized Alpine dealer.