
User manual
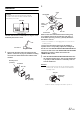
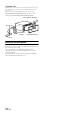
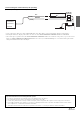
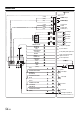
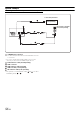
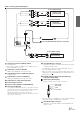
Table Of Contents
- Operating Instructions
- WARNING
- Getting Started
- Radio
- CD/MP3/WMA/AAC
- DVD/Video CD
- Playing a Disc
- Numeric Keypad Input Operation
- Stopping Playback (Pre Stop) ( IVE-W530EBT only)
- Stopping Playback ( IVE-W530EBT only)
- Fast-forwarding/Fast-reversing ( IVE-W530EBT only)
- Finding the Beginnings of Chapters/Files ( IVE-W530EBT only)
- Playing Still Frames (Pausing) ( IVE-W530EBT only)
- Slow Motion Playback ( IVE-W530EBT only)
- Selecting Folders
- Repeat Playback ( IVE-W530EBT only)
- Searching by Title/Folder Number
- Searching Directly by Chapter, File Number
- Switching the Angle
- Switching the Audio Tracks ( IVE-W530EBT only)
- Switching the Subtitles (Subtitle Language)
- Switching from the disc menu
- About DivX
- Other Useful Features
- Setup
- BT Hands Free Calling
- Rearview Camera Operation (Optional)
- Navigation System (Optional)
- Auxiliary Device (Optional)
- TUE-T200DVB Operation (Optional)
- Flash Memory (Optional)
- iPod/iPhone (Optional)
- Information
- Installation and Connections

51-EN
Installation
The main unit must be mounted within 30 degrees of the
horizontal plane, back to front.
1
Remove the mounting sleeve from the main unit
(Refer to “Removal” on page 51). Slide the mounting
sleeve into the dashboard and fix it with the metal
shackles.
2
Reinforce the head unit with the metal mounting strap
(not supplied). Secure the ground lead of the unit to a
clean metal spot using a screw (*
1
) already attached to
the vehicle’s chassis.
Connect each input lead coming from an amplifier or
equalizer to the corresponding output lead coming from
the left rear of the IVE-W530EBT/IVE-W530ABT/IVE-W530E.
Connect all other leads of the IVE-W530EBT/IVE-W530ABT/
IVE-W530E according to details described in the
CONNECTlONS section.
3
Slide the IVE-W530EBT/IVE-W530ABT/IVE-W530E into
the dashboard until it clicks. This ensures that the unit
is properly locked and will not accidentally come out
from the dashboard.
Removal
1. Insert the bracket keys into the unit, along the guides
on either side. The unit can now be removed from the
mounting sleeve.
2. Pull the unit out, keeping it unlocked as you do so.
Heat Sink
Caution
Do not block the unit’s heat sink, thus preventing air
circulation. If blocked, heat will accumulate inside the
unit and may cause a fire.
Rear of the Unit
Rear of the unit
Less than 30°
Mounting Sleeve
(Included)
Dashboard
This unit
Face Plate
(Included)
• For the screw marked “*
2
”, use an appropriate screw for the chosen
mounting location.
*
2
*
1
This unit
Chassis
Ground Lead
Metal
Mounting
Strap
Hex Nut (M5)
Screw
Bolt Stud
This unit
Bracket keys
(Included)