
User manual


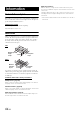
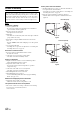

Table Of Contents
- Operating Instructions
- PRECAUTIONS
- WARNING
- Features
- Getting Started
- Common Operations
- Radio
- RDS
- CD/MP3/WMA/AAC
- DVD
- Playing a Disc
- Stopping Playback (PRE STOP)
- Stopping Playback
- Fast-forwarding/Fast-reversing
- Finding the Beginnings of Chapters/ Tracks/Files
- Playing Still Frames (Pausing)
- Forward frame-by-frame Playback
- Slow Motion Playback
- Selecting Folders
- Repeat Playback
- Searching by Title Number
- Searching Directly by Chapter Number
- Searching for a Desired Video File
- Switching the Angle
- Switching the Audio Tracks
- Switching the Subtitles (Subtitle Language)
- About DivX®
- Setup
- Setup Operation
- General Setup
- General Setup Operation
- Language Setting
- Remote Sensor Setting
- Opening/Closing Screen Automatically
- Setting the Remove Screen Angle
- Security Code Setting
- Setting Top banner and Bottom banner Display
- Screen/LED Customize
- Visual Setting
- About INE-W977BT
- Installation Setup
- Setting the External Audio Processor On/Off
- Setting the Digital Output
- Sound Setup
- Sound Setup Operation
- Setting the Balance/Fader/Subwoofer
- Setting the MX (Media Xpander)
- Equalizer Presets (Bass Max EQ)
- Adjusting the Parametric Equalizer Curve (Parametric EQ)
- Adjusting the Time Correction (Time Correction)
- Adjusting the Crossover Settings (X-OVER)
- Setting Defeat
- Volume Setting
- Setting the Volume for Each Source
- About Time Correction
- About the Crossover
- Source Setup
- BLUETOOTH Setup
- BLUETOOTH Setup Operation
- BLUETOOTH Setting
- Displaying BLUETOOTH Information
- Registering the BLUETOOTH Device
- Automatic Connection setting
- Setting the Passcode
- Changing the Character Code of the Phone Book
- Setting Received Calls Automatically
- Setting the time for automatic reception of a call
- Selecting the Output Speaker
- Adjusting the Caller Volume
- Adjusting the Microphone Level
- Adjusting the Ring Tone Volume
- Deleting All the Histories
- Camera Setup
- BLUETOOTH Operation
- Auxiliary Device (Optional)
- Camera Operation (Optional)
- USB Memory (Optional)
- iPod/iPhone (Optional)
- Information
- Installation and Connections

88-EN
In Case of Difficulty
Basic
No function or display.
• Vehicle’s ignition is off.
- If connected according to the instructions, the unit will not
operate with the vehicle’s ignition off.
• Improper power lead connections.
- Check power lead connections.
•Blown fuse.
- Check the fuse on the battery lead of the unit; replace with the
proper value if necessary.
• Internal micro-computer malfunctioned due to interference
noise, etc.
- Press the RESET switch with a ballpoint pen or other pointed
article.
• Screen panel is unlocked.
- Attaching the screen panel correctly. Refer to “Detaching and
Attaching the Screen” on page 20.
No sound or unnatural sound.
• Incorrect setting of volume/balance/fader controls.
- Readjust the controls.
• Connections are not properly or securely made.
- Check the connections and firmly connect.
Screen not displayed.
• Brightness/Contrast control is set at the minimum position.
- Adjust the Brightness/Contrast control.
• Temperature in the vehicle is too low.
- Increase the vehicle’s interior temperature to operation
temperature range.
• Connections to the DVD are not securely made.
- Check the connections and firmly connect.
• The Parking Brake Lead is not connected.
• The Parking Brake is not engaged.
- Connect the Parking Brake Lead, then engage the Parking
Brake. (See page 101)
Movement of displayed picture is abnormal.
• Temperature in the vehicle is too high.
- Allow the vehicle’s interior temperature to cool.
The optional remote control is inoperative.
• The remote control sensor setting of “Remote Sensor Setting”
(page 42) is not set to this unit (“Front”).
- Set for “Front”.
Screen panel cannot be attached.
• Attaching method is not correct.(e.g. Insert the downside of
screen panel into the main unit first.)
- Attach the screen panel correctly. Refer to “Detaching and
Attaching the Screen” on page 20.
• The lock catch of main unit is in lock state (figure1) .
- Slide the Release Lever upward to unlock the lock catch
(figure2).
If you encounter a problem, please turn the power off, then on again.
If the unit is still not functioning normally, please review the items in
the following checklist. This guide will help you isolate the problem
if the unit is at fault. Otherwise, make sure the rest of your system is
properly connected, or then consult your authorised Alpine dealer.
figure2
figure1
lock catch (lock)
lock catch (unlock)
Release Lever