
User manual


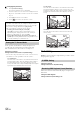
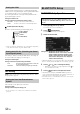
Table Of Contents
- Operating Instructions
- PRECAUTIONS
- WARNING
- Features
- Getting Started
- Common Operations
- Radio
- RDS
- CD/MP3/WMA/AAC
- DVD
- Playing a Disc
- Stopping Playback (PRE STOP)
- Stopping Playback
- Fast-forwarding/Fast-reversing
- Finding the Beginnings of Chapters/ Tracks/Files
- Playing Still Frames (Pausing)
- Forward frame-by-frame Playback
- Slow Motion Playback
- Selecting Folders
- Repeat Playback
- Searching by Title Number
- Searching Directly by Chapter Number
- Searching for a Desired Video File
- Switching the Angle
- Switching the Audio Tracks
- Switching the Subtitles (Subtitle Language)
- About DivX®
- Setup
- Setup Operation
- General Setup
- General Setup Operation
- Language Setting
- Remote Sensor Setting
- Opening/Closing Screen Automatically
- Setting the Remove Screen Angle
- Security Code Setting
- Setting Top banner and Bottom banner Display
- Screen/LED Customize
- Visual Setting
- About INE-W977BT
- Installation Setup
- Setting the External Audio Processor On/Off
- Setting the Digital Output
- Sound Setup
- Sound Setup Operation
- Setting the Balance/Fader/Subwoofer
- Setting the MX (Media Xpander)
- Equalizer Presets (Bass Max EQ)
- Adjusting the Parametric Equalizer Curve (Parametric EQ)
- Adjusting the Time Correction (Time Correction)
- Adjusting the Crossover Settings (X-OVER)
- Setting Defeat
- Volume Setting
- Setting the Volume for Each Source
- About Time Correction
- About the Crossover
- Source Setup
- BLUETOOTH Setup
- BLUETOOTH Setup Operation
- BLUETOOTH Setting
- Displaying BLUETOOTH Information
- Registering the BLUETOOTH Device
- Automatic Connection setting
- Setting the Passcode
- Changing the Character Code of the Phone Book
- Setting Received Calls Automatically
- Setting the time for automatic reception of a call
- Selecting the Output Speaker
- Adjusting the Caller Volume
- Adjusting the Microphone Level
- Adjusting the Ring Tone Volume
- Deleting All the Histories
- Camera Setup
- BLUETOOTH Operation
- Auxiliary Device (Optional)
- Camera Operation (Optional)
- USB Memory (Optional)
- iPod/iPhone (Optional)
- Information
- Installation and Connections

58-EN
Connection with external input devices is available through the iPod
VIDEO connector. An optional adapter cable is required (standard RCA
to 3.5ø mini-phono plug or 3.5ø to 3.5ø mini phono plug).
You can also play back video connecting with an optional AV cable
(4-pole mini AV plug to 3-RCA).
Setting item: AUX3 In Sel.
Setting contents: iPod Video (Initial setting) / AUX3
Usable 4-pole mini AV plug
The unit accepts the following 4-pole mini AV plug pin-out:
• Please check pin-out carefully before use of this product. Depending
on the cable, there may be no picture and/or sound.
After setting to “AUX3” in “Setting the AUX3 In Sel.”, this setting can
be carried out. The video input type can be changed.
Setting item: AUX3 Signal
Setting contents: Auto (Initial setting) / NTSC/PAL
RSE Setting
[RSE] is selected on the Source setup menu in step 3. Refer to “Source
Setup Operation” (page 54).
Video and audio can be output to the rear monitor.
Setting item: RSE
Setting contents: Off (Initial setting) / On
• If you selected the “On” setting, set the “Remote Sensor Setting”
(page 42).
BLUETOOTH Setup Operation
1
Touch [Setup] icon of Top banner.
The Setup main screen is displayed.
2
Touch (BLUETOOTH).
The BLUETOOTH Setup screen appears.
3
Select the desired item.
Setting items: BLUETOOTH / BLUETOOTH Info. / Set
BLUETOOTH Device / Auto Connect / Passcode
Change / Default Phonebook Encoding / Auto
Answer / Auto Answer Time / Phone Speaker* /
Caller Volume / Microphone Level / Ring Tone
Volume / Delete Call History
* When External AP is set to On, phone speaker can not be adjusted.
Refer to “Setting the External Audio Processor On/Off” (page 46)
4
Touch [] or [] etc., to change its setting.
• When the pop-up window for setup is displayed, touch [] to
close the window after setting.
5
Touch [] to return to the previous screen.
• Immediately after changing the BLUETOOTH Setup (while the
system is writing data automatically) do not turn the ignition key to
OFF. Otherwise, the settings may not be changed.
• For details on how to scroll through the list, refer to “Selecting an
Item in a List” (page 28).
Setting the AUX3
iPod Video: Set when connected to an iPod or iPhone.
AUX3: Set when connected to an external input device.
Setting the AUX3 Sel. (Switching the Visual
Input Signal System)
Auto: The video input signal type (NTSC or PAL) will
be automatically selected.
NTSC/PAL: Choose the video input signal type manually.
Setting the Rear Seat Entertainment
System
Audio L (White)
Audio R (Red)
Ground
Video (Yellow)
BLUETOOTH Setup
The following steps 1 to 5 are common operations to each
“Setting item” of BLUETOOTH Setup. Refer to each section for
details.