
User manual


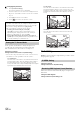
Table Of Contents
- Operating Instructions
- PRECAUTIONS
- WARNING
- Features
- Getting Started
- Common Operations
- Radio
- RDS
- CD/MP3/WMA/AAC
- DVD
- Playing a Disc
- Stopping Playback (PRE STOP)
- Stopping Playback
- Fast-forwarding/Fast-reversing
- Finding the Beginnings of Chapters/ Tracks/Files
- Playing Still Frames (Pausing)
- Forward frame-by-frame Playback
- Slow Motion Playback
- Selecting Folders
- Repeat Playback
- Searching by Title Number
- Searching Directly by Chapter Number
- Searching for a Desired Video File
- Switching the Angle
- Switching the Audio Tracks
- Switching the Subtitles (Subtitle Language)
- About DivX®
- Setup
- Setup Operation
- General Setup
- General Setup Operation
- Language Setting
- Remote Sensor Setting
- Opening/Closing Screen Automatically
- Setting the Remove Screen Angle
- Security Code Setting
- Setting Top banner and Bottom banner Display
- Screen/LED Customize
- Visual Setting
- About INE-W977BT
- Installation Setup
- Setting the External Audio Processor On/Off
- Setting the Digital Output
- Sound Setup
- Sound Setup Operation
- Setting the Balance/Fader/Subwoofer
- Setting the MX (Media Xpander)
- Equalizer Presets (Bass Max EQ)
- Adjusting the Parametric Equalizer Curve (Parametric EQ)
- Adjusting the Time Correction (Time Correction)
- Adjusting the Crossover Settings (X-OVER)
- Setting Defeat
- Volume Setting
- Setting the Volume for Each Source
- About Time Correction
- About the Crossover
- Source Setup
- BLUETOOTH Setup
- BLUETOOTH Setup Operation
- BLUETOOTH Setting
- Displaying BLUETOOTH Information
- Registering the BLUETOOTH Device
- Automatic Connection setting
- Setting the Passcode
- Changing the Character Code of the Phone Book
- Setting Received Calls Automatically
- Setting the time for automatic reception of a call
- Selecting the Output Speaker
- Adjusting the Caller Volume
- Adjusting the Microphone Level
- Adjusting the Ring Tone Volume
- Deleting All the Histories
- Camera Setup
- BLUETOOTH Operation
- Auxiliary Device (Optional)
- Camera Operation (Optional)
- USB Memory (Optional)
- iPod/iPhone (Optional)
- Information
- Installation and Connections

56-EN
Changing the password
1 Touch [Password Change].
The numeric keypad screen is displayed.
2 Touch the input screen to enter a new 4-digit password.
• Keep a note of the number somewhere safe in case you should
forget it.
3 Touch [OK] to memorise the number.
4 Touch [] to return to the previous screen.
Use the procedure described below to modify the output screen
according to the type of TV monitor (rear monitor) being used.
If the rear monitor is not connected, the screen setting is 16:9.
Setting item: TV Screen
Setting contents: 4:3LB / 4:3PS / 16:9 (Initial setting)
• For some discs, the picture may not be set to the selected screen size.
(For details, refer to the explanation on the disc’s jacket.)
4:3 LETTER BOX:
Select this when connected to a conventional 4:3 size (normal
TV aspect ratio) monitor. There may be black stripes visible at
the top and bottom of the screen (when playing a 16:9 size
movie). The width of these stripes will depend upon the original
aspect ratio of the theatrical release of the movie.
4:3 PAN-SCAN:
Select this when connected to a conventional 4:3 size monitor.
The picture will fill the entire TV screen. However, due to the
mismatch in aspect ratio, parts of the movie at the extreme left
and right sides will not be visible (when playing a 16:9 size
movie).
16:9 WIDE:
Select this when connected to a wide screen TV. This is the
factory setting.
Radio Setting
[Radio] is selected on the Source setup menu in step 3. Refer to “Source
Setup Operation” (page 54).
Setting item: PI Seek
Setting contents: Auto / Off (Initial setting)
When Off is selected, the unit automatically keeps receiving the local
RDS station.
Setting item: RDS Regional
Setting contents: On (Initial setting) / Off
Changing the rating level temporarily
Some discs may request that you change the rating level set in
the default settings during playback. In this case, the message
“Do you wish to change Parental level? [OK] [Cancel]”.
If this screen appears, change the level as follows:
• To change parental level and play, touch [OK].
When [OK] is touched, the numeric keypad input screen is
displayed. Input the 4-digit password you set in “Setting the
Rating Level (Parental Lock)”, then touch [OK].
• To play without changing the parental level, touch [Cancel].
(If [Cancel] is touched, playback will be at the parental level set
in “Setting the Rating Level (Parental Lock)”.)
Setting the TV Screen Mode
PI SEEK Setting
Receiving RDS Regional (Local) Stations