
User manual
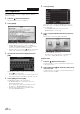
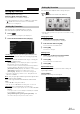
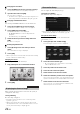

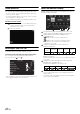
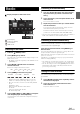
Table Of Contents
- Operating Instructions
- PRECAUTIONS
- WARNING
- Features
- Getting Started
- Common Operations
- Radio
- RDS
- CD/MP3/WMA/AAC
- DVD
- Playing a Disc
- Stopping Playback (PRE STOP)
- Stopping Playback
- Fast-forwarding/Fast-reversing
- Finding the Beginnings of Chapters/ Tracks/Files
- Playing Still Frames (Pausing)
- Forward frame-by-frame Playback
- Slow Motion Playback
- Selecting Folders
- Repeat Playback
- Searching by Title Number
- Searching Directly by Chapter Number
- Searching for a Desired Video File
- Switching the Angle
- Switching the Audio Tracks
- Switching the Subtitles (Subtitle Language)
- About DivX®
- Setup
- Setup Operation
- General Setup
- General Setup Operation
- Language Setting
- Remote Sensor Setting
- Opening/Closing Screen Automatically
- Setting the Remove Screen Angle
- Security Code Setting
- Setting Top banner and Bottom banner Display
- Screen/LED Customize
- Visual Setting
- About INE-W977BT
- Installation Setup
- Setting the External Audio Processor On/Off
- Setting the Digital Output
- Sound Setup
- Sound Setup Operation
- Setting the Balance/Fader/Subwoofer
- Setting the MX (Media Xpander)
- Equalizer Presets (Bass Max EQ)
- Adjusting the Parametric Equalizer Curve (Parametric EQ)
- Adjusting the Time Correction (Time Correction)
- Adjusting the Crossover Settings (X-OVER)
- Setting Defeat
- Volume Setting
- Setting the Volume for Each Source
- About Time Correction
- About the Crossover
- Source Setup
- BLUETOOTH Setup
- BLUETOOTH Setup Operation
- BLUETOOTH Setting
- Displaying BLUETOOTH Information
- Registering the BLUETOOTH Device
- Automatic Connection setting
- Setting the Passcode
- Changing the Character Code of the Phone Book
- Setting Received Calls Automatically
- Setting the time for automatic reception of a call
- Selecting the Output Speaker
- Adjusting the Caller Volume
- Adjusting the Microphone Level
- Adjusting the Ring Tone Volume
- Deleting All the Histories
- Camera Setup
- BLUETOOTH Operation
- Auxiliary Device (Optional)
- Camera Operation (Optional)
- USB Memory (Optional)
- iPod/iPhone (Optional)
- Information
- Installation and Connections

25-EN
8
Select the material of the car seats.
The settings confirmation screen is displayed.
• If the car seats are made of both leather and fabric, select
[Half leather].
9
Check the settings and touch [OK].
• If Preset3 was already saved for Time Correction/X-OVER/
Parametric EQ, the data will be overwritten.
• The Easy sound settings are reflected in the following Audio Setup
items.
Setting the MX (Media Xpander)
- Adjusting the Parametric Equalizer Curve (Parametric EQ)
Adjusting the Time Correction (Time Correction)
Adjusting the Crossover Settings (X-OVER) (only when
Subwoofer is set to [On])
The Equalizer Presets (Bass Max EQ) settings are disabled.
Downloaded Sound Settings
Using a USB memory device, the sound settings downloaded from the
ALPINE website can be used to configure Time Correction, X-OVER
and Parametric EQ settings.
Setting item: Downloaded Sound Settings
The file name of download data shall be
“A_U*****.MP3”.
• Save the setting data in the root folder.
• For details about procedures of download, see ALPINE’s web site.
1
Touch [Downloaded Sound Settings].
Setting data files are displayed in a list with a maximum of 5
items.
2
Touch the desired file.
3
Touch [OK].
The downloaded setting values are set as the Time
Correction/X-OVER/Parametric EQ settings, and at the
same time saved as Preset3, respectively.
• When no USB memory is connected, the “iPersonalize Setting”
function is not available.
• If Preset3 was already saved for Time Correction/X-OVER/
Parametric EQ, the data will be overwritten.
Settings When Switching Users
The functions/settings that are affected when switching users are as
shown below.
*
1
Except i-Personalize Setup
*
2
The display pattern can be set when a camera equipped with a switch
function on the Camera screen is connected.
Items whose settings are affected when switching
registered users, are indicated by
“ ” in this manual.
Example:
Extender (fixed)
Identifier (alphabet or number
5 letters maximum)
Header (fixed)
Item Ref.
page
My Favourites User Registration 22
Setting My Favourites*
1
23
Displaying the Camera Image*
2
24
RDS Displaying Radio Text 31
General Setup Setting Top banner and Bottom banner
Display
43
Switching the Display Colour 43
Sound Setup Turning Subwoofer ON/OFF 48
Adjusting the Subwoofer Level 48
Source setup Source Layout Setting 54
Hands-Free
Phone Control
Assigning as a Short Cut Dialling
Number
68
Redial Function 66
Phone Book Function 67
Camera
Operation
Switching the Image Pattern for the
Rear Camera*
2
73
Switching the Image Pattern for the
Front Camera*
2
76
Guide Display ON/OFF Setting 73, 76
Adjusting the Caution Display Location 73, 76