
User manual
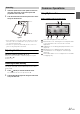
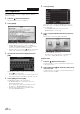
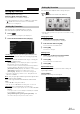
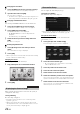
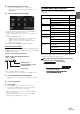

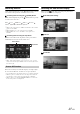
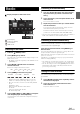
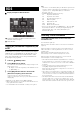
Table Of Contents
- Operating Instructions
- PRECAUTIONS
- WARNING
- Features
- Getting Started
- Common Operations
- Radio
- RDS
- CD/MP3/WMA/AAC
- DVD
- Playing a Disc
- Stopping Playback (PRE STOP)
- Stopping Playback
- Fast-forwarding/Fast-reversing
- Finding the Beginnings of Chapters/ Tracks/Files
- Playing Still Frames (Pausing)
- Forward frame-by-frame Playback
- Slow Motion Playback
- Selecting Folders
- Repeat Playback
- Searching by Title Number
- Searching Directly by Chapter Number
- Searching for a Desired Video File
- Switching the Angle
- Switching the Audio Tracks
- Switching the Subtitles (Subtitle Language)
- About DivX®
- Setup
- Setup Operation
- General Setup
- General Setup Operation
- Language Setting
- Remote Sensor Setting
- Opening/Closing Screen Automatically
- Setting the Remove Screen Angle
- Security Code Setting
- Setting Top banner and Bottom banner Display
- Screen/LED Customize
- Visual Setting
- About INE-W977BT
- Installation Setup
- Setting the External Audio Processor On/Off
- Setting the Digital Output
- Sound Setup
- Sound Setup Operation
- Setting the Balance/Fader/Subwoofer
- Setting the MX (Media Xpander)
- Equalizer Presets (Bass Max EQ)
- Adjusting the Parametric Equalizer Curve (Parametric EQ)
- Adjusting the Time Correction (Time Correction)
- Adjusting the Crossover Settings (X-OVER)
- Setting Defeat
- Volume Setting
- Setting the Volume for Each Source
- About Time Correction
- About the Crossover
- Source Setup
- BLUETOOTH Setup
- BLUETOOTH Setup Operation
- BLUETOOTH Setting
- Displaying BLUETOOTH Information
- Registering the BLUETOOTH Device
- Automatic Connection setting
- Setting the Passcode
- Changing the Character Code of the Phone Book
- Setting Received Calls Automatically
- Setting the time for automatic reception of a call
- Selecting the Output Speaker
- Adjusting the Caller Volume
- Adjusting the Microphone Level
- Adjusting the Ring Tone Volume
- Deleting All the Histories
- Camera Setup
- BLUETOOTH Operation
- Auxiliary Device (Optional)
- Camera Operation (Optional)
- USB Memory (Optional)
- iPod/iPhone (Optional)
- Information
- Installation and Connections

21-EN
1
Insert the upside of the screen panel into the main
unit. Align the groove on the screen panel with
projections on the main unit.
2
Push the downside of the screen panel until it locks
firmly into the main unit.
• Before attaching the screen panel, make sure that there is no dirt or
dust on the connector terminals and no foreign object between the
screen panel and the main unit.
• Attach the screen panel carefully, holding the sides of the screen
panel to avoid pushing buttons by mistake.
Adjusting the Volume
Adjust the volume by pressing or .
Volume decreases/increases continuously by pressing and
holding or .
Volume: 0 - 35
Lowering Volume Quickly
Activating the Audio Mute function will instantly lower the volume
level by 20 dB.
1
Press (MUTE) to activate the MUTE mode.
The audio level will decrease by about 20 dB.
2
Pressing (MUTE) again will bring the audio back
to its previous level.
Using My Favourites
Display example of My Favourites screen
User name: Displays the name of the user
My Favourites icon: Touching an icon on My Favourites
screen will switch to the screen for the selected
application.
Add button: Use to add (register) My Favourites icons
(page 23)
Edit button: Use to edit My Favourites (page 23)
Camera button: Use to display the camera image
(page 24)
i-Personalize button: Use to configure the i-Personalize
Setup (page 24)
Attaching
figure4
Common Operations