
Quick Start

ALPINE INE-W977BT QRG 68-24567Z08-A (EN)
14-EN
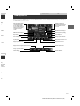
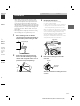
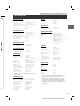
Mounting Sleeve
(Included)
Dashboard
This unit
Face Plate*
2
(Included)
Pressure
Plates*
1
Bracket
Rubber Cap
(Included)
Hex Bolt
(Included)
*1 If the installed mounting sleeve is loose in the
dashboard, the pressure plates may be bent slightly to
remedy the problem.
*2 The supplied face plate may be mounted.
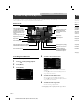
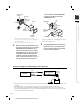
5 When your vehicle has the Bracket, mount
the long hex bolt onto the rear panel of the
INE-W977BT and put the Rubber Cap on
the hex bolt. If your vehicle does not have
the Mounting Support, reinforce the head
unit with the metal mounting strap (not
supplied). Secure the ground lead of the
unit to a clean metal spot using a screw (*1)
already attached to the vehicle’s chassis.
Connect all the leads of the INE-W977BT
according to details described in the
CONNECTION section.
This unit
Screw
Chassis
*
1
*
2
Hex Nut (M5)
Bolt Stud
Metal
Mounting
Strap
Ground Lead
For the screw marked “*2”, use an appropriate screw for
the chosen mounting location.
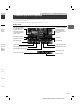
6 Slide the INE-W977BT into the dashboard
until it clicks. This ensures that the unit is
properly locked and will not accidentally
come out from the dashboard.
•
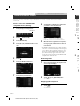
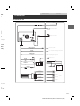
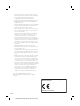
Connection Diagram of SPST Switch (sold separately)
(If the ACC power supply is not available)
SPST SW (Optional)
INE-W977BT
ACC
(Red)
BATTERY
(Yellow)
FUSE (5A)
(Optional)
FUSE (20A)
(Optional)
Battery
If your vehicle has no ACC power supply, add an SPST (Single-Pole, Single-Throw) switch (sold separately) and fuse (sold
separately).
The diagram and the fuse amperage shown above are in the case when INE-W977BT is used individually.
If the switched power (ignition) lead of the INE-W977BT is connected directly to the positive (+) post of the vehicle’s
battery, the INE-W977BT draws some current (several hundred milliamperes) even when its switch is placed in the OFF
position, and the battery may be discharged.
•
•
•
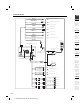
Con
Conne