
User manual


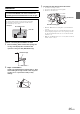
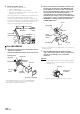
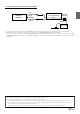
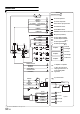
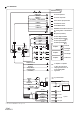
Table Of Contents
- Operating Instructions
- PRECAUTIONS
- WARNING
- Features
- Getting Started
- For INE-W920R
- For INE-W928R
- Common Operations
- Radio
- RDS
- CD/MP3/WMA/AAC
- DVD
- Playing a Disc
- Stopping Playback (PRE STOP)
- Stopping Playback
- Fast-forwarding/Fast-reversing
- Finding the Beginnings of Chapters/Tracks/Files
- Playing Still Frames (Pausing)
- Forward frame-by-frame Playback
- Slow Motion Playback
- Selecting Folders
- Repeat Playback
- Searching by Title Number
- Searching Directly by Chapter Number
- Searching for a Desired Video File
- Switching the Angle
- Switching the Audio Tracks
- Switching the Subtitles (Subtitle Language)
- About DivX®
- Setup
- Setup Operation
- General Setup
- Sound Setup
- Sound Setup Operation
- Setting the Balance/Fader/Subwoofer
- Setting the MX (Media Xpander)
- Equalizer Presets (Bass Max EQ)
- Adjusting the Parametric Equalizer Curve (Parametric EQ)
- Adjusting the Time Correction (Time Correction)
- Adjusting the Crossover Settings (X-OVER)
- Setting Defeat
- Volume Setting
- Setting the Volume for Each Source
- About Time Correction
- About the Crossover
- Source Setup
- BLUETOOTH Setup
- BLUETOOTH Setup Operation
- BLUETOOTH Setting
- Displaying BLUETOOTH Information
- Registering the BLUETOOTH Device
- Automatic Connection setting
- Setting the Passcode
- Changing the Character Code of the Phone Book
- Setting Received Calls Automatically
- Setting the time for automatic reception of a call
- Selecting the Output Speaker
- Adjusting the Receive Volume
- Adjusting the Transmit Volume
- Adjusting the Calling Volume
- Deleting All the Histories
- Camera Setup
- BLUETOOTH Operation
- Hands-Free Phone Control
- BLUETOOTH Audio
- Auxiliary Device (Optional)
- Camera Operation (Optional)
- USB Memory (Optional)
- iPod/iPhone (Optional)
- Information
- Installation and Connections

96-EN
4
Mounting the Microphone.
For safe use, make sure of the following:
• location is stable and firm.
• driver’s view and operations are not obstructed.
• microphone is located where the driver’s voice can be easily
picked up (on the sun visor, etc.).
When you speak into the microphone, you should not have
to change your driving posture. This may cause a
distraction, taking your attention away from safely driving
your vehicle. Carefully consider direction and distance while
mounting the microphone. Confirm that the driver’s voice
can be easily picked up at the selected location.
For INE-W920R
5
Remove the mounting sleeve from the main unit (see
“Removal” on page 96).
Slide the unit into the mounting sleeve and secure it.
*
1
If the installed mounting sleeve is loose in the dashboard, the
pressure plates may be bent slightly to remedy the problem.
*
2
The supplied face plate may be mounted.
6
When your vehicle has the Bracket, mount the long
hex bolt onto the rear panel of the INE-W920R and
put the Rubber Cap on the hex bolt. If your vehicle
does not have the Mounting Support, reinforce the
head unit with the metal mounting strap (not
supplied). Secure the ground lead of the unit to a
clean metal spot using a screw (*1) already attached
to the vehicle’s chassis. Connect all the leads of the
INE-W920R according to details described in the
CONNECTION section.
• For the screw marked “*2,” use an appropriate screw for the chosen
mounting location.
7
Slide the INE-W920R into the dashboard until it
clicks. This ensures that the unit is properly locked
and will not accidentally come out from the
dashboard.
Removal
1. Insert the bracket keys into the unit, along the guides
on either side. The unit can now be removed from the
mounting sleeve.
2. Pull the unit out, keeping it unlocked as you do so.
Cable clamp
(Sold separately)
Microphone
Mounting Sleeve
(Included)
Dashboard
Rubber Cap
(Included)
Face Plate*
2
(Included)
This unit
Hex Bolt
(Included)
Bracket key
Pressure
Plates
*
1
Hex Nut (M5)
Screw
Bolt Stud
This unit
Chassis
Ground Lead
Metal
Mounting
Strap
*
2
*
1
This unit
Bracket keys
(Included)