
User manual
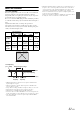
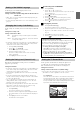

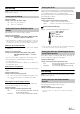

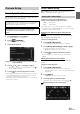
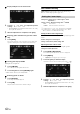
Table Of Contents
- Operating Instructions
- PRECAUTIONS
- WARNING
- Features
- Getting Started
- For INE-W920R
- For INE-W928R
- Common Operations
- Radio
- RDS
- CD/MP3/WMA/AAC
- DVD
- Playing a Disc
- Stopping Playback (PRE STOP)
- Stopping Playback
- Fast-forwarding/Fast-reversing
- Finding the Beginnings of Chapters/Tracks/Files
- Playing Still Frames (Pausing)
- Forward frame-by-frame Playback
- Slow Motion Playback
- Selecting Folders
- Repeat Playback
- Searching by Title Number
- Searching Directly by Chapter Number
- Searching for a Desired Video File
- Switching the Angle
- Switching the Audio Tracks
- Switching the Subtitles (Subtitle Language)
- About DivX®
- Setup
- Setup Operation
- General Setup
- Sound Setup
- Sound Setup Operation
- Setting the Balance/Fader/Subwoofer
- Setting the MX (Media Xpander)
- Equalizer Presets (Bass Max EQ)
- Adjusting the Parametric Equalizer Curve (Parametric EQ)
- Adjusting the Time Correction (Time Correction)
- Adjusting the Crossover Settings (X-OVER)
- Setting Defeat
- Volume Setting
- Setting the Volume for Each Source
- About Time Correction
- About the Crossover
- Source Setup
- BLUETOOTH Setup
- BLUETOOTH Setup Operation
- BLUETOOTH Setting
- Displaying BLUETOOTH Information
- Registering the BLUETOOTH Device
- Automatic Connection setting
- Setting the Passcode
- Changing the Character Code of the Phone Book
- Setting Received Calls Automatically
- Setting the time for automatic reception of a call
- Selecting the Output Speaker
- Adjusting the Receive Volume
- Adjusting the Transmit Volume
- Adjusting the Calling Volume
- Deleting All the Histories
- Camera Setup
- BLUETOOTH Operation
- Hands-Free Phone Control
- BLUETOOTH Audio
- Auxiliary Device (Optional)
- Camera Operation (Optional)
- USB Memory (Optional)
- iPod/iPhone (Optional)
- Information
- Installation and Connections

59-EN
Camera Setup Operation
With an optional camera connected, its video is output to the monitor.
When the camera is connected, set this item.
1
Touch [Setup] icon of Top banner.
The Setup main screen is displayed.
2
Touch [ (CAMERA)].
The Camera Setup screen appears.
3
Select the desired item.
Setting items: Direct Camera/AUX Camera*/Camera Interrupt
(Power OFF Mode)
4
Touch [] or [] etc., to change its setting.
• When the pop-up window for setup is displayed, touch [] to
close the window after setting.
5
Touch [] to return to the previous screen.
• Immediately after changing the Camera Setup (while the system is
writing data automatically) do not turn the ignition key to OFF.
Otherwise, the settings may not be changed.
• For details on how to scroll through the list, refer to “Selecting an
Item in a List” (page 29).
Direct Camera Setting
[Direct Camera] is selected on the Camera setup menu in step 3.
Refer to “Camera Setup Operation” (page 59).
Setting item: Camera Select/ Guide Adjustment*
1
Setting contents: Off (Initial setting) / Front / Rear*
2
*
1
If “Camera Select” is set to “Off”, this option is not available.
*
2
If “Camera Select” in AUX Camera Setting is set to “Rear,” “Rear”
cannot be set in Direct Camera Setting.
Switching video patterns for Rear camera & Front
camera
The video pattern can be changed when connected to HCE-C200R/
HCE-C200F/HCE-C210RD/HCE-C212F.
Setting item: Guide Adjustment
1
Touch [Guide Adjustment].
The camera guide adjustment screen is displayed.
2
Touch [Back], [Panorama], [Corner], or [Top].
The view will change to the selected view.
• [Back] will not appear for the Front camera.
3
Touch [] to return to the previous screen.
• For an explanation of video patterns, see the camera Owner's
Manual.
Adjusting the Rear/Front Camera Guide
If you select “Rear” or “Front,” you can adjust the camera guide
position.
Setting item: Guide Adjustment
1
Touch [Guide Adjustment].
The camera guide adjustment screen is displayed.
• If the video pattern is set to “Corner,” the camera guide will not
be displayed.
2
Touch [Adjust].
• If [Adjust] does not appear, proceed to step 3.
3
Touch the guide you intend to adjust.
Guide line can also be selected by touching [] [].
Display example for rear camera mode
Camera Setup
The parking brake must be engaged to access the Setup screen.
Attempting to access this screen while driving will display the
warning-Unable to operate while driving.
The following steps 1 to 5 are common operations to each
“Setting item” of Camera Setup. Refer to each section for
details.
Setting the Camera Input
Rear: Rear camera
Front: Front camera