
User manual

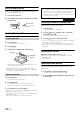


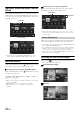


Table Of Contents
- Operating Instructions
- PRECAUTIONS
- WARNING
- Features
- Getting Started
- For INE-W920R
- For INE-W928R
- Common Operations
- Radio
- RDS
- CD/MP3/WMA/AAC
- DVD
- Playing a Disc
- Stopping Playback (PRE STOP)
- Stopping Playback
- Fast-forwarding/Fast-reversing
- Finding the Beginnings of Chapters/Tracks/Files
- Playing Still Frames (Pausing)
- Forward frame-by-frame Playback
- Slow Motion Playback
- Selecting Folders
- Repeat Playback
- Searching by Title Number
- Searching Directly by Chapter Number
- Searching for a Desired Video File
- Switching the Angle
- Switching the Audio Tracks
- Switching the Subtitles (Subtitle Language)
- About DivX®
- Setup
- Setup Operation
- General Setup
- Sound Setup
- Sound Setup Operation
- Setting the Balance/Fader/Subwoofer
- Setting the MX (Media Xpander)
- Equalizer Presets (Bass Max EQ)
- Adjusting the Parametric Equalizer Curve (Parametric EQ)
- Adjusting the Time Correction (Time Correction)
- Adjusting the Crossover Settings (X-OVER)
- Setting Defeat
- Volume Setting
- Setting the Volume for Each Source
- About Time Correction
- About the Crossover
- Source Setup
- BLUETOOTH Setup
- BLUETOOTH Setup Operation
- BLUETOOTH Setting
- Displaying BLUETOOTH Information
- Registering the BLUETOOTH Device
- Automatic Connection setting
- Setting the Passcode
- Changing the Character Code of the Phone Book
- Setting Received Calls Automatically
- Setting the time for automatic reception of a call
- Selecting the Output Speaker
- Adjusting the Receive Volume
- Adjusting the Transmit Volume
- Adjusting the Calling Volume
- Deleting All the Histories
- Camera Setup
- BLUETOOTH Operation
- Hands-Free Phone Control
- BLUETOOTH Audio
- Auxiliary Device (Optional)
- Camera Operation (Optional)
- USB Memory (Optional)
- iPod/iPhone (Optional)
- Information
- Installation and Connections

22-EN
Initial System Start-Up
Be sure to press the RESET switch when using the unit for the first
time, after changing the car battery, etc.
1
Turn off the unit power.
2
Press RESET switch with a ballpoint pen or similar
pointed object.
Inserting/Ejecting a Disc
1
Press c (Eject).
The Open/Tilt screen is displayed.
2
Touch [Open].
3
Insert the disc with the label side facing up.
Insert the disc until it is automatically pulled into the unit.
The unit starts to play the disc.
* The SD memory card does not support Music/Video playback.
For details on how to use SD memory cards, refer to “Navigation
system OM” on the supplied CD-ROM.
1
Press c (Eject).
The Open/Tilt screen is displayed.
2
Touch [c Disc].
The monitor will open. Then the disc is ejected.
When the disc has been ejected part way, take it out.
3
Touch [Close], or press c (Eject).
• If the disc does not eject after touching [c Disc], press and hold
c (Eject) for at least 5 seconds.
• Do not apply shock to the monitor when it is open as it may result in
malfunction of the unit.
• The monitor will stop at the set tilt angle when closing.
Adjusting the Monitor Viewing Angle
Adjust the monitor’s angle for better visibility.
1
Press c (Eject).
The Open/Tilt screen is displayed.
2
Touch [Up] or [Down] of “Tilt” to adjust the
desired monitor angle.
The monitor angle can be adjusted in 5 stages.
3
Touch [] to return to the normal mode.
• The screen colour will vary when viewed at certain angles. Adjust the
screen angle for the best viewing position.
• If the voltage of the vehicle’s battery power is low, the screen may
blink when the screen angle is changed. This is normal and not a
malfunction.
Adjusting the Volume
Adjust the volume by pressing or .
Volume decreases/increases continuously by pressing and
holding or .
Volume: 0 - 35
Lowering Volume Quickly
Activating the Audio Mute function will instantly lower the volume
level by 20 dB.
1
Press MUTE to activate the MUTE mode.
The audio level will decrease by about 20 dB.
2
Pressing MUTE again will bring the audio back to its
previous level.
Inserting the Disc
Removing the Disc
RESET switch
SD memory
card slot*
Disc Slot
CAUTION
Keep hands (or any other object) away from the monitor while it
is opening or closing to avoid damage or injury. The back of the
monitor tends to become very warm under normal operating
conditions. This is not a malfunction, but care should be taken to
avoid prolonged contact with it.