
User manual

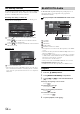

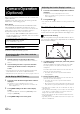
Table Of Contents
- Operating Instructions
- PRECAUTIONS
- WARNING
- Getting Started
- Accessory List
- Location of Controls
- Turning Power On or Off
- Turning the System On
- Inserting/Ejecting a Disc
- Adjusting the Volume
- Lowering Volume Quickly
- Top banner and Bottom banner Fade Out Setting
- Switching Sources
- About Sound Menu button
- About Dual Screen
- Touch Operation
- Selecting an Item in a List
- About the Indicator Display
- Radio/RBDS
- CD/MP3/WMA/AAC
- DVD
- Playing a Disc
- Stopping Playback (PRE STOP)
- Stopping Playback
- Fast-forwarding/Fast-reversing
- Finding the Beginnings of Chapters/Tracks/Files
- Playing Still Frames (Pausing)
- Slow Motion Playback
- Selecting Folders
- Repeat Playback
- Searching by Title Number
- Searching Directly by Chapter Number
- Searching for a Desired Video File
- Switching the Angle
- Switching the Audio Tracks
- Switching the Subtitles (Subtitle Language)
- About DivX®
- Setup
- Setup Operation
- General Setup
- Sound Setup
- Sound Setup Operation
- Car Specific Sound Setup
- Setting the MX (Media Xpander)
- Equalizer Presets (Factory’s EQ)
- Setting the Balance/Fader/Subwoofer
- Adjusting the Time Correction (TCR)
- Adjusting the Crossover Settings (X-OVER)
- Adjusting the Parametric Equalizer Curve (Parametric EQ)
- Other Setting
- Setting Defeat
- About Time Correction
- About the Crossover
- Source Setup
- BLUETOOTH Setup
- BLUETOOTH Setup Operation
- BLUETOOTH Setting
- Displaying BLUETOOTH Information
- Registering the BLUETOOTH Device
- Automatic Connection Setting
- Setting the Passcode
- Setting Received Calls Automatically
- Setting the Time for Automatic Reception of a Call
- Selecting the Output Speaker
- Adjusting the Ring Tone Volume
- Adjusting the Microphone Level
- Adjusting the Caller Volume
- Deleting All the Histories
- Camera Setup
- BLUETOOTH Operation
- Auxiliary Device (Optional)
- Camera Operation (Optional)
- SiriusXM Satellite Radio (Optional) (INE-W940/INE-NAV-40 only)
- Receiving Channels with the SiriusXM Tuner
- Tuning Channels by Category
- Changing the Display
- Checking the SiriusXM Radio ID Number
- Storing Channel Presets
- Tuning Channels Using Presets
- Search Function
- Selecting the Channel Directly
- Storing the Desired Song/Artist
- Receiving and Tuning to an Alert
- SiriusXM Replay™ Function
- Parental Lock Function
- Using Jump Memory and Jump Recall Function
- USB Memory (Optional)
- iPod/iPhone (Optional)
- Pandora® internet radio (optional) (INE-W940/INE-NAV-40 only)
- Information
- Installation and Connections
- LIMITED WARRANTY

60-EN
When an optional camera is connected, the view video of camera can be
output to the monitor.
Depending on your camera, please choose the camera type first. For
details, refer to “Camera Setup” (page 48).
Rear camera:
If an HCE-C305R*/HCE-C300R*/HCE-C210RD/HCE-C200R/
HCE-C117D/HCE-C107D/HCE-C115/HCE-C105 camera is
connected, when the vehicle is reversed, the rear camera view
(guide marks for vehicle width and available distance) is
displayed automatically on the screen of this unit.
* When connecting to HCE-C305R/HCE-C300R, calibration must be
performed. For details, refer to “Calibration” in the owner’s manual
of HCE-C305R/HCE-C300R.
Rear Camera Operation
Set “Rear” for “AUX Camera Setting” (page 48).
1
Shift the gear lever to the reverse (R) position.
The rear view image is displayed while the car remains in
reverse.
2
If you shift the gear lever to a position other than
reverse (R), the monitor returns to the previous
screen.
• Never depend solely on the camera when backing up. Always turn
and look and only use the camera for additional assistance.
• This function is effective when the reverse wire is properly connected.
1
Touch the screen when the image from the camera is
displayed.
The operation screen is displayed on the screen.
• After a 5-second time-out, the operation screen returns to the
camera display screen.
2
Touch [Guide OFF] on the Rear camera display
screen.
The guide disappears, and then the [Guide OFF] switch
changes to [Guide ON].
3
Touch [Guide ON] to turn on the guide.
1
Touch the screen when the image from the camera is
displayed.
The operation screen is displayed on the screen.
• After a 5-second time-out, the operation screen returns to the
camera display screen.
2
Touch [Caution ].
• For each touch, the caution location moves to the top or bottom of the
screen.
About the Rear Camera Guide
To display the guide, set “Guide Display ON/OFF Setting” (page 60) to
On. You can also turn off the guide in the Rear camera display screen.
Indication mark meaning
When the car is put into reverse gear, the monitor switches to the rear
view camera image. Guides appear to help visualize the car's width and
distance from the rear bumper.
1 Car width extension marks (red, yellow and green in
order of distance)
If properly calibrated, the marks indicate the car's width.
This helps guide the car’s path when backing up in a
straight line.
The marks represent the distance from the rear of the car
(from the rear end of the bumper).
• The marks do not move in synchronization with the
steering wheel.
2 Distance guidance marks
The marks represent the distance from the rear of the car
(from the rear end of the bumper).
• The marks do not move in synchronization with the
steering wheel.
• Each center position of the mark represents about 0.5 m
(red), about 1 m (yellow) and about 2 m (green) behind.
• Depending on the condition of the car or road surface, the range of
vision may vary.
• The camera has a limited range of vision. Objects at extreme angles
to the camera (e.g. under the bumper or at opposite ends of the
bumper) may not be in the its field-of-vision.
• The rear camera image may have a tint which is different from the
actual surroundings.
• Depending on the car, the guidance may deviate to the right or left.
This is not a malfunction.
Camera Operation
(Optional)
You can adjust the quality of the camera image.
Setting items: Bright / Color / Contrast
Refer to “Visual Setting” (page 32).
Displaying the Rear View Video while the
Car is in Reverse
Guide Display ON/OFF Setting
Adjusting the Caution Display Location