
User manual
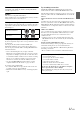


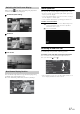
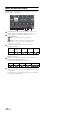
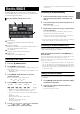
Table Of Contents
- Operating Instructions
- PRECAUTIONS
- WARNING
- Getting Started
- Accessory List
- Location of Controls
- Turning Power On or Off
- Turning the System On
- Inserting/Ejecting a Disc
- Adjusting the Volume
- Lowering Volume Quickly
- Top banner and Bottom banner Fade Out Setting
- Switching Sources
- About Sound Menu button
- About Dual Screen
- Touch Operation
- Selecting an Item in a List
- About the Indicator Display
- Radio/RBDS
- CD/MP3/WMA/AAC
- DVD
- Playing a Disc
- Stopping Playback (PRE STOP)
- Stopping Playback
- Fast-forwarding/Fast-reversing
- Finding the Beginnings of Chapters/Tracks/Files
- Playing Still Frames (Pausing)
- Slow Motion Playback
- Selecting Folders
- Repeat Playback
- Searching by Title Number
- Searching Directly by Chapter Number
- Searching for a Desired Video File
- Switching the Angle
- Switching the Audio Tracks
- Switching the Subtitles (Subtitle Language)
- About DivX®
- Setup
- Setup Operation
- General Setup
- Sound Setup
- Sound Setup Operation
- Car Specific Sound Setup
- Setting the MX (Media Xpander)
- Equalizer Presets (Factory’s EQ)
- Setting the Balance/Fader/Subwoofer
- Adjusting the Time Correction (TCR)
- Adjusting the Crossover Settings (X-OVER)
- Adjusting the Parametric Equalizer Curve (Parametric EQ)
- Other Setting
- Setting Defeat
- About Time Correction
- About the Crossover
- Source Setup
- BLUETOOTH Setup
- BLUETOOTH Setup Operation
- BLUETOOTH Setting
- Displaying BLUETOOTH Information
- Registering the BLUETOOTH Device
- Automatic Connection Setting
- Setting the Passcode
- Setting Received Calls Automatically
- Setting the Time for Automatic Reception of a Call
- Selecting the Output Speaker
- Adjusting the Ring Tone Volume
- Adjusting the Microphone Level
- Adjusting the Caller Volume
- Deleting All the Histories
- Camera Setup
- BLUETOOTH Operation
- Auxiliary Device (Optional)
- Camera Operation (Optional)
- SiriusXM Satellite Radio (Optional) (INE-W940/INE-NAV-40 only)
- Receiving Channels with the SiriusXM Tuner
- Tuning Channels by Category
- Changing the Display
- Checking the SiriusXM Radio ID Number
- Storing Channel Presets
- Tuning Channels Using Presets
- Search Function
- Selecting the Channel Directly
- Storing the Desired Song/Artist
- Receiving and Tuning to an Alert
- SiriusXM Replay™ Function
- Parental Lock Function
- Using Jump Memory and Jump Recall Function
- USB Memory (Optional)
- iPod/iPhone (Optional)
- Pandora® internet radio (optional) (INE-W940/INE-NAV-40 only)
- Information
- Installation and Connections
- LIMITED WARRANTY

19-EN
The RBDS (Radio Broadcast Data System) is a radio information
system. The RBDS allows you to receive a variety of information such
as traffic information, station names.
Display example for Radio main screen
Band display
Displays the band of the signal currently being
received.
Frequency display
Displays the frequency, song name and artist name of
the signal currently being received.
Preset button
Registers and recalls preset frequencies.
SEEK mode
Displays the current SEEK mode.
Listening to the Radio
1
Press the (AUDIO) button.
2
Touch [Radio] of Top banner.
The radio mode is activated and the display changes to the
Radio mode screen.
• The display content varies depending on the last band selected.
([RadioFM1], etc.)
3
Touch [Band] of Bottom banner to select the
desired radio band.
Each touch changes the bands as follows:
4
Touch [TUNE] to select the tuning mode.
* Displays only when the PTY tuning mode is selected. For
details, refer “PTY (Program Type) Tuning” (page 20)
• There are two modes you can select for auto tuning, DX and
Local:
- DX (Distance) mode;
Both strong and weak stations will be tuned in.
- Local mode;
Only strong stations will be tuned in.
The initial setting is DX.
5
Touch [], [] or [], [] to change the
radio frequency up or down respectively.
In manual mode, touch and hold to change the frequency
continuously.
Presetting Stations Manually
1
Tune in a desired radio station you wish to store in
the preset memory by manual or automatic seek
tuning.
2
Touch and hold any one of the preset buttons for at
least 2 seconds.
The selected station is stored.
3
Repeat the procedure to store up to 5 other stations
onto the same band.
To use this procedure for other bands, simply select the
desired band and repeat the procedure.
A total of 18 stations can be stored in the preset memory
(6 stations for each band; FM1, FM2 or AM).
• If a preset memory has already been set in the same preset number, it
will be cleared and the new station will be memorized.
Presetting Stations Automatically
The tuner can automatically seek and store 6 strong stations in the
selected band in ascending order of frequency.
After selecting the desired band, touch [A.Memo] of
Bottom banner.
The tuner automatically seeks and stores 6 strong stations into
the preset buttons in ascending order of frequency.
When automatic storing has completed, the station stored in the
preset 1 is selected.
• If no stations are stored, the tuner will return to the original station
you were listening to before the automatic storing procedure began.
• You can cancel this process by touching [A.Memo] while the tuner is
automatically seeking stations. Canceling will return the tuner preset
to the previous setting.
Tuning to Preset Stations
You can tune in the preset stations in memory on either band using its
preset number.
1
Touch [Band] of Bottom banner repeatedly until the
desired band is displayed.
2
Touch any one of the preset buttons that has a
station stored to it.
The preset station is received.
Radio/RBDS
FM1 FM2 AM FM1
DX SEEK Local SEEK MANUAL PTY*