
User manual
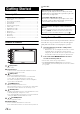


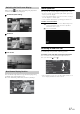
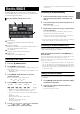
Table Of Contents
- Operating Instructions
- PRECAUTIONS
- WARNING
- Getting Started
- Accessory List
- Location of Controls
- Turning Power On or Off
- Turning the System On
- Inserting/Ejecting a Disc
- Adjusting the Volume
- Lowering Volume Quickly
- Top banner and Bottom banner Fade Out Setting
- Switching Sources
- About Sound Menu button
- About Dual Screen
- Touch Operation
- Selecting an Item in a List
- About the Indicator Display
- Radio/RBDS
- CD/MP3/WMA/AAC
- DVD
- Playing a Disc
- Stopping Playback (PRE STOP)
- Stopping Playback
- Fast-forwarding/Fast-reversing
- Finding the Beginnings of Chapters/Tracks/Files
- Playing Still Frames (Pausing)
- Slow Motion Playback
- Selecting Folders
- Repeat Playback
- Searching by Title Number
- Searching Directly by Chapter Number
- Searching for a Desired Video File
- Switching the Angle
- Switching the Audio Tracks
- Switching the Subtitles (Subtitle Language)
- About DivX®
- Setup
- Setup Operation
- General Setup
- Sound Setup
- Sound Setup Operation
- Car Specific Sound Setup
- Setting the MX (Media Xpander)
- Equalizer Presets (Factory’s EQ)
- Setting the Balance/Fader/Subwoofer
- Adjusting the Time Correction (TCR)
- Adjusting the Crossover Settings (X-OVER)
- Adjusting the Parametric Equalizer Curve (Parametric EQ)
- Other Setting
- Setting Defeat
- About Time Correction
- About the Crossover
- Source Setup
- BLUETOOTH Setup
- BLUETOOTH Setup Operation
- BLUETOOTH Setting
- Displaying BLUETOOTH Information
- Registering the BLUETOOTH Device
- Automatic Connection Setting
- Setting the Passcode
- Setting Received Calls Automatically
- Setting the Time for Automatic Reception of a Call
- Selecting the Output Speaker
- Adjusting the Ring Tone Volume
- Adjusting the Microphone Level
- Adjusting the Caller Volume
- Deleting All the Histories
- Camera Setup
- BLUETOOTH Operation
- Auxiliary Device (Optional)
- Camera Operation (Optional)
- SiriusXM Satellite Radio (Optional) (INE-W940/INE-NAV-40 only)
- Receiving Channels with the SiriusXM Tuner
- Tuning Channels by Category
- Changing the Display
- Checking the SiriusXM Radio ID Number
- Storing Channel Presets
- Tuning Channels Using Presets
- Search Function
- Selecting the Channel Directly
- Storing the Desired Song/Artist
- Receiving and Tuning to an Alert
- SiriusXM Replay™ Function
- Parental Lock Function
- Using Jump Memory and Jump Recall Function
- USB Memory (Optional)
- iPod/iPhone (Optional)
- Pandora® internet radio (optional) (INE-W940/INE-NAV-40 only)
- Information
- Installation and Connections
- LIMITED WARRANTY

15-EN
Turning the System On
With the Alpine system, when the ignition key is turned to ACC or ON,
the opening screen will be automatically displayed.
1
When the system is used for the first time, the
language selection menu is displayed. There are 24
languages to choose from. Touch [] or [] to
scroll the list, and then touch the desired language.
• You can also scroll through lists by touching the screen and
sliding your finger up and down.
2
Touch [OK].
The radio screen is displayed.
• Some of this unit’s functions cannot be performed while the vehicle is
in motion. Be sure to stop your vehicle in a safe location and apply
the parking brake before attempting these operations.
Inserting/Ejecting a Disc
Insert the disc with the label side facing up.
When you insert the disc up to certain point, it is automatically
pulled into the unit. The unit starts to play the disc.
• Do not touch the surface of the disc directly with your fingers.
• Before inserting or removing the disc, always turn the ignition key to
ACC or ON. You cannot remove or insert the disc with the ignition
key turned to OFF.
Press (Eject button).
When the disc has been ejected part way, take it out.
If the disc cannot be ejected by pressing , press and hold
again for at least 5 seconds.
Adjusting the Volume
Adjust the volume by pressing or .
Volume decreases/increases continuously by pressing and
holding or .
Volume: 0 - 35
Lowering Volume Quickly
Activating the Audio Mute function will instantly lower the volume
level by 20 dB.
1
Press MUTE button to activate the MUTE mode.
The audio level will decrease by about 20 dB.
2
Pressing MUTE button again will bring the audio
back to its previous level.
Top banner and Bottom banner Fade Out
Setting
When “Top/Bottom Banner Fade Out” is set to “ON,” the Top banner
and Bottom banner on the Audio/Visual Playback screen fade out after 5
seconds if no operation is performed. To display the keys again, touch
the middle of the screen.
• For details of how to set Top/Bottom Banner Fade Out, refer to
“Setting Top banner and Bottom banner Display” (page 31).
Inserting the Disc
Removing the Disc
Disc Slot
Top banner
Bottom banner