
User manual
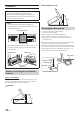
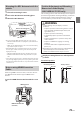
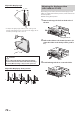
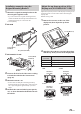
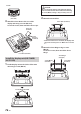
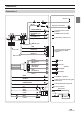


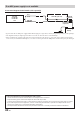
Table Of Contents
- Operating Instructions
- WARNING
- Getting Started
- Setup
- Device Setup
- Function Setup
- System Setup
- Sound Setup
- Apple CarPlay (Optional)
- Android Auto (Optional)
- Radio/RDS
- Radio Basic Operation
- RDS Operation
- DAB/DAB+
- USB Flash drive (Optional)
- USB Audio
- USB Video
- iPod mode on iPhone (Optional)
- HDMI Device (Optional)
- Bluetooth Operation
- Hands-free Phone Control
- Bluetooth Audio
- Auxiliary Device (Optional)
- Camera Operation (Optional)
- About Vehicle Interlock Function
- Dash Cam (Drive Recorder) Operation (Optional)
- Information
- Installation and Connections
- WARNING
- CAUTION
- Precautions
- Accessory List
- Installation
- Caution concerning the installation location
- Mounting the Microphone
- Mounting the GPS Antenna inside the vehicle
- Note on using HDMI Connection Cables
- Position Adjustment and Mounting Dimensions of the Display (iLX-F905D/iLX-F115D only)
- Adjusting the display position (iLX-F905D/iLX-F115D)
- Installation example using the Original Mounting Bracket
- Adjust the up-down position of the Display unit (iLX-F905D/iLX-F115D)
- Install the display unit (iLX-F905D/iLX-F115D)
- Connections
- System Example

73-EN
Mounting the GPS Antenna inside the
vehicle
1 Clean the mounting location.
2 Put on the GPS Antenna mounting plate.
3 Mount the GPS Antenna.
GPS Antenna
Antenna mounting plate
This unit
• Do not mount the GPS Antenna inside the centre console.
– Mount the GPS Antenna on a flat plane of the dash board
or rear tray.
– Make sure the GPS Antenna is not covered (obstructed) by
any metallic surface or object.
• If the GPS Antenna is mounted near the unit, the reception
becomes poor, and the location of your vehicle may not be
displayed correctly.
– Mount the GPS Antenna far away enough from the unit.
– Bundle the GPS Antenna cable away from the rear of the
unit.
• Some thermal reflection type or thermal absorption type glass
may interrupt high frequency waves. If reception is poor with
the antenna installed inside the car, try to mount the antenna
outside the car.
Note on using HDMI Connection
Cables
When using HDMI connection cables, secure the cables to
the HDMI Terminals with the supplied HDMI Fixation
Bracket.
Secure the HDMI Fixation Bracket with the screw
(A).
HDMI Terminal
HDMI Fixation Bracket
(Included)
(A)
Position Adjustment and Mounting
Dimensions of the Display
(iLX-F905D/iLX-F115D only)
The mounting position of this unit’s Display can be adjusted
(front-back/angle). When mounting the Display, confirm the
mounting position and mounting dimensions so that it
does not obstruct your field of vision or impair driving.
WARNING
• In the following cases, the display cannot be
mounted.
– It impairs operation of the steering wheel or various
levers (gearshift, windshield wiper switch, turn
signal switch, etc.)
– It impairs operation of the airbag
– It significantly impairs operation of the hazard
switch
– It impairs identification or operation of any other
control switches
– It impairs confirmation of gauges or warning
indicators
– It interferes with vehicle equipment (switches,
panels, etc.)
∗ Depending on the vehicle, the glove compartment or
cup holders may become inaccessible, or air
conditioner ventilation ducts may be covered.
■
Display mounting dimensions and adjustable
positions
Front-back position
<Forward position>
51.5 mm
31.5 mm
<Back position>