
User manual

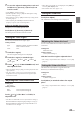
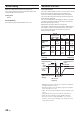
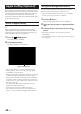
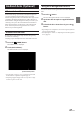
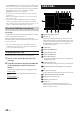
Table Of Contents
- Operating Instructions
- WARNING
- Getting Started
- Setup
- Device Setup
- Function Setup
- System Setup
- Sound Setup
- Apple CarPlay (Optional)
- Android Auto (Optional)
- Radio/RDS
- Radio Basic Operation
- RDS Operation
- DAB/DAB+
- USB Flash drive (Optional)
- USB Audio
- USB Video
- iPod mode on iPhone (Optional)
- HDMI Device (Optional)
- Bluetooth Operation
- Hands-free Phone Control
- Bluetooth Audio
- Auxiliary Device (Optional)
- Camera Operation (Optional)
- About Vehicle Interlock Function
- Dash Cam (Drive Recorder) Operation (Optional)
- Information
- Installation and Connections
- WARNING
- CAUTION
- Precautions
- Accessory List
- Installation
- Caution concerning the installation location
- Mounting the Microphone
- Mounting the GPS Antenna inside the vehicle
- Note on using HDMI Connection Cables
- Position Adjustment and Mounting Dimensions of the Display (iLX-F905D/iLX-F115D only)
- Adjusting the display position (iLX-F905D/iLX-F115D)
- Installation example using the Original Mounting Bracket
- Adjust the up-down position of the Display unit (iLX-F905D/iLX-F115D)
- Install the display unit (iLX-F905D/iLX-F115D)
- Connections
- System Example

32-EN
Time Correction Settings
[Time Correction] is selected on the Sound Setup Menu
screen.
Before performing the following procedures, see “About
Time Correction” (page 35).
Correction mode
Setting item:
Time Correction
1 Touch the Correction mode button, and then
select [ms], [cm] or [inch].
2 Touch [ ] or [ ] for each speaker to adjust
the time or distance.
0.00 msec to 20.00 msec (0.02 msec/step)
0.0 cm to 680.0 cm (0.68 cm/step)
0.0 inch to 268.0 inch (0.268 inch/step)
All speaker setting values are adjustable in the range of
20 ms or 680 cm.
3 To store the adjusted setting value, touch and
hold [Preset 1], [Preset 2], or [Preset 3] for at
least 2 seconds.
• Touch [Flat] to set all values to 0.0.
• If the Rear Speaker setting is [Off], the Rear Speaker setting
cannot be edited (page 31).
• If the Subwoofer setting is [Off], the Subwoofer setting cannot
be edited (page 31).
Calling the Time Correction Value
Calling the pre-set time correction value.
Touch [Preset 1], [Preset 2], or [Preset 3] on the time
correction screen.
The setting stored in the Preset will be recalled.
Crossover Settings (X-OVER)
Before performing the following procedures, see “About the
Crossover” (page 34).
Setting item:
X-OVER
1 Touch [X-OVER].
The X-OVER setting screen is displayed.
2 Touch [Front HPF], [Front LPF], [Rear HPF],
[Rear LPF] or [Subw. LPF] to select a channel
to adjust.
3 Touch [ ] or [ ] of “Frequency,” and then
select the cut-off frequency.
Setting contents:
Front HPF: 20 / 25 / 31.5 / 40 / 50 / 63 / 80 (Initial
setting) / 100 / 125 / 160 / 200 / 250 Hz
Front LPF: 4k / 5k / 6.3k / 8k (Initial setting) / 10k /
12.5k / 16k / 20k Hz
Rear HPF: 20 / 25 / 31.5 / 40 / 50 / 63 / 80 (Initial
setting) / 100 / 125 / 160 / 200 / 250 Hz
Rear LPF: 4k / 5k / 6.3k / 8k (Initial setting) / 10k /
12.5k / 16k / 20k Hz
Sub.w.LPF: 20 / 25 / 31.5 / 40 / 50 / 63 / 80 (Initial
setting) / 100 / 125 / 160 / 200 / 250 Hz
4 Touch [ ] or [ ] of “Slope,” and then adjust
the HPF or LPF slope.
Setting contents:
0 (Initial setting) / 6 / 12 / 18 / 24 dB/oct.
5 Touch [ ] or [ ] of “Level,” and then adjust
the HPF or LPF level.
Setting contents:
-12 to 0 dB (Initial setting: 0)
6 Repeat steps 2 to 5 to make adjustment to the
other channels.