
Quick Start


ALPINE iLX-F905D 68-41657Z79-B_QRG (EN) ALPINE iLX-F905D 68-41657Z79-B_QRG (EN)
14-EN
• If the GPS Antenna is mounted near the unit, the
reception becomes poor, and the location of your vehicle
may not be displayed correctly.
– Mount the GPS Antenna far away enough from the unit.
– Bundle the GPS Antenna cable away from the rear of the unit.
• Some thermal reflection type or thermal absorption type
glass may interrupt high frequency waves. If reception is
poor with the antenna installed inside the car, try to
mount the antenna outside the car.
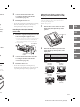
Note on using HDMI Connection Cables
When using HDMI connection cables, secure the
cables to the HDMI Terminals with the supplied HDMI
Fixation Bracket.
1 Secure the HDMI Fixation Bracket with the
screw (A).
HDMI Fixation Bracket
(Included)
HDMI Terminal
(A)
Adjusting the display position
(iLX-F905D/iLX-F115D)
Depending on the vehicle, the front-back display
position differs. To adjust the front-back position, set
the slider to the forward position.
Default setting: Back position
Front-back position
51.5 mm 31.5 mm
<Forward position> <Back position>
1 Remove 4 hexagon bolts from both sides of
the unit.
Hexagon bolts ×4
2 Pull out the slider to the forward position.
(To return the slider to the back position,
push it in.)
Slider
3 Install 4 hexagon bolts to secure the slider.
Installing the Unit (iLX-705D)
1 Mount the original mounting bracket to
the unit using the supplied screws.
If you do not have the original mounting bracket,
mount the Double din KIT* (provided with the side
mounting bracket), etc. to the main unit.
* Sold separately.
Face plate (Included)
Screws (M5 × 8)
(included)
Original Mounting
Bracket
2 Connect all other leads of the unit
according to details described in the
“Connections” (page18).
3 Mounting the unit in a car.
• Fix the cables carefully. Do not damage them by tucking
them into movable parts, such as a seat rail, or by
locating them against sharp or pointed edges.
Installing the Unit (iLX-F905D/
iLX-F115D)
1 Mount the original mounting bracket to the
main unit using the supplied screws.
• If you do not have the original mounting bracket,
mount the Double din KIT* (provided with the
side mounting bracket), etc. to the main unit.
* Sold separately.
Screws (M5 × 8)
(included)
Original Mounting
Bracket
2 Connect all other leads of the main unit
according to details described in the
“Connections” (page18).
3 Mount the unit in a car.
• Fix the cables carefully. Do not damage them by
mounting them into movable parts, such as the seat rail,
or by locating them against sharp or pointed edges.