
User manual
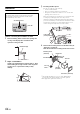

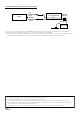
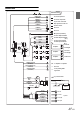
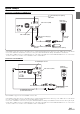

Table Of Contents
- Operating Instructions
- WARNING
- Features
- Getting Started
- Accessory List
- Location of Controls
- Touch operation
- Turning Power On or Off
- Turning the System On
- Initial System Start-Up
- Inserting/Ejecting a Disc
- Adjusting the Monitor Viewing Angle
- Adjusting the Volume
- Using the Home Screen
- Using the Favorites Menu
- Switching between Simple Mode & Info Mode
- Selecting an Item in a List
- About the Indicator Display
- Radio
- RDS
- CD/MP3/WMA/AAC
- DVD
- Playing a Disc
- Stopping Playback (PRE STOP)
- Stopping Playback
- Fast-forwarding/Fast-reversing
- Finding the Beginnings of Chapters/ Tracks/Files
- Playing Still Frames (Pausing)
- Forward frame-by-frame Playback
- Slow Motion Playback
- Selecting Programme/Playlist
- Selecting Folders
- Repeat Playback
- Searching by Title/Programme Number
- Searching Directly by Chapter Number
- Searching by Programme
- Searching by Playlist
- Searching for a Desired Video File
- Switching the Angle
- Switching the Audio Tracks
- Switching the Subtitles (Subtitle Language)
- About DivX®
- Setup
- Audio Setup
- Audio Setup Operation
- Setting the Balance/Fader/Subwoofer
- Setting the Volume for Each Application
- Setting the MX (Media Xpander)
- Equalizer Presets (Bass Max EQ)
- Download Sound Setting
- Setting Defeat
- Adjusting the Time Correction (Time Correction)
- Adjusting the Crossover Settings (X- OVER)
- Adjusting the Parametric Equalizer Curve (Parametric EQ)
- About Time Correction
- About the Crossover
- Display Setup
- General Setup
- Application Setup
- Audio Setup
- BLUETOOTH Operation
- Navigation System (Optional)
- Auxiliary Device (Optional)
- Camera Operation (Optional)
- USB Memory (Optional)
- iPod/iPhone (Optional)
- Nokia(Optional)
- Information
- Installation and Connections

84-EN
Installation
Caution concerning the installation location
1
Before installing, make sure that the opening and
closing of the display will not interfere with
operation of the gear shift.
2
Angle of installation
Install at an angle between horizontal and 30°. Note
that installing at an angle outside of this range will
result in a loss of performance and possibly
damage.
3
Mounting the Microphone.
For safe use, make sure of the following:
• location is stable and firm.
• driver’s view and operations are not obstructed.
• microphone is located where the driver’s voice can be easily
picked up (on the sun visor, etc.).
When you speak into the microphone, you should not have
to change your driving posture. This may cause a
distraction, taking your attention away from safely driving
your vehicle. Carefully consider direction and distance while
mounting the microphone. Confirm that the driver’s voice
can be easily picked up at the selected location.
4
Remove the mounting sleeve from the main unit (see
“Removal” on page 85).
Slide the unit into the mounting sleeve and secure it.
*
1
If the installed mounting sleeve is loose in the dashboard, the
pressure plates may be bent slightly to remedy the problem.
*
2
The supplied face plate may be mounted.
Caution
Do not block the unit’s fan or heat sink, thus preventing
air circulation. If blocked, heat will accumulate inside
the unit and may cause a fire.
Air ventilation hole
Rear of the Unit
Heat sink
Movable Display
0 -30°
Cable clamp
(Sold separately)
Microphone
Mounting Sleeve
(Included)
Dashboard
Rubber Cap
(Included)
Face Plate*
2
(Included)
This unit
Hex Bolt
(Included)
Bracket key
Pressure
Plates
*
1