
User manual
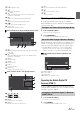


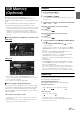


Table Of Contents
- Operating Instructions
- WARNING
- Features
- Getting Started
- Accessory List
- Location of Controls
- Touch operation
- Turning Power On or Off
- Turning the System On
- Initial System Start-Up
- Inserting/Ejecting a Disc
- Adjusting the Monitor Viewing Angle
- Adjusting the Volume
- Using the Home Screen
- Using the Favorites Menu
- Switching between Simple Mode & Info Mode
- Selecting an Item in a List
- About the Indicator Display
- Radio
- RDS
- CD/MP3/WMA/AAC
- DVD
- Playing a Disc
- Stopping Playback (PRE STOP)
- Stopping Playback
- Fast-forwarding/Fast-reversing
- Finding the Beginnings of Chapters/ Tracks/Files
- Playing Still Frames (Pausing)
- Forward frame-by-frame Playback
- Slow Motion Playback
- Selecting Programme/Playlist
- Selecting Folders
- Repeat Playback
- Searching by Title/Programme Number
- Searching Directly by Chapter Number
- Searching by Programme
- Searching by Playlist
- Searching for a Desired Video File
- Switching the Angle
- Switching the Audio Tracks
- Switching the Subtitles (Subtitle Language)
- About DivX®
- Setup
- Audio Setup
- Audio Setup Operation
- Setting the Balance/Fader/Subwoofer
- Setting the Volume for Each Application
- Setting the MX (Media Xpander)
- Equalizer Presets (Bass Max EQ)
- Download Sound Setting
- Setting Defeat
- Adjusting the Time Correction (Time Correction)
- Adjusting the Crossover Settings (X- OVER)
- Adjusting the Parametric Equalizer Curve (Parametric EQ)
- About Time Correction
- About the Crossover
- Display Setup
- General Setup
- Application Setup
- Audio Setup
- BLUETOOTH Operation
- Navigation System (Optional)
- Auxiliary Device (Optional)
- Camera Operation (Optional)
- USB Memory (Optional)
- iPod/iPhone (Optional)
- Nokia(Optional)
- Information
- Installation and Connections

66-EN
Calibration when connected to HCE-
C300R
Obstacle detection performance adjustment and guidance mark settings
of HCE-C300R (REAR VIEW CAMERA SYSTEM) require that
camera installation information be entered and calibration performed. If
camera information is not entered, accurate detection will not be
possible, so be sure to perform calibration. For details on calibration,
refer to “Calibration” in the owner’s manual of HCE-C300R. To
perform calibration with the supplied switch, refer to “Performing
Calibration” in the owner’s manual of HCE-C300R. When connected to
this unit, you can perform operations via the screen of this unit.
About the Connection
Refer to “Connection of HCE-C300R” (page 94) for details on
connecting the unit to HCE-C300R.
About the Camera Settings
Before performing calibration, set the camera. Set “Direct Camera” to
“Rear.” Refer to “Setting the Camera Input” (page 47).
To activate the Calibration Setup Mode of this unit
1
Set the SETUP switch of the control unit to “ON.”
2
Set the ignition key to ACC ON.
The camera system starts in calibration mode.
3
Touch any area of the screen to display the onscreen
buttons.
4
Touch [Back] [Corner] [Back], following the
instructions on the screen.
The Setup Mode screen appears.
Continue with the following operations after performing step 4 in
“Performing Calibration” of the owner’s manual of HCE-C300R.
During these operations, touch the button on the screen to select
“CHANGE” or “DONE” to perform calibration on this unit.
Touching [Corner] and [Back] on the screen of this unit performs
the same operation as pressing the switch which is supplied by
HCE-C300R.
[Corner] =VIEW:Selects a desired item. (The selected switch is
enclosed by a yellow frame.)
[Back] = SET.: Executes the selection.