
User manual
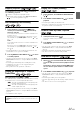
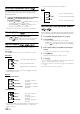
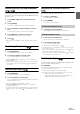
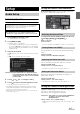
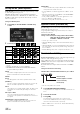
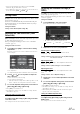
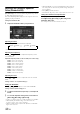
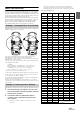
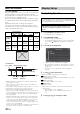
Table Of Contents
- Operating Instructions
- WARNING
- Features
- Getting Started
- Accessory List
- Location of Controls
- Touch operation
- Turning Power On or Off
- Turning the System On
- Initial System Start-Up
- Inserting/Ejecting a Disc
- Adjusting the Monitor Viewing Angle
- Adjusting the Volume
- Using the Home Screen
- Using the Favorites Menu
- Switching between Simple Mode & Info Mode
- Selecting an Item in a List
- About the Indicator Display
- Radio
- RDS
- CD/MP3/WMA/AAC
- DVD
- Playing a Disc
- Stopping Playback (PRE STOP)
- Stopping Playback
- Fast-forwarding/Fast-reversing
- Finding the Beginnings of Chapters/ Tracks/Files
- Playing Still Frames (Pausing)
- Forward frame-by-frame Playback
- Slow Motion Playback
- Selecting Programme/Playlist
- Selecting Folders
- Repeat Playback
- Searching by Title/Programme Number
- Searching Directly by Chapter Number
- Searching by Programme
- Searching by Playlist
- Searching for a Desired Video File
- Switching the Angle
- Switching the Audio Tracks
- Switching the Subtitles (Subtitle Language)
- About DivX®
- Setup
- Audio Setup
- Audio Setup Operation
- Setting the Balance/Fader/Subwoofer
- Setting the Volume for Each Application
- Setting the MX (Media Xpander)
- Equalizer Presets (Bass Max EQ)
- Download Sound Setting
- Setting Defeat
- Adjusting the Time Correction (Time Correction)
- Adjusting the Crossover Settings (X- OVER)
- Adjusting the Parametric Equalizer Curve (Parametric EQ)
- About Time Correction
- About the Crossover
- Display Setup
- General Setup
- Application Setup
- Audio Setup
- BLUETOOTH Operation
- Navigation System (Optional)
- Auxiliary Device (Optional)
- Camera Operation (Optional)
- USB Memory (Optional)
- iPod/iPhone (Optional)
- Nokia(Optional)
- Information
- Installation and Connections

37-EN
• If Preset3 was already saved for Time Correction/X-OVER/
Parametric EQ, the data will be overwritten.
• If two USB memory devices are connected, you can switch between
the two by touching [USB1 2] [USB2 1].
Setting Defeat
[Defeat] is selected on the Audio setup menu in step 3. Refer to “Audio
Setup Operation” (page 35).
If Defeat is “On,” MX, Bass Max EQ, Download Sound Setting and
Parametric EQ functions are turned OFF. This disables any settings
made for these functions.
Setting item: Defeat
Setting content: Off / On (Initial setting: Off)
Adjusting the Time Correction (Time
Correction)
[Time Correction] is selected on the Audio setup menu in step 3. Refer
to “Audio Setup Operation” (page 35).
Before performing the following procedures, refer to “About Time
Correction” (page 39).
Setting item: Time Correction
1
Touch [msec] or [cm] to select mode for making
adjustments.
Each time you touch, the onscreen button and correction
mode changes.
msec: Adjust time.
cm: Adjust listening position and distance from each speaker.
2
Touch [] or [] for each speaker to adjust the
time or distance.
0.0msec to 9.9msec (0.1msec/step)
0.0cm to 336.6cm (3.4cm/step)
• If the sum total of the setting values of all the speakers exceeds
20msec or 680cm, the settings may not function normally.
3
To store the adjusted setting value, touch and hold
[Preset1], [Preset2], or [Preset3].
• Touch [Flat] to set all values to 0.0.
• If the Subwoofer setting is “Off,” the Subwoofer setting cannot be
edited (Refer to page 35).
Calling the Time Correction Value
Calling the pre-set time correction value.
Touch [Preset1], [Preset2], or [Preset3] on the time
correction screen.
The setting stored in the Preset will be recalled.
Adjusting the Crossover Settings (X-
OVER)
[X-OVER] is selected on the Audio setup menu in step 3. Refer to
“Audio Setup Operation” (page 35).
Before performing the following procedures, refer to “About the
Crossover” (page 40).
Setting item: X-OVER
1
Touch [Channel] to select the channel.
Each time you touch, the channel switches.
• The channel being adjusted is displayed in red.
2
Adjust the crossover to your preference.
Selecting the Cut-Off Frequency
Touch [] or [] of “Freq.,” then select the cut-off
frequency.
Setting contents: 20 / 25 / 31.5 / 40 / 50 / 63 / 80 (Initial setting) /
100 / 125 / 160 / 200 Hz
Adjusting the Slope
Touch [] or [] of “Slope,” then adjust the HPF or LPF
slope.
Setting contents: 0 (Initial setting) / 6 / 12 / 18 / 24 dB/oct
Adjusting the Level
Touch [] or [] of “Level,” then adjust the HPF or LPF
level.
Setting contents: -12 to 0 dB (Initial setting: 0)
3
Repeat steps 1 to 2 to make adjustment to the other
channels.
4
To store the adjusted setting value, touch and hold
[Preset1], [Preset2], or [Preset3].
• Touch [Flat] to initialize all values.
• If the Subwoofer setting is “Off,” the Subwoofer setting cannot be
edited (Refer to page 35).
• While adjusting the X-OVER you should consider the frequency
response of the connected speakers.
Calling the X-OVER adjusted value
Calling the pre-set X-OVER adjusted value.
Touch [Preset1], [Preset2], or [Preset3] on the X-
OVER screen.
The setting stored in the Preset will be recalled.
Correction mode
Front HPF Rear HPF Subw. LPF