
User manual
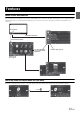
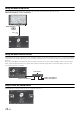
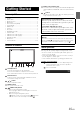
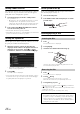
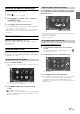
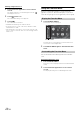
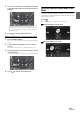
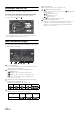
Table Of Contents
- Operating Instructions
- WARNING
- Features
- Getting Started
- Accessory List
- Location of Controls
- Touch operation
- Turning Power On or Off
- Turning the System On
- Initial System Start-Up
- Inserting/Ejecting a Disc
- Adjusting the Monitor Viewing Angle
- Adjusting the Volume
- Using the Home Screen
- Using the Favorites Menu
- Switching between Simple Mode & Info Mode
- Selecting an Item in a List
- About the Indicator Display
- Radio
- RDS
- CD/MP3/WMA/AAC
- DVD
- Playing a Disc
- Stopping Playback (PRE STOP)
- Stopping Playback
- Fast-forwarding/Fast-reversing
- Finding the Beginnings of Chapters/ Tracks/Files
- Playing Still Frames (Pausing)
- Forward frame-by-frame Playback
- Slow Motion Playback
- Selecting Programme/Playlist
- Selecting Folders
- Repeat Playback
- Searching by Title/Programme Number
- Searching Directly by Chapter Number
- Searching by Programme
- Searching by Playlist
- Searching for a Desired Video File
- Switching the Angle
- Switching the Audio Tracks
- Switching the Subtitles (Subtitle Language)
- About DivX®
- Setup
- Audio Setup
- Audio Setup Operation
- Setting the Balance/Fader/Subwoofer
- Setting the Volume for Each Application
- Setting the MX (Media Xpander)
- Equalizer Presets (Bass Max EQ)
- Download Sound Setting
- Setting Defeat
- Adjusting the Time Correction (Time Correction)
- Adjusting the Crossover Settings (X- OVER)
- Adjusting the Parametric Equalizer Curve (Parametric EQ)
- About Time Correction
- About the Crossover
- Display Setup
- General Setup
- Application Setup
- Audio Setup
- BLUETOOTH Operation
- Navigation System (Optional)
- Auxiliary Device (Optional)
- Camera Operation (Optional)
- USB Memory (Optional)
- iPod/iPhone (Optional)
- Nokia(Optional)
- Information
- Installation and Connections

16-EN
Turning Power On or Off
Some of this unit’s functions cannot be performed while the vehicle is in
motion. Be sure to stop your vehicle in a safe location and apply the
parking brake, before attempting these operations.
1
Turn the ignition key to the ACC or ON position.
The system turns on.
• When turned on, the system displays the last mode screen that
was displayed before the ignition key was turned off. For
example, if the unit is in radio mode when ignition is turned off,
it will remain in radio mode when ignition is turned back on.
2
Press and hold the Home/C button for at least 5
seconds to turn the power off.
• The unit can be turned on by pressing any button.
• The ICS-X8 is a precision device. Careful handling of the unit should
provide you with years of trouble-free operation.
Turning the System On
With the Alpine system, when the ignition key is turned to ACC or ON,
the opening screen will be automatically displayed.
1
When the system is used for the first time, the
language selection menu is displayed. There are 15
languages to choose from. Touch [] or [] to
scroll the list, and then touch the desired language.
• You can also scroll through lists by touching the screen and
sliding your finger up and down.
2
Touch [OK].
The radio screen is displayed.
• Some of this unit’s functions cannot be performed while the vehicle is
in motion. Be sure to stop your vehicle in a safe location and apply
the parking brake before attempting these operations.
Initial System Start-Up
Be sure to press the RESET switch when using the unit for the first
time, after changing the car battery, etc.
1
Turn off the unit power.
2
Press RESET switch with a ballpoint pen or similar
pointed object.
Inserting/Ejecting a Disc
1
Press .
The Open/Tilt screen is displayed.
2
Touch [Open].
3
Insert the disc with the label side facing up.
Insert the disc until it is automatically pulled into the unit.
The unit starts to play the disc.
1
Press .
The Open/Tilt screen is displayed.
2
Touch [ Disc].
The monitor will open. Then the disc is ejected.
When the disc has been ejected part way, take it out.
3
Touch [Close], or press .
• If the disc does not eject after touching [ Disc], press and hold
for at least 5 seconds.
• Do not apply shock to the monitor when it is open as it may result in
malfunction of the unit.
• The monitor will stop at the set tilt angle when closing.
Inserting the Disc
Removing the Disc
CAUTION
Keep hands (or any other object) away from the monitor while it
is opening or closing to avoid damage or injury. The back of the
monitor tends to become very warm under normal operating
conditions. This is not a malfunction, but care should be taken to
avoid prolonged contact with it.
RESET switch
Disc Slot