
Troubleshooting guide


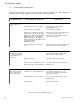

39
4.0 Troubleshooting, Continued
745-573-B0-001 REV. A
4.2 Troubleshooting Guide Part 2
ACTIONPROBABLE CAUSESYMPTOM
AC input "High" red LED
is lit.
AC input voltage is above 156 (or 299 for
230V nominal units, or 276 for 240V
nominal units) VAC— unit will be in
standby mode, running on battery.
Measure the AC input voltage with a true RMS
voltmeter. If above 156V (or 265, or 276),
notify the local power company of the
significant overvoltage at the power supply
location Operate the CPR from an alternate
AC source (generator) until the overvoltage is
corrected.
Load ">100%" red LED is
lit.
CPR unit is loaded >100%. If the overload
is >110%, the output will turn off after30
seconds, and then attempt to restart every
30 seconds for 3 hours. If the overload is
not removed after 3 hours, the module will
shut down and must be manually restarted
by pressing the "Output ON" button.
Reduce the overload in the coax network.
"Inverter" red LED is lit. Inverter is operating. This is normal if
Utility power has failed.
Measure AC input voltage with a true RMS
voltmeter. If power is present, verify Utility
voltage and frequency is within the limits shown
above in this table.
AC input "Low" red LED is
lit.
AC input voltage is below 96 (or 161 for
230V nominal units, or 192 for 240V
nominal units) VAC— unit will be in
standby mode, running on battery.
Measure the AC input voltage with a true RMS
voltmeter. If below 96V (or 184, or 192), notify
the local power company of the significant
undervoltage at the power supply location
Operate the CPR from an alternate AC source
(generator) until the undervoltage is corrected.
Output voltage reads zero
or nearly zero at the front
panel test points.
COAX network is shorted. Measure AC output current with a clamp-on
probe. If it is > rated out put amps, check the
network for a short circuit, or "bucking power"
and correct.
Output has been disabled due to overload
timeout.
Press "Output ON" button. The "Output
Voltage" LED should come on. Check
network for overloads.
Table 4-2, Troubleshooting guide, Part 2