
Manual


0700015-J0 Rev B
104
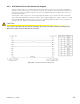
9. Remote Communications
The instructions provided in this chapter should enable the user to establish remote communications
with the CXC. The communications protocol supports a web interface. All CXC models can be set up,
monitored and tested with an Ethernet 10/100 Base-T either locally or remotely. Local connection is also
possible with a PPP serial data connection. The installation manual describes some standard scenarios.
NOTE: A step by step connection wizard – provided to establish remote communications with the CXC –
is available via the Alpha website (www.alpha.ca). The wizard does not work in Windows Vista or Win-
do ws 7.
9.1 Establishing a Network Connection via a Crossover Cable
Laptop
1. Connect the network crossover cable between the host computer (e.g. laptop) and the Cordex
controller.
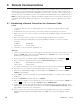
2. In Windows®, select the Start menu, Control Panel, and then select Network Connections.
3. Right-click on the icon for the Local Area Connection (to be used by the laptop computer) and then
select Properties.
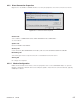
4. Make sure Internet Protocol (TCP/IP) is checked; highlight it and then select Properties.
5. Check the radio button beside Use the Following IP Address and enter or verify the following
information:
IP address: 10.10.10.202
Subnet mask: 255.255.255.0
6. Click OK to close each window opened thus far.
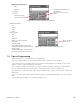
CXC LCD
7. Login to the CXC: First, tap on the home page icon at the bottom left corner of the LCD touch screen
and select LOGIN. Next, enter the password 1234 and tap on ACCEPT. Last, close the message
window (access granted to the controller).
8. On the main menu, scroll down and tap on Communications and then tap on IP Address (6.5).
9. Enter or verify the following information (uncheck Obtain Automatically if necessary):
IP address: 10.10.10.201 (factory default)
Subnet mask: 255.255.255.0
To change a number, tap on the numeric field to edit via the virtual numeric keypad, see Figure 6.
10. Select the √ icon to accept the new setting and return to the previous menu.
11. Return to the MAIN MENU navigation screen and press the OPTION button to evoke the SAVE /
LOGOUT pop-up window.
12. Select SAVE to save the new settings. A pop-up window will appear to confirm the selection (select
the X icon).
13. Select the OPTION button again and choose LOGOUT.
14. Tap on the home page icon at the bottom left corner of the LCD touch screen and select RESET, see
Section 4.4. To confirm the reset, tap on ACCEPT and then REBOOT NOW.
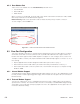
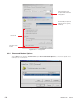
15. In Windows®, once the CXC has rebooted, launch Internet Explorer® 8 or greater and enter the IP
address of the CXC (10.10.10.201) in the address bar. Under Tools\Internet Options\Security, add the
logon address of the CXC to the Trusted Sites.
16. If the connection was successful, the password prompt will appear. Enter your name in the USER
NAME field and the default PASSWORD (1234). Select OK to proceed to the language selection
window.