
User guide
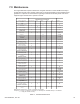


78
042-288-B0-001, Rev. A2
Filter Removal, Replacement, and Cleaning:
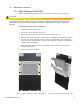
1. Unlock and remove the enclosure rear door.
2. Locate and loosen the lter bracket thumbscrew on the inside wall of the enclosure,
opposite the air intake vent.
3. Lower the bracket and remove the lter.
4. Clean the lter using a vacuum or compressed air (if available) to remove loose dust and
dirt. Then use a soap and water solution to remove any trapped dirt. Use compressed
air to dry the lter. After cleaning, re-coat the lters using RP Super Filter Coat Adhesive,
available from local suppliers.
5. Replace the lter.
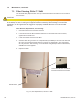
7.0 Maintenance, continued
7.3 Filter Cleaning, PN-6x-T 7.5kW
The air intake lter (Alpha P/N 561-216-10) is located inside the air intake vent on the side of
the enclosure.
Failure to keep the lter clean, or using improperly installed lters, may cause system failure due
to dirt buildup or lack of cooling air. Equipment failures caused by lter blockage, incorrect lter
substitution, or dirt ingress due to clogged or improperly installed lters are not covered under
warranty.
CAUTION!
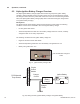
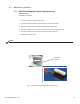
Fig. 7-3, Filter Replacement, PN-6x-T 7.5kW
X
Loosen thumbscrew on inside of
enclosure and lower the bracket.
Filter Bracket