
User's Manual
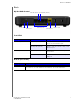
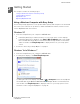
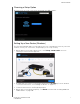
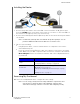
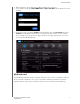
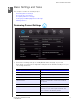
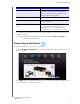
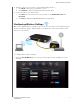
Table Of Contents
- WD® Service and Support
- Important User Information
- Product Overview
- Getting Started
- Basic Settings and Tasks
- Advanced Settings
- Performing Advanced Tasks
- Installing and Using WD Print Share
- Troubleshooting
- Regulatory and Warranty Information
- Appendix: Technical Specifications
- Index

GETTING STARTED
11
MY NET N900 CENTRAL ROUTER
USER MANUAL
Installing the Router
2
3
1
1. Connect the power cable to the router’s DC connector and into an AC power outlet.
Press the On/Off button on the back of the router once to turn it on. The four LEDs on
the front the router light up one by one as it boots up.
2. Connect the included yellow Internet (Ethernet) cable to the router’s Internet port and the
the modem.
Note: One Ethernet (network) cable is included in the product package. You can
purchase additional cables from the WD Store or another source.
3. Do one of the following:
Using Ethernet cables, connect network devices or computers to the router’s
unused Ethernet ports.
If you do not have another Ethernet cable, use a wireless connection to set up the
router. Make sure your Mac computer's Wi-Fi is turned on, and select the network
WesternDigital from the list of wireless networks and connect. By default there is
no password.
Accessing My Dashboard
Mac users access My Dashboard to configure all router settings.
Note: You can set up your My Net router using a Windows computer the same
way, though you will not be able to take advantage of Easy Setup’s
shortcuts for setting up a wireless connection and configuring security.
To. . . Go to ...
Complete basic router
setup
“Connecting to the Internet” on page 15 and
“Configuring Wireless Settings” on page 16
Access and use My
Dashboard
“Accessing My Dashboard” on page 11
“My Dashboard” on page 12
“Setting Up and Managing External Storage” on page
17
“Adding a Device” on page 20