CG-WLCB54GL User’s Guide
Contents Package Contents .................................................... 3 Introduction............................................................... 4 Wireless Basics ........................................................ 7 Getting Started........................................................ 10 Installation .............................................................. 14 Using the Configuration Utility for Windows 2000, 98, or ME ................................................................
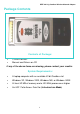
IEEE 802.11g Cardbus Wireless Network Adapter Package Contents Contents of Package: • CG-WLCB54GL • Manual and Drivers on CD If any of the above items are missing, please contact your reseller. System Requirements: • A laptop computer with an available 32-bit Cardbus slot • Windows XP, Windows 2000, Windows ME, or Windows 98SE • At least 32 MB of memory and a 300 MHz processor or higher • An 802.
IEEE 802.11g Cardbus Wireless Network Adapter Introduction CG-WLCB54GL is an advanced IEEE 802.11b/g compatible, high performance, wireless card that supports data transfer speeds of up to 54 Mbps in 802.11g mode. CG-WLCB54GL comes with software drivers for the most popular Microsoft Windows operating systems and can be integrated into a larger network, running Windows XP, Windows 2000, Windows ME, Windows 98SE, Infrastructure mode (with an Access Point).
IEEE 802.11g Cardbus Wireless Network Adapter Product Features • Compatible with IEEE 802.11b standard to provide wireless Ethernet data rates of up to11Mbps data rate • Compatible with IEEE 802.11g high rate standard to provide wireless 54Mbps data rate • Operation at dual 2.4 ~ 2.5GHz frequency bands to meet worldwide regulations • Dynamic date rate scaling at 1, 2, 5.5, and 11Mbps for IEEE 802.11b • Dynamic date rate scaling at 6, 9, 12, 18, 24, 36, 48, 54Mbps for IEEE 802.
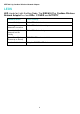
IEEE 802.11g Cardbus Wireless Network Adapter LEDS LED stands for Light-Emitting Diode. The IEEE 802.11g Cardbus Wireless Network Adapter has two LEDs: POWER and ACTIVITY.
IEEE 802.11g Cardbus Wireless Network Adapter Wireless Basics Wireless products are based on industry standards to provide easy-to-use and compatible high-speed wireless connectivity within your home or business. Strictly adhering to the 802.11b and 802.11g standards, our wireless family of products will allow you to access the data you want, when and where you want it. No longer will you be limited to one location or forced to run new wiring through your home or office.
IEEE 802.11g Cardbus Wireless Network Adapter standardization facilitates interoperability of all WLAN devices that conform to the 802.11b or 802.11g sets of standards. Installation Speed and Simplicity - Installing a wireless LAN system can be fast and easy and can eliminate the need to pull cable through walls and ceilings. Installation Flexibility - Wireless technology allows the network to go where wires cannot go.
IEEE 802.11g Cardbus Wireless Network Adapter 1. Keep the number of walls and ceilings between the Access Point and your receiving device to a minimum - Each wall or ceiling can reduce your Wireless product’s range from 3-90 feet (1-30 meters.) For some businesses or for a large residential home deployment, it may be beneficial to have more than one access point with overlapping coverage. 2. Be aware of the direct line between Access Points and computers with wireless cards - A wall that is 1.
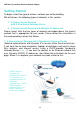
IEEE 802.11g Cardbus Wireless Network Adapter Getting Started To begin, select the type of wireless network you will be building. We will discuss the following types of networks in this section: 1. A Home Internet Network with A Residential Gateway/Router 2. A Home Internet Network with Multiple IP Addresses Please select, from the four types of networks described above, the type of network that is appropriate for your needs. Please follow the instructions in the corresponding section that follows. 1.
IEEE 802.11g Cardbus Wireless Network Adapter (Requirements: A Residential Gateway/Router connected with an Ethernet (CAT5) cable to an 802.11a/b Access Point or an 802.11a/g Access Point or another computer with an 802.11b/g WLAN card installed). This type of installation requires that you provide a dynamic IP address for each computer on your network. You will need a DHCP-capable Residential Gateway/Router for your network. To complete the installation, please follow these steps: 1.
IEEE 802.11g Cardbus Wireless Network Adapter Please note that this type of installation requires that your ISP (Internet Service Provider) provides you a static IP address for each computer and the Access Point on your network. Please refer to the manual that came with your Access Point to determine its configuration. Please follow these steps to complete the installation: 1. Connect the Wireless Access Point to a Broadband connection. 2.
IEEE 802.11g Cardbus Wireless Network Adapter Note: The IP Address for all computers must be in the same IP Address range, and the Subnet Mask must be the same for all the computers on the network. For example: If the first computer is assigned an IP Address of 192.168.0.2 with a Subnet Mask of 255.255.255.0, then the second computer can be assigned an IP Address of 192.168.0.3 with a Subnet Mask of 255.255.255.0, etc.
IEEE 802.11g Cardbus Wireless Network Adapter Installation This section shows you how to install the Utility if you are using the operating systems Windows 2000, ME, 98SE. Follow the instructions given below on how to install the hardware (CG-WLCB54GL) and then the software (driver and utility). For those using Windows XP, the installation procedure will be the same until the utility installation. Windows XP has a built in utility for wireless devices.
IEEE 802.11g Cardbus Wireless Network Adapter Installing the Driver Installing the software involves two steps. The first is to install the Driver and the second is to install the Configuration Utility. • When CG-WLCB54GL has been inserted into a 32-bit Cardbus slot, the Found New Hardware screen appears. • Continue with the installation and the screen below should appear. Click on Yes to proceed with the installation.
IEEE 802.11g Cardbus Wireless Network Adapter • Insert the Driver CD into the CD-ROM drive. If you have not inserted the Driver CD into the CD-Rom a prompt such as the one below will appear. Click OK. • Otherwise installation will continue with the following screen and come to completion.
IEEE 802.11g Cardbus Wireless Network Adapter 3. Installing the Configuration Utility Look for the file named “Setup.exe” on the installation CD-ROM. Doubleclick on it to start the installation for the configuration utility. Setup.exe When this screen appears click Next. To install to the folder C:\Program Files\NonBrand Utility click Next. Otherwise click on Browse to choose an alternate location.
IEEE 802.11g Cardbus Wireless Network Adapter Click Next to proceed with the utility installation.
IEEE 802.11g Cardbus Wireless Network Adapter The Setup Status screen will appear to inform you that the installation is in process, as seen below. This same screen will then alert you that all backup files have been removed. After WLAN Utility has been successfully installed, InstallShield Wizard will prompt you to restart your computer. Select “Yes, I want to restart my computer now,” and click on Finish.
IEEE 802.11g Cardbus Wireless Network Adapter 4. Uninstalling the Configuration Utility To uninstall the configuration utility Programs WLAN Monitor Uninstall. simply To uninstall the driver, right-click on My Computer.
IEEE 802.11g Cardbus Wireless Network Adapter Left-click on Properties to bring up the System Properties screen. Click on the Hardware tab.
IEEE 802.
IEEE 802.11g Cardbus Wireless Network Adapter Click on Device Manager.
IEEE 802.11g Cardbus Wireless Network Adapter Double-click on Network adapters.
IEEE 802.11g Cardbus Wireless Network Adapter Right-click on the “CG-WLCB54GL” icon.
IEEE 802.11g Cardbus Wireless Network Adapter Click on Uninstall. You will then receive a Confirm Device Removal screen. Click OK to complete the uninstall procedure.
IEEE 802.11g Cardbus Wireless Network Adapter Using the Configuration Utility for Windows 2000, 98, or ME If you are using Windows 2000, ME or 98SE the Configuration Utility program for the CG-WLCB54GL is called WLAN. Once you have installed WLAN (the configuration utility), you can read this section of the manual to find out how to monitor and configure your CG-WLCB54GL using WLAN. Screenshots for this section have been taken in Windows 2000.
IEEE 802.11g Cardbus Wireless Network Adapter On the left side of the screen are Available WLANs, which you may connect to by first selecting the WLAN (it will appear highlighted) and then clicking on Add. When you do so a screen like the one below will pop up: In the Wireless Network Properties screen you may change the name of the WLAN. You may also enter wireless network encryption keys by checking Network Authentication (Shared mode) or Data encryption (Wep enabled).
IEEE 802.11g Cardbus Wireless Network Adapter computer to computer (ad hoc) network; no access points are used” to enable this option. On the Configuration Tab click on Refresh to call up all the available WLANs. On the right side of the screen is a list of Preferred WLANs. These are WLANs that have already been added to the wireless network. Click New to rename the WLAN and reset its properties. You will see the Wireless Network Properties screen as displayed previously when you click New.
IEEE 802.11g Cardbus Wireless Network Adapter Information given under Connected State are the Connection status (connected or disconnected), SSID, Network type (infrastructure or adhoc), Wep Status (enabled or disabled), Speed (of the wireless connection), and Signal Strength (a colored bar shows the intensity of the radio signals in the network). Under Hardware Information the Media Access Control (MAC) address of the hardware (WLAN cardbus card) is given.
IEEE 802.11g Cardbus Wireless Network Adapter Option Tab Under General Setting, check “Auto launch when Windows starts up” so that WLAN automatically launches when Windows starts up. Check “Use IP Setting in Profile” to enable the IP settings made under IP Config in the Wireless Network Properties screen. If checked current IP settings will be saved. If unchecked (and previously checked), previous IP settings will be restored.
IEEE 802.11g Cardbus Wireless Network Adapter The About Tab gives the utility version number of the WLAN utility.
IEEE 802.11g Cardbus Wireless Network Adapter Using the Configuration Utility for Windows XP The WLAN Configuration Utility supports Windows XP; however, Windows XP has its own utility for wireless devices. In order to use the WLAN Configuration Utility as described in the last section you must disable the utility built into Windows XP by unchecking the box below.
IEEE 802.11g Cardbus Wireless Network Adapter If you leave the “Use Windows to configure my wireless network settings” box checked, you will use the Windows XP utility for wireless devices. The following demonstrates how to manage wireless network connections with the Windows XP built-in utility. Creating a connection Right click on “My Network Places” to obtain a drop-down menu with Properties listed.
IEEE 802.11g Cardbus Wireless Network Adapter Left-click on Properties to obtain the Network Connections screen. Right-click on the “Wireless Network Connection” icon to produce another drop-down menu with item Properties.
IEEE 802.11g Cardbus Wireless Network Adapter Left-click on Properties to bring up the screen below.
IEEE 802.
IEEE 802.11g Cardbus Wireless Network Adapter Click on the Wireless Networks tab. Click on the Access Point under Available Networks with which you wish to establish a connection.
IEEE 802.11g Cardbus Wireless Network Adapter Click on Configure to establish a connection with the chosen access point “TLD 3PS.” A screen such as the following called Wireless Network Properties will then appear.
IEEE 802.11g Cardbus Wireless Network Adapter Enter the appropriate settings on the screen below and click OK.
IEEE 802.11g Cardbus Wireless Network Adapter The access point “TLD 3PS” has been added to the network under Preferred networks. Click OK.
IEEE 802.11g Cardbus Wireless Network Adapter The Network Connections window now shows the wireless network connection as “Enabled”.
IEEE 802.11g Cardbus Wireless Network Adapter Networking Basics Using the Network Setup Wizard in Windows XP In this section you will learn how to establish a network at home or work, using Microsoft Windows XP. Note: Please refer to websites such as http://www.homenethelp.com and http://www.microsoft.com/windows2000 for information about networking computers using Windows 2000, ME or 98.
IEEE 802.11g Cardbus Wireless Network Adapter Click Next. In the following window, select the best description of your computer. If your computer connects to the internet through a gateway/router, select the second option as shown.
IEEE 802.11g Cardbus Wireless Network Adapter Click Next. Enter a Computer description and a Computer name (optional.) Click Next. Enter a Workgroup name. All computers on your network should have the same Workgroup name.
IEEE 802.11g Cardbus Wireless Network Adapter Click Next. Please wait while the wizard applies the changes. When the changes are complete, click Next. Please wait while the wizard configures the computer. This may take a few minutes.
IEEE 802.11g Cardbus Wireless Network Adapter In the window below, select the best option. In this example, “Create a Network Setup Disk” has been selected. You will run this disk on each of the computers on your network. Click Next.
IEEE 802.11g Cardbus Wireless Network Adapter Format the disk if you wish, and click Next. Please wait while the wizard copies the files. Please read the information under Here’s how in the screen below. After you complete the Network Setup Wizard you will use the Network Setup Disk to run the Network Setup Wizard once on each of the computers on your network. To continue, click Next.
IEEE 802.11g Cardbus Wireless Network Adapter Please read the information on this screen, and then click Finish to complete the Network Setup Wizard.
IEEE 802.11g Cardbus Wireless Network Adapter The new settings will take effect when you restart the computer. Click Yes to restart the computer. You have completed configuring this computer. Next, you will need to run the Network Setup Disk on all the other computers on your network. After running the Network Setup Disk on all your computers, your new wireless network will be ready to use.
IEEE 802.11g Cardbus Wireless Network Adapter Networking Basics Naming your Computer To name your computer, please follow these directions: In Windows XP: • Click START (in the lower left corner of the screen). • Right-click on My Computer. • Select Properties and Click. • Select the Computer Name Tab in the System Properties window. You may enter a Computer description if you wish, this field is optional.
IEEE 802.11g Cardbus Wireless Network Adapter • In this window, enter the Computer name. • Select Workgroup and enter the name of the Workgroup. • All computers on your network must have the same Workgroup name. • Click OK. Checking the Installation of the Drivers for the Wireless Card • Go to Start. • Right-click on My Computer. • Click Properties.
IEEE 802.11g Cardbus Wireless Network Adapter • Select the Hardware Tab. • Click Device Manager. • Click on Network Adapters • Right-click on IEEE 802.
IEEE 802.11g Cardbus Wireless Network Adapter • Look under Device Status to check that the device is working properly. • Click OK.
IEEE 802.11g Cardbus Wireless Network Adapter Networking Basics Checking the IP Address in Windows XP • Right-click on the networking icon in the task bar. • Click on Status. The following window will display • Click the Support tab. • Click Close.
IEEE 802.11g Cardbus Wireless Network Adapter Networking Basics Assigning a Static IP Address Note: Residential Gateways/Broadband Routers will automatically assign IP Addresses to the computers on the network, using DHCP (Dynamic Host Configuration Protocol) technology. If you are using a DHCP-capable Gateway/Router you will not need to assign Static IP Addresses.
IEEE 802.11g Cardbus Wireless Network Adapter • Double-click on Network Connections. • Right-click on Local Area Connections. • Click Properties.
IEEE 802.11g Cardbus Wireless Network Adapter • Highlight Internet Protocol (TCP/IP). • Click Properties. • Select Use the following IP address in the Internet Protocol (TCP/IP) Properties window. • Input your IP address and subnet mask. (The IP Addresses on your network must be within the same range. For example, if one computer has an IP Address of 192.168.0.2, the other computers should have IP Addresses that are sequential, like 192.168.0.3 and 192.168.0.4.
IEEE 802.11g Cardbus Wireless Network Adapter • Click OK. You have completed the assignment of a Static IP Address. (You do not need to assign a Static IP Address if you have a DHCP-capable Gateway/Router.
IEEE 802.11g Cardbus Wireless Network Adapter Networking Basics Adding and Sharing Printers in Windows XP After you have run the Network Setup Wizard on all the computers in your network (please see the Network Setup Wizard section at the beginning of Networking Basics,) you can use the Add Printer Wizard to add or share a printer on your network.
IEEE 802.11g Cardbus Wireless Network Adapter • Go to Start> Printers and Faxes.
IEEE 802.11g Cardbus Wireless Network Adapter • Click on Add a printer. • Click Next.
IEEE 802.11g Cardbus Wireless Network Adapter • Select Local printer attached to this computer. • (Deselect Automatically detect and install my Plug and Play printer if it has been selected.) • Click Next. • Select Use the following port: • From the pull-down menu select the correct port for your printer. (Most computers use the LPT1: port, as shown in the illustration.) • Click Next. • Select and highlight the correct driver for your printer. • Click Next.
IEEE 802.11g Cardbus Wireless Network Adapter • At this screen, you can change the name of the printer (optional.) • Click Next. • Select Yes to print a test page. A successful printing will confirm that you have chosen the correct driver. • Click Next. This screen gives you information about your printer. • Click Finish.
IEEE 802.11g Cardbus Wireless Network Adapter When the printed, test page has • Click OK. • Go to Start> Printers and Faxes. A successful installation will display the printer icon as shown at right. You have successfully added a local printer.
IEEE 802.11g Cardbus Wireless Network Adapter Networking Basics Sharing a network printer After you have run the Network Setup Wizard on all the computers on your network, you can run the Add Printer Wizard on all the computers on your network. Please follow these directions to use the Add Printer Wizard to share a printer on your network: • Go to Start> Printers and Faxes. • Click on Add a Printer.
IEEE 802.11g Cardbus Wireless Network Adapter • Click Next. • Select Browse for a printer • Click Next. • Select the printer you would like to share. • Click Next.
IEEE 802.11g Cardbus Wireless Network Adapter • Click Finish. To check for proper installation: • Go to Start> Printers and Faxes.
IEEE 802.11g Cardbus Wireless Network Adapter The printer icon will appear at right, indicating proper installation. You have completed adding the printer. To share this printer on your network: • Remember the printer name • Run the Add Printer Wizard on all the computers on your network. • Make sure you have already run the Network Setup Wizard on all the network computers. After you run the Add Printer Wizard on all the computers in the network, you can share the printer.
IEEE 802.11g Cardbus Wireless Network Adapter • Go to Start> Printers and Faxes. • Click on Add a Printer. The screen to the right will display. • Click Next. • Select A Network Printer. • Click Next.
IEEE 802.11g Cardbus Wireless Network Adapter • Select Create a new port. • From the pull-down menu, select Standard TCP/IP Port, as shown. • Click Next. • Please read the instructions on this screen. • Click Next. • Enter the Printer IP Address and the Port Name, as shown. • Click Next.
IEEE 802.11g Cardbus Wireless Network Adapter • In this screen, select Custom. • Click Settings. • Enter the Port Name and the Printer Name or IP Address. • Select LPR. • Enter a Queue Name. If there is more than one port on the print server, you must name the Queue. • Click OK.
IEEE 802.11g Cardbus Wireless Network Adapter • This screen will show you information about your printer. • Click Finish. • Select the printer you are adding from the list of Printers. • Insert the printer driver disk that came with your printer. • Click Have Disk. If the printer driver is already installed, • Select Keep existing driver. • Click Next.
IEEE 802.11g Cardbus Wireless Network Adapter • You can rename your printer if you choose. It is optional. Please remember the name of your printer. You will need this information when you use the Add Printer Wizard on the other computers on your network. • Click Next. • Select Yes, to print a test page. • Click Next. This screen will display information about your printer. • Click Finish to complete the addition of the printer.
IEEE 802.11g Cardbus Wireless Network Adapter Troubleshooting This chapter provides solutions to problems that can occur during the installation and operation of the CG-WLCB54GL. Read the following descriptions if you are having problems. 1. Checking the Installation of the Drivers for the Wireless Card • Go to Start. • Right-click on My Computer. • Click Properties.
IEEE 802.11g Cardbus Wireless Network Adapter • Select the Hardware Tab. • Click Device Manager. • Click on Network adapters. • Right-click on CGWLCB54GL. • Select Properties to check that the drivers are installed properly.
IEEE 802.11g Cardbus Wireless Network Adapter • Look under Device Status to check that the device is working properly. • Click OK. 2. The computer does not recognize the CG-WLCB54GL. • Make sure that the CG-WLCB54GL is properly seated in the computer’s cardbus slot. • If Windows does not detect the hardware upon insertion of the card, make sure to completely remove drivers that were previously installed. To remove the drivers, do the following: A.
IEEE 802.11g Cardbus Wireless Network Adapter 3. The CG-WLCB54GL does not work properly after the driver is installed. • Restart the computer. (In some cases, it will be necessary to restart the computer after installing the drivers.) • In Windows XP, go to Start>Control Panel>System>Hardware Tab> click on the Device Manager Tab> click on Network Cards> double click on CG-WLCB54GL > make sure that “This device is working properly” is displayed under Device Status under the General Tab.
IEEE 802.11g Cardbus Wireless Network Adapter • Check that the IP Address assigned to the wireless card is within the same IP Address range as the access point and gateway. (For example: if one computer has an IP Address of 192.168.0.2, the other computers should have IP Addresses that are sequential, like 192.168.0.3 and 192.168.0.4. The subnet mask must be the same for all the computers on the network.
IEEE 802.11g Cardbus Wireless Network Adapter Technical Specifications Standards • • IEEE 802.11b (up to 11 Mbps) IEEE 802.11g (up to 54 Mbps) Card Type • Cardbus Type II Supported OS • Windows XP • Windows 2000 • Windows ME • Windows 98SE Frequency Range • 2400-2483.5 MHz ISM band Data Rates • • 1, 2, 5.5, 11 Mbps (IEEE 802.11b) 6, 9, 12, 18, 24, 36, 48, 54Mbps (IEEE 802.11g) Modulation Techniques IEEE 802.11g • BPSK • QPSK • 16 QAM • 64 QAM • OFDM IEEE 802.
IEEE 802.11g Cardbus Wireless Network Adapter Media Access Control • CSMA/CA with ACK Diagnostic LED • Power • Link Current Consumption • Sleep mode - 40mW • Transmit mode - 2310mW • Receive mode – 1320mW Operating Voltage • 3.
IEEE 802.
IEEE 802.11g Cardbus Wireless Network Adapter Federal Communication Commission Interference Statement This equipment has been tested and found to comply with the limits for a Class B digital device, pursuant to Part 15 of the FCC Rules. These limits are designed to provide reasonable protection against harmful interference in a residential installation.