
Owner Manual

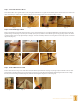
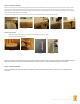


Step 9. Position Roof Panels
Place the roof panels on top of the ceiling supports being sure the predrilled holes are facing up (Image 41). Insert the tongue of one panel into
the groove of the other (Image 42). Measure around the roof support rails to be sure the panels are spaced evenly around the top of the sauna;
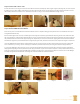
approximately 1” of the support rails should extend past each side of the roof panels (Image 43). Secure them to the roof support rails using the 2”
screws through the predrilled holes (Image 44).
Using the 1” trim nails, secure the decorative trim pieces to the front and back of the ceiling panels (Image 45).
Step 10: Accessories
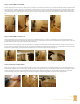
1. Install the vent-hole cover using the provided screw and washer (Images 46 & 47).
2. Install doorknob (Image 48 & 49)
After the sauna has been installed, sweep down the inside to remove any sawdust and wood shavings, and then vacuum completely. Using a
damp cloth and warm water, wipe down the entire sauna including the benches to remove any remaining dirt, dust and debris.
Step 11: Heater Installation
Please consult your heater manual for all heater installation information. All electrical connections must be done by a qualied licensed
electrician.
GRAYSON/RAINELLE SAUNA INSTALLATION MANUAL
page 5
Image 41 Image 42 Image 43 Image 44 Image 45
Image 46 Image 47
Image 48 Image 49