
Owner Manual

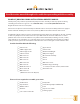


Step 1. Connect the Four Floor Risers
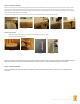
Fasten the four oor risers together with 2” screws, using the predrilled holes as a guide. For the Rainelle, the two shorter risers are located on the
sides. For the Grayson - all the risers are uniform. (Images 1-4) Use a framing square to ensure the assembly is square.
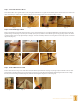
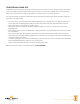
Step 2. Position Wall Support Rails
Align each wall support so that the angled cuts make a corner. Each wall support has one angled predrilled hole. Fasten the front, back and sides
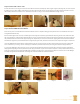
together using 2” screws (Image 5 -7) and lay the assembly squarely on top of the oor risers with the groove facing up (Image 8). The rails should
overlap both sides of the riser by approximately 1” (Image 9). Secure the assembly to the oor risers using three screws evenly spaced on each wall
support rail (Image 10).
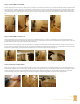
Step 3. Position Wall Sections A & B
Position wall section A in the groove of the left rail and push it ush against the back rail (Image 11). Having a helper hold wall section A, orient
wall section B so that the vent holes are on top and place it in the groove of the back rail. Push the at edge ush against wall section A. Align
the two panels so their edges are ush (Image 12) and fasten them together using the 2” screws (Image 13).
Image 1 Image 2 Image 3 Image 4
GRAYSON/RAINELLE SAUNA INSTALLATION MANUAL
page 2
Image 5 Image 6 Image 7
Image 8 Image 9 Image 10
Image 11 Image 12 Image 13