® Rainelle & Grayson Sauna Installation & Owner’s Manual Rainelle Grayson
® Read this entire manual through to the end before proceeding with the assembly. RAINELLE | GRAYSON SAUNA INSTALLATION & OWNER’S MANUAL Thank you for your purchase of your Rainelle | Grayson Sauna. Should you have any questions during assembly, please feel free to give us a call at 888.355.3050, or email sales@almostheaven.com. Regular business hours are 9-5 EST, M-F.
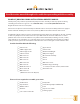
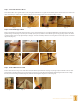
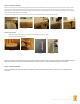
Step 1. Connect the Four Floor Risers Fasten the four floor risers together with 2” screws, using the predrilled holes as a guide. For the Rainelle, the two shorter risers are located on the sides. For the Grayson - all the risers are uniform. (Images 1-4) Use a framing square to ensure the assembly is square. Image 1 Image 2 Image 3 Image 4 Step 2. Position Wall Support Rails Align each wall support so that the angled cuts make a corner. Each wall support has one angled predrilled hole.
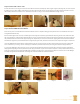
Step 4. Position wall sections C & D Position wall section C into the groove of the back rail. Attach it to wall section B by way of the tongue and groove fit (Image 14). Secure it into place by tapping section C with a rubber mallet (Image 15). Position wall section D onto the side rail (Image 16), pushing it flush against the back rail so that it overlaps the flat end of wall section C.
Step 6. Position Wall Section E & H Position wall section E into the groove of the side rail, orienting it so the four heater vent holes are located at the bottom (Image 30). Wall section E attaches to wall section D by means of a tongue and groove fit so there is no need for screws. Slide securely into place, tapping it in with a rubber mallet (Image 31). Position wall/window section H into the groove on the opposite side rail (Image 32).
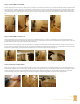
Step 9. Position Roof Panels Place the roof panels on top of the ceiling supports being sure the predrilled holes are facing up (Image 41). Insert the tongue of one panel into the groove of the other (Image 42). Measure around the roof support rails to be sure the panels are spaced evenly around the top of the sauna; approximately 1” of the support rails should extend past each side of the roof panels (Image 43).
TRADITIONAL SAUNA USE Congratulations! You are ready to enjoy your sauna! You may use your sauna in a wet or dry fashion. A dry sauna means you do not sprinkle any water onto the stones, while wet means you increase the humidity of the room by sprinkling water on the stones. Please note that not much water is needed to achieve a wet sauna experience. The sauna as we know it originates in Finland.
®