® Auburn | Bluestone Sauna Installation & Owner’s Manual In addition to reading this manual through to the end before proceeding with assembly you may find our instruction video helpful. You can find it at: youtube.
® Read this entire manual through to the end before proceeding with the assembly. Thank you for your purchase of your Auburn / Bluestone sauna! Should you have any questions during assembly, please feel free to call us at 888.355.3050, or email sales@almostheaven.com. Regular business hours are 9-5 EST, M-F. Your Auburn / Bluestone Indoor Sauna is specifically designed to utilize your existing floor. As such, assembly is made very simple since the entire sauna sits on pre-fabricated rails and risers.
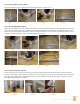
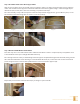
Step 1. Connect the Four Floor Risers Fasten the four floor risers together using the predrilled holes as a guide. (1-4) Image 1 Image 2 Image 3 Image 4 Step 2. Position Wall Support Rails Align each wall support so that the angled cuts make a corner (5). Each wall support has a predrilled hole. Fasten the front, back, and sides together (6 & 7) and lay the assembly squarely on top of the floor risers with the groove facing up (8).
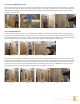
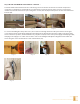
Step 4. Position Wall Panels C & D Position wall panel C into the groove of the back rail. Attach it to wall panel B by way of the tongue and groove fit (15 & 16). Secure it by tapping it into place with a rubber mallet. Position wall panel D into the groove to the right-side rail and push flush against the back rail (17). Being sure panels D and C are flush with each other, fasten them together using the 2” screws (18). Image 15 Image 16 Image 17 Image 18 Step 5.
Step 6. Assemble and Position Roof Support Rails Align each roof support rail so the angled cuts join together to make a 90-degree angle placing the longer supports on the sides and the shorter supports on the front and back. Fasten them together using 2” screws through the predrilled holes (26, 27 & 28). This is the same assembly you performed in Step 2. Place the assembly on top of the wall panels so that the wall panels fit snugly into the groove.
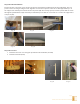
Step 7. Bench and LED Backrest Installation continued . . . Center the LED backrest between the two sides being sure it’s oriented so the shorter slat is down and position it vertically at a height most comfortable for you (typically 8-12” from the bench). Using a level to ensure proper installation, fasten the backrest into place using the 2” screws (34 & 35). Repeat this process for the lower side bench backrest (36).
Step 8. Position Roof Panels Position the two roof panels on top of the roof support rails with the predrilled holes facing up (42 & 43). The roof panels connect via tongue and groove fit. Align the connected roof panels on the rails so that approximately 1” of the support rails extend past each side of the roof panels (44). Once evenly spaced, secure the panels with 2” screws through the predrilled holes (45).
Step 10. Finishing Touches After the sauna has been installed, sweep down the inside to remove any sawdust and wood shavings, and then vacuum completely. Using a damp cloth with warm water, wipe down the entire sauna including the benches to remove any remaining dirt, dust and debris. Step 11. Heater Installation Please consult your heater manual for all heater installation information. All electrical connections must be done by a qualified licensed electrician.