
Installation & Assembly

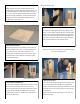

2. Posion the Floor Panel
Place the Floor Panel on a level surface. The Floor Panel is
labeled to indicate front vs. back. To avoid damaging your
oor, do not move the sauna aer assembly; prior to
assembly, select a locaon within reach of a power outlet
and pay aenon to the orientaon of the door to make
sure nothing will block it.
3. Place the Back and Le Panels
The Back Panel is disnguished by the Bench Support mount.
Have someone hold the Back Panel in place while you
posion the Le Panel. (The Le Panel should sit all the way
back and overlap the edge of the Back Panel.) Using the
provided screws and the pre-drilled holes, screw the Le
Panel into the Back Panel.
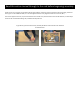
1. Lay out All Sauna Components
Package includes Floor Panel, mulple Wall Panels, pre-
assembled Bench Secons, Roof Panel with Dust Cover, and
Top Front Plate. Make sure that the Wall Panels are right
side up. The top of each panel is disnguished by the Roof
Panel Support edge; addionally, the pre-posioned cords
supplying power to the carbon ber heang panels will
emerge from the sauna at the top.
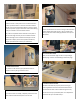
4. Place the Right Panel
The Right Panel is disnguished by its decorave groove at
the top. It is also thicker than the le panel and has a small
groove on the outside-facing wall. Posion the Right Panel
so that it sits all the way back and overlaps the edge of the
Back Panel. Using the provided screws and the pre-drilled
holes, screw the Right Panel into the Back Panel.
NOTE: You may choose to do Step 5 or Step 6 rst according
to your personal preference.
5. Place the Front Panel
The Le Panel will overlap the edge of the Front Panel, and
the Front Panel will overlap the edge of the Right Panel.
Using the provided screws and the pre-drilled holes, screw
the Le Panel into the Front Panel and the Front Panel into
the Right Panel.
Separate the door handles and reaach to the door, one
handle on each side.
Bench Support mount
Roof Panel Support edge