Radiant Series Infrared Sauna Installation & Owner’s Manual April 2016
Read this entire manual through to the end before beginning assembly. Thank you for your purchase of your Radiant Series Infrared Sauna. Should you have any questions during assembly, please feel free to give us a call at 888.355.3050, or e-mail sales@almostheaven.com. (Regular business hours 9-5 EST, M-F.) This manual applies to the LX1, LX2, and LX3 infrared sauna models. The panels and bench sizes will be different, but assembly is the same. We recommend watching the provided assembly video too.
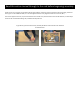
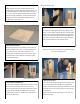
Roof Panel Support edge 1. Lay out All Sauna Components Package includes Floor Panel, multiple Wall Panels, preassembled Bench Sections, Roof Panel with Dust Cover, and Top Front Plate. Make sure that the Wall Panels are right side up. The top of each panel is distinguished by the Roof Panel Support edge; additionally, the pre-positioned cords supplying power to the carbon fiber heating panels will emerge from the sauna at the top. 4.
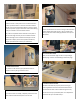
6. Install the Bench The Bench comes in two portions: the Front Bench Section and the Top Bench Section. Insert the Front Bench Section into the notch in the Left and Right Panels to hold it in place. Connect the power supply for the lower carbon fiber heating panel pre-installed on the Front Bench Section. Next, take the Top Bench Section and slide it into place so that the front edge sits firmly on the Front Bench Section and the back edge sits on the Rear Bench Support mount (referenced in Step 3).
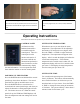
9. Install Screw Covers (optional) 10. Connect to Power Source Use a hammer to tap the provided screw covers into the predrilled holes in the Wall Panels to give the sauna a seamless finish. Your sauna plugs directly into a 110V, 20 Amp dedicated outlet. Operating Instructions Follow these instructions for operation of your Radiant Infrared Sauna. CONTROL PANEL All functions of the Radiant Sauna will be accessed through the control panel.
LIGHT CONTROL USB Press the LIGHT button to turn on both the interior light and the therapy light. To operate just one of either the interior light or therapy light, press the LIGHT button for 5 seconds until you see “2n” on the TIME display. While in the “2n” mode, pressing the TIME+ button turns the interior light on and off, and the TIME- turns the high intensity light therapy fixture on and off. The exterior accent light function operates along with the light therapy fixture.