
Installation & Assembly


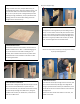

6. Install the Bench
The Bench comes in two porons: the Front Bench Secon
and the Top Bench Secon. Insert the Front Bench Secon
into the notch in the Le and Right Panels to hold it in place.
Connect the power supply for the lower carbon ber heang
panel pre-installed on the Front Bench Secon.
Next, take the Top Bench Secon and slide it into place so
that the front edge sits rmly on the Front Bench Secon
and the back edge sits on the Rear Bench Support mount
(referenced in Step 3). Secure the Top Bench Secon by
using (4) provided screws and the pre-drilled holes.
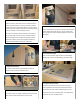
7d. Install the Roof Panel
Next, connect the heater plugs to their correspondingly
labeled plugs as well as the labeled light and audio plugs.
8. Install the Roof Front Plate
The Roof Front Plate will pop into posion in the gap
remaining between the Front Panel and the Roof Panel.
(Arrows indicate which side should be facing the front.)
Connect the front pre-posioned power cord. Replace the
Dust Cover that you removed in Step 7.
7a. Install the Roof Panel
First, make sure all of the top pre-posioned cords are
draped so that they hang outside the sauna.
7b. Install the Roof Panel
If you haven’t done so already, completely remove the Dust
Cover from the Roof Panel and place it to one side.
7c. Install the Roof Panel
Posion the Roof Panel so that it’s resng on the Roof Panel
Support edge (referenced in Step 1). On the inside of the
sauna, you’ll noce a decorave gap between the Top and
Wall Panels.