
Installation & Assembly

ROOM ASSEMBLY continued
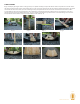
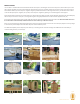
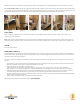
With the front and end pieces level and placed, begin placing staves up the sides of the sauna. Tap each board with a rubber mallet (23). Hammer
a 2” nail through every second or third stave into the front and back end panels to keep them from falling out (24). The fewer nails you use, the
easier disassembly will be should you ever need to take down the sauna. Stop using nails about halfway up the sides (25-26).
Note: If you have access to a pneumatic nailer this process will go faster.
BENCHES AND SUPPORTS
Note: You may choose to install benches and supports after the entire room has been assembled, but you may nd installation easier with the
space and light aorded at this point.
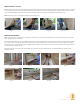
Each barrel sauna includes two pre-assembled benches that are side specic. Be sure the shorter bench slat is in front and against the doorframe
(27).Laythebenchesonthelowercleats,whicharemountedoneachendpanel(28).Fastenthebenchesintothecleatsusingthepredrilled
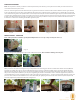
holes(29).Besuretocountersinkthefastenersslightlybelowthesurfaceofthewood.Forthe6’and8’models,fastenthecenterbenchsupport
tothebenchandtotheoor(30-31).
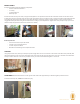
Mountthebackrestsatthelevelmostcomfortabletoyou,typically8-12”abovethebench.Usealevelwhilefasteningtoensureaneven
installation (32-33).
BARREL SAUNA INSTALLATION MANUAL
page 5
Image 23 Image 24 Image 25 Image 26
Image27 Image28 Image29 Image30
Image 31 Image 32 Image 33