
Installation & Assembly

ROOM ASSEMBLY
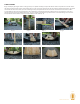
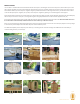
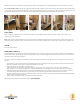
It is now time to assemble the barrel ends. Take the three front end pieces, including the door and two side pieces, and line them up so so that
the A stickers align with each other, and the B stickers align with each other (11-13). Gently tap the two side pieces in place into the door piece
with a rubber mallet (14). Secure the pieces together using the predrilled holes found on the edge of the barrel - you should use four screws to
secure the front panel pieces together (15-17). Next, secure the pieces together by putting one screw through the center support.
Next, take the three back end pieces and line them up so the C stickers align with each other, and the D stickers align with each other. Gently tap
thetwosidepiecesintothecenterpiece,securingthemtogetherusingthepredrilledholesinthehorizontalsupportbeams(18).
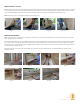
Position the front and back ends in the notches, with the horizontal support boards facing the inside of the sauna.
Note: the metal vents are to
be on the bottom on the back end, and the vent holes are to be on the top on the door end (19).
Place a level on the uppermost horizontal support boards on the front and back ends to ensure each end is level (20). Adjust as necessary. Image
21 shows what your assembly should look like at this point of the installation process.
You will nd it helpful to place a temporary stave at the top, connecting the two ends. This will align and stabilize the two ends while you
continue adding staves to your sauna (22).
BARREL SAUNA INSTALLATION MANUAL
page 4
Image 11 Image 12 Image 13
Image 14 Image 15 Image 16
vents
on top
vents
on bottom
Image17 Image18 Image19
Image 20 Image 21 Image 22