
Instructions / Assembly
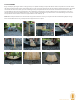
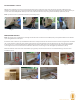

BAND ASSEMBLY
Each band assembly includes the following components:
• Stainless steel band w/brackets
• ½” nuts (2)
• Threaded rod
• Black vinyl caps
Position the bands around your sauna, evenly spaced (39). (On non-canopied barrel saunas the two end bands should cover the nails used to
hold the lower staves in place. On canopy models, evenly spaced bands won’t cover the front nails.) Insert the threaded rod through the bracket
and tighten the nuts by hand evenly until no longer able (40). Before continuing to tighten, verify the bands are evenly spaced and align or
stagger the bracket placement along the side of the sauna according to personal preference. Tighten nuts evenly and place vinyl caps over the
threaded rod (41-42).
Band requirements:
• 4’ and 5’ barrel saunas require two bands
• 6’ barrel saunas require three bands
• 8’ saunas require four bands
• Grandview and Lewisburg saunas require ve bands
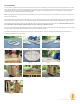
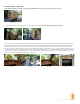
LED LIGHT
Locate the LED mounting brackets and mount them on the lower horizontal 2x4 brace on the back wall using the provided 2” screws. (43) Space
them approximately 20” apart (44) and clip the LED light into place so that it sits snug and centered on the lower brace.
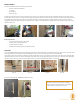
Using the provided screws, mount your waterproof power supply where it is most convenient on the exterior of the back sauna panel (45). Run
the female end of the power connection through the panel and connect the two (46). Plug the power source into a standard 110V outlet either
directly or with an extension cord. You may also wish to have your electrician hardwire the light to a 110V circuit.
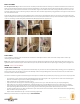
Install door handle (47-48) Note: Door handles may vary.
BARREL SAUNA INSTALLATION MANUAL
page 6
Image 39 Image 40 Image 41 Image 42
Image 45 Image 46
mount to rear
panel
Image 47 Image 48
Image 43 Image 44
Optional accessories for your sauna, including a
back rest, robe hook and much more are available
at almostheaven.com/sauna-accessories/.
20”