
Instructions / Assembly

Read this entire manual through to the end before proceeding with the assembly.
BARREL SAUNA INSTALLATION MANUAL
page 1
Congratulations on your purchase of an Almost Heaven barrel sauna!
The barrel sauna is unique to Almost Heaven, and has been our most
popular product for over 40 years. We are delighted you have decided
to partake in the sauna tradition!
A WORD ABOUT BARREL SAUNAS
While there are various barrel sauna models with dierent features, this
manual is designed for all Almost Heaven barrel saunas. The overall installation
instructions are the same for all classic and canopy barrel saunas, and even
though specic details may vary, we note where these details dier. Our sauna
kits are designed for ease of assembly by the customer, and every attempt has
been made to make assembly information as clear as possible.
For further guidance on assembly, please visit our YouTube channel at you-
tube.com/user/almostheavensauna.
If you have any questions about assembly, please do not hesitate to call us at
888-355-3050, or send us an email at sales@almostheaven.com.
Thank you again for choosing Almost Heaven. We are grateful for your busi-
ness and know you will have many years of enjoyment in your barrel sauna!
Your Almost Heaven barrel is designed for outdoor use although it is perfectly
ne to use it indoors. The lumber is naturally resistant to the elements. Rain
and sun will not damage the wood, although natural weathering and coloring
of the wood will occur over time. To preserve the initial look of the sauna, you
may choose to stain the exterior with a UV inhibiting stain. Consult your local
paint store for their recommendations on a particular stain for your sauna. We
do not recommend that you paint or varnish your sauna.
Properly assembled, you should not experience water dripping in the sauna.
You may experience water seepage, particularly on the top and sides of the
sauna. This is due to the porous nature of softwoods as well as the tongue and
groove design of the staves.
Water seepage or leakage will NOT harm the sauna and in most cases will
evaporate quickly in the hot, dry interior. If you wish to completely waterproof
your sauna, we suggest covering it with a shelter or structure with a roof.
Alternately, you may purchase an Almost Heaven rain jacket, which covers the
top of your barrel sauna.
Your barrel sauna will include the following:
c One full box of staves
c Drain stave
c Filler stave
c Six barrel end sections (three per barrel end panel)
c Heater and mounting hardware, which are found in the heater
box enclosed in the bag containing plaques
c Stones
c Hardware bag
c Doorknob assembly
c Two benches
c Two backrests
c Banding assembly*
c Cradles*
c Exterior bench assembly**
*Quantity varies by model
**Canopied barrel saunas only
®
ELECTRICAL REQUIREMENTS
All electrical wiring must be performed by A QUALIFIED LICENSED ELECTRI-
CIAN. Costs of an electrician can vary greatly depending on several factors,
including your sauna’s distance from your electrical service box, where you live
and cost of materials. We always recommend you get quotes from two to three
dierent licensed electricians before you begin installation in order to get the
best possible service and price.
Use copper wire with 90C insulation. Do not use aluminum wire to make the
connection. Consult with an electrician so you can determine the require-
ments for your particular situation. All wiring must conform to all national,
state and local codes and regulations.
For further information and instruction on your heater installation and opera-
tion, please consult the provided heater manual.
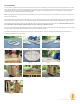
LOCATING THE SAUNA
Because the traditional sauna experience involves a heating-cooling-resting
regimen, it is important to plan ahead before installing your sauna. Our
method of construction allows you to place your barrel sauna in a wide variety
of settings.
Be sure the surface is rm and level, and can support the weight of the sauna
and its users (1,000+ lbs). A deck or concrete slab is certainly an option, but
if your sauna sits directly on the ground, be sure the cradle supports rest on
paver stones or something similar to prevent the cradles from settling into the
ground.
BASIC TOOLS
These tools are helpful in the assembly of your barrel sauna:
• Cordlessdrill
• Rubbermallet
• Hammer
• Framingsquare
• Screwdrivers(Phillipsandathead)
• Utilityknife
• Level
• Wrench
FIRST CONSIDERATIONS
Before beginning assembly, ensure that the installation surface is level. Many
garage,basementordeckoorsareslopedfordrainage.Aslightslopewill
not be an issue, but a more pronounced slope will require shimming to make
the sauna level. An uneven installation surface can result in poor-tting staves
leading to poor sauna function. Also, if the site might receive heavy winds, it is
recommended extra precautions are taken to ensure the door does not blow
open. In most situations, this factor will not be a concern.
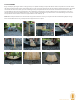
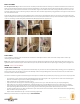
Unpack all staves. Identify the drain stave (it will have one or more drainage
holes bored into it). This will be the bottommost and rst stave used.