® Barrel Sauna Installation & Owner’s Manual In addition to reading this manual through to the end before proceeding with assembly you may find our instruction video helpful. You can find it at: youtube.
® Read this entire manual through to the end before proceeding with the assembly. Congratulations on your purchase of an Almost Heaven barrel sauna! The barrel sauna is unique to Almost Heaven, and has been our most popular product for over 40 years. We are delighted you have decided to partake in the sauna tradition! A WORD ABOUT BARREL SAUNAS While there are various barrel sauna models with different features, this manual is designed for all Almost Heaven barrel saunas.
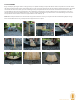
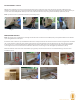
FLOOR ASSEMBLY Begin assembly by placing the cradles on the ground (1). For optimal assembly, it is important that the cradles are parallel to each other. Fasten the drain stave directly in the center of the cradles using 2” screws so the stave extends over the end cradles by approximately 4” (2-4). (For barrel saunas with more than two cradles, space the remaining cradle(s) evenly between the two end cradles. Secure the staves into these cradles as well.
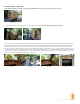
ROOM ASSEMBLY It is now time to assemble the barrel ends. Take the three front end pieces, including the door and two side pieces, and line them up so so that the A stickers align with each other, and the B stickers align with each other (11-13). Gently position the two wing sections into place on either side of the door panel - you may use a rubber mallet to achieve a snug fit. Secure the wings to the door section with 2” screws through the predrilled holes on the horizontal support beam (image 14).
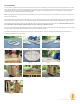
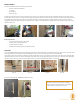
ROOM ASSEMBLY continued With the front and back pieces level and placed, begin placing staves up the sides of the sauna. Tap each board with a rubber mallet (21). Hammer a 2” nail through every second or third stave into the front and back end panels to keep them from falling out (22). The fewer nails you use, the easier disassembly will be should you ever need to take down the sauna. Stop using nails about halfway up the sides (23-24).
ROOM ASSEMBLY…CONTINUED Note: at this point in the installation, you may find it helpful to tie a loose rope or strap around your sauna. (32) Image 32 Continue placing staves, tapping them in place with a rubber mallet (33-34). Do not nail the remaining staves in place. Image 33 Image 34 When you arrive to the point of closing the room, you may find that the remaining space will not accommodate a full-size stave (35). We have provided a set of filler staves cut into various widths (36).
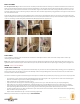
BAND ASSEMBLY Each band assembly includes the following components: • Stainless steel band w/brackets • ½” nuts (2) • Threaded rod • Black vinyl caps Position the bands around your sauna, evenly spaced (39). (On non-canopied barrel saunas the two end bands should cover the nails used to hold the lower staves in place. On canopy models, evenly spaced bands won’t cover the front nails.) Insert the threaded rod through the bracket and tighten the nuts by hand evenly until no longer able (40).
BENCH ASSEMBLY For canopied models only: Locate the exterior bench cleat with pre-drilled holes. Measure vertically 17.5” from the bottom of the door frame and make a pencil mark. (49) At this mark, measure horizontally approximately 3.75” and make a mark (50). This will be the upper and interior corner of the exterior bench cleat. Position the described corner at this mark.