
Installation Guide

WOOD BURNING HEATER INSTALLATION MANUAL
page 4
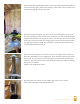
5. Using a string with slight weight located over the center of the adaptor pipe, nd the
center point at the ceiling of the sauna and place a mark. Drill a 1/2” hole at this point
all the way through the ceiling of the sauna.
6. Cut out the template using the 1:25 oval circle. Position the template on the top of
the sauna, putting the center point directly over the hole you drilled and squaring the
template with the sauna. The long portion of the oval should be directed to the sides
of the sauna, not the front and rear. Using a jig saw, cut a hole in the sauna following
the edge of the template. NOTE: Place a blanket or similar over the sauna heater to
catch the debris that falls as you cut.
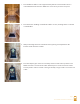
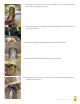
7. Place the wood ceiling frame over the heater prior to inserting either the chimney or
water tank, depending on your conguration. These instructions will assume a water
tank is used. If you do not have a water tank then your chimney will include a short
extension. Attach the short section to the chimney to lengthen it and place chimney
directly over the adaptor.
(chimney only conguration shown.)
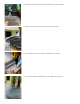
8. Place the water tank securely over the adaptor pipe on the stove as shown.
(Water tank conguration shown for following steps.)