® Barrel Sauna Wood-Burning Heater Installation & Owner’s Manual
® Read this entire manual through to the end before proceeding with the assembly. The following instructions explain how to install a wood-burning heater in a barrel sauna. The instructions apply to various barrel sauna diameters and sizes, and while some of the images may not appear to exactly match your own sauna, the process is the same. At least a day prior to installing your heater you should burn wood in the heater prior to installation.
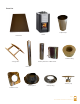
Parts List Adaptor Pipe Heater Heater Base Insulation Ring Chimney Extension or Water Tank Ceiling Frame Chimney Chimney Cap Chimney Boot Chimney Ring Insulation Cover page 2 WOOD BURNING HEATER INSTALLATION MANUAL
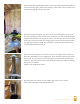
1. Place the flat wood floor section approximately 4” from rear wall and be sure it is centered between the benches. NOTE: It is not necessary to anchor it in place. 2. Place the heater “bedding” on the flat wood floor section, ensuring that it is centered on the flat floor. 3. After pre-burning the heater outside the sauna, placing it evenly between the benches and 6” from the rear wall. 4. Place the adaptor pipe on the stove chimney outlet located on the top of the stove.
. Using a string with slight weight located over the center of the adaptor pipe, find the center point at the ceiling of the sauna and place a mark. Drill a 1/2” hole at this point all the way through the ceiling of the sauna. 6. Cut out the template using the 1:25 oval circle. Position the template on the top of the sauna, putting the center point directly over the hole you drilled and squaring the template with the sauna.
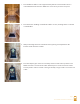
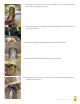
9. Next place the chimney over the water tank. NOTE: The open end of the chimney with insulation showing will point up. 10. Connect the two pieces of insulation using the included bands and lower over the chimney from the top. 11. Position the insulation rink through the hole in the sauna as shown. 12. Lift the wood frame up and screw into the ceiling as shown. 13. Attach the stainless cover plates to the frame to conceal the insulation ring with included screws as shown.
14. Slip the boot down over the chimney from the outside as shown. 15. Apply a bead of silicone to the underside of the boot lip. 16. Screw the boot to the roof with included screws as shown. 17. Secure the clamp around the boot so it is tight to the chimney.
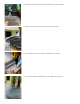
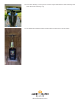
18. Place the chimney cover in place over the exposed insulation of the chimney and then attach the chimney cap. 19. The finished installation with a water tank from the interior of the sauna. ® almostheaven.