
Instructions / Assembly

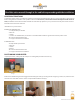


a. For barrel saunas,theheatermountingholesarepre-drilled(5).
b. For indoor saunas,thescrewsshouldbemounted22”otheoor,andspaced15.25”apartapproximatelycenteredabovethe
ventholes(ifpresent).Itisnethattheheateriscoveringtheholesasventilationstilloccurs(6).
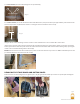
Hangtheheateronthemountingscrewstoensureitislevelandthatitsbasesits5-7”otheoorofthesauna.
If these criteria are met, make a mark on the wall of the sauna directly behind one of the rubber gaskets on the lower back of the
heater(7);thiswillbewherethepowerentersthesauna.Taketheheaterothewallandremovetherubbergasket,exposingthe
cutout.Itdoesnotmatterwhichgasketisremoved(8).
NOTE: While this location is the most common, the power can enter the sauna at any location. It is not recommended you use the
pre-drilled vent holes as an entrance for the conduit.
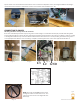
REMOVING THE STONE GUARD AND BOTTOM COVER
Removethetwoscrewsholdingthestoneguardinplace.Prytheguardbackandliftuptoremoveit.Cliptheziptieholdingthe
metalsensorhousingfromtheelementsandsetitasideforlaterinstallation(9–11).
KIP HEATER INSTALLATION MANUAL
page 3
Image 7 Image 8
Image 5
Image 6
Image9 Image10Image11
Pre-drilled holes
22”
15 ¼ ”