
Installation Guide


Read this entire manual through to the end before proceeding with the assembly.
Bridgeport |Braxton Installation & Owner’s Manual
Note: While there are cosmetic and feature variations of the Bridgeport and Braxton models assembly is the
same except where noted.
Thank you for your purchase of your Bridgeport |Braxton sauna! Should you have any questions during
assembly, please feel free to call us at 888.355.3050, or email sales@almostheaven.com. Regular business
hours are 9-5 EST, M-F.
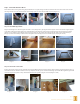
Your Bridgeport |Braxton Indoor Sauna is specically designed to utilize your existing oor. As such,
assembly is made very simple since the entire sauna sits on pre-fabricated rails and risers. Your sauna can be
assembled on any surface that is rm and at, including concrete, ceramic, vinyl, laminate or tile. Installation
on a carpeted surface is not recommended.
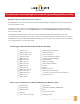
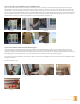
Your Bridgeport | Braxton kit should include the following:
BRIDGEPORT | BRAXTON SAUNA INSTALLATION MANUAL
page 1
These tools are required to assemble your Bridgeport | Braxton sauna:
c Cordless drill
c Tape measure
c Rubber mallet
c Hammer
c 1/2” or 5/8” Forstner bit
c Utility knife
c Screwdriver (phillips and athead)
c Level
c Step stool or ladder
c Framing square
c 4 Floor risers
c 4 Wall support rails
c 4 Roof support rails
c 3 Roof sections
c Wall section A
c Wall section B
c Wall section C
c Wall section D
c Wall section E
c Wall section F
c Window section G
c Door section H
c Window section I
c Wall section J
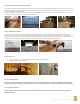
c Upper bench
c Extra upper bench support
c Lower long bench
c Lower side bench
c 3 Lower side bench supports
c Long backrest w/LED light
c Short backrest
c LED power supply
c Door handle assembly
c Heater
c Stones
c Wall sensor cover
c Hardware bag containing
2” screws, 2.5” bench screws, and trim nails
c Heater fence kit