Bridgeport | Braxton Sauna Installation & Owner’s Manual
Read this entire manual through to the end before proceeding with the assembly. Bridgeport | Braxton Installation & Owner’s Manual Note: While there are cosmetic and feature variations of the Bridgeport and Braxton models assembly is the same except where noted. Thank you for your purchase of your Bridgeport | Braxton sauna! Should you have any questions during assembly, please feel free to call us at 888.355.3050, or email sales@almostheaven.com. Regular business hours are 9-5 EST, M-F.
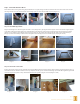
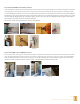
Step 1. Connect the Four Floor Risers Fasten the four floor risers together using the predrilled holes as a guide, being sure the two shorter boards are located on the sides and the two longer boards are on the front and back. Use a framing square to ensure the assembly is square. (Images 1-5) Image 1 Image 2 Image 3 Image 4 Image 5 Step 2.
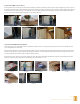
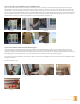
Step 4. Position Wall Sections C, D, & E Position wall section C into the groove of the back rail. Attach it to wall section B by way of the tongue and groove fit (Images 19 & 20). Secure it by tapping it into place with a rubber mallet. Repeat this step for wall section D, again tapping it into place with a rubber mallet (Images 21 & 22). Position wall section E into the groove to the right side rail and push flush against the back rail (Image 23).
Step 5. Bench and LED Backrest Installation continued Center the LED backrest between the two sides being sure it’s oriented so the shorter slat is down and position it vertically at a height most comfortable for you (typically 8-12” from the bench). Using a level to ensure proper installation, fasten the backrest into place using the 2” screws (Images 34 & 35).
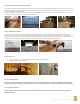
Step 7. Position Door Section H, Window Section I and Wall Section J Place door section H onto the front rail orienting it so that the door opens according to your preference (Image 45). Snip the securing rope (Image 46). Door section H connects to window section G via tongue and groove so there is no need for screws. Gently tap it into place with a rubber mallet to secure the fit (Image 47).
Step 9. Assemble and Position Roof Support Rails Align each roof support rail so the angled cuts join together to make a 90 degree angle (Image 56), placing the shorter supports on the sides and the longer supports on the front and back. Fasten them together using 2” screws through the predrilled holes (Image 57). Use a framing square to ensure the assembly is square. Place the assembly on top of the wall sections so that the wall sections fit snugly into the groove (Image 58).
TRADITIONAL SAUNA USE Congratulations! You are ready to enjoy your sauna! You may use your sauna in a wet or dry fashion. A dry sauna means you do not sprinkle any water onto the stones, while wet means you increase the humidity of the room by sprinkling water on the stones. Please note that not much water is needed to achieve a wet sauna experience. The sauna as we know it originates in Finland.