® Allworx User’s Guide Release 7.
No part of this publication may be reproduced, stored in a retrieval system, or transmitted, in any form or by any means, electronic, mechanical, photocopy, recording, or otherwise without the prior written permission of Allworx Corp. © 2013 Allworx Corp, a Windstream company. All rights reserved. All other names may be trademarks or registered trademarks of their respective owners.
User’s Guide – Release 7.5 Table of Contents 1 Message Center ..........................................................................................................................1 1.1 1.2 1.3 1.4 2 Accessing Your Message Center Inbox ..................................................................................................... 1 Using the Audio Message Center ..............................................................................................................
User’s Guide – Release 7.5 1 Message Center The Allworx Message Center provides unified messaging for Allworx users. If you have voicemail, the Messages button on your Allworx phone will be lit. If you have a Messages PFK programmed to monitor another mailbox, the PFK will light when messages are in that mailbox. 1.
User’s Guide – Release 7.5 • • 1.1.2 Access an outside line from the Message Center Place internal calls without leaving the Message Center Audio Message Center Pressing the Messages button twice will place a call to the Message Center. You can also access the audio Message Center by dialing x404 † from any phone. When prompted, enter your PIN using the telephone keypad, followed by the # key. If you do not know your PIN, see the System Administrator.
User’s Guide – Release 7.5 1.2 Using the Audio Message Center 1.2.
User’s Guide – Release 7.5 2. The system will prompt you to enter the first extension to which you wish to forward the message. The system will play the selected user’s name then prompt for the next extension. You can enter another extension, press 9 † to forward the message to every voicemail user (if enabled), or press the # key to finish. Repeat this process until all extensions are entered. 3. You will be prompted to record a message to precede the forwarded message. 4.
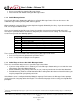
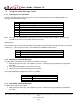
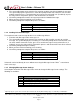
User’s Guide – Release 7.5 1.2.6 Changing Presence Setting 1. Select Option 1 to change the Presence setting. The current Presence will be announced. 2. Select one of the following options: Key 1 2 3 4 5 6 7 1.2.7 Function In Office At A Meeting On Vacation On Business Trip At Home Away Busy Change the Recording of Your Name 1. Select Option 2 to change the recording of your name.
User’s Guide – Release 7.5 7 To manage your Busy greeting Note: The default greeting is used for all presences that do not already have a greeting. 3. Select the greeting to be managed. If a greeting has not been recorded the only option available will be option 1 “To record your {Presence} greeting”.
User’s Guide – Release 7.5 1.2.11 Placing Internal Calls within Message Center From the main Message Center menu, you can call any internal extension. Dial * plus the extension. Note: The Message Center audio prompts do not mention this option. For Example: Mary calls her voicemail from home. She listens to three new messages and then decides she needs to call John. Mary enters *101 and is immediately transferred to John. 1.
User’s Guide – Release 7.5 6. Press 4: To prevent callers from leaving messages To configure Announce Only Call Handling in My Allworx Manager 1. If you have not already done so, record a greeting for the Presence that will be used for Announce Only. Do this using the procedure in Section 1.4.3, Manage Greetings. After you have completed recording and saving the greeting, hang up. 2. Open and log into My Allworx Manager using your PIN. See Section 2, My Allworx Manager, for instructions. 3.
User’s Guide – Release 7.5 2 My Allworx Manager The Allworx system provides an internal website for users to access system information and configure certain personal setting. The following items are available: • My Account • My Call Details • My Conferences • My Extension • My Presence • My Products • Directory • Distribution Lists • Call Queue Statistics • Phone Functions Note: Some items in the list above are available as tabs on the main My Allworx Manager page.
User’s Guide – Release 7.5 2.3 Available Information and Settings Some of these are privileged options that must be enabled for you by the System Administrator. My Account Allows you to change your password and PIN. Note: You have both a PIN and a password. The PIN is for Hot Desk logins, logging into the Message Center, and logging into ACD Queues.
User’s Guide – Release 7.5 Phone Features Provides usage instructions for Allworx phone and calling features. This is particularly valuable if the System Administrator has changed the system extension settings from their defaults since the instructions in this guide use the default extensions for system feature dialing. Figure 2.1 Toll Free 1-866-ALLWORX • 585-421-3850 • www.allworx.com © 2013 Allworx Corp, a Windstream company. All rights reserved.
User’s Guide – Release 7.5 3 My Conferences The Allworx Conference Center provides a method of reserving conference bridges provided by the Allworx server. It also offers password-restricted access to the conference for attendees. The Allworx Conference Center allows for both scheduled and unscheduled conferences. Unscheduled conferences are considered unplanned or not previously scheduled using the scheduling feature. Specific Conference IDs have been designated for the unscheduled conferences.
User’s Guide – Release 7.5 • Moderator – Can modify, delete, end the conference, view statistics, and disconnect participants. A user can be a Moderator without having permission to create conferences. • State o Active – A scheduled conference that is available to be joined by attendees. It will remain active until the duration has been reached and all attendees have exited. o Queued – A conference that has not reached its scheduled start time.
User’s Guide – Release 7.5 Figure 3.1 Note: All expired or cancelled conferences that are older than 30 days will be automatically deleted the next time the server is rebooted. 3.1.2 Creator / Moderator The Creator and Moderator of a conference can: • End an active conference, which will disconnect all members currently logged in. • Modify a conference. • Delete a conference. • View the participants and the time they joined the active conference.
User’s Guide – Release 7.5 3.2 Schedule a Conference 1. Log into My Allworx Manager using your password. (See Section 2.2, Logging In, under My Allworx Manager, for instructions) 2. Select the My Conference tab then click the add conference link. If the link is not shown, you do not have permission to create conferences 3. Enter a description. 4. Assign a password to be given to all conference attendees or use the default password provided. 5.
User’s Guide – Release 7.5 o † Have another user transfer the incoming call to ext 408 . Note: If a busy signal is heard when calling the conference extension, it is possible that the Conference Center feature has not purchased or implemented. See the System Administrator for more information. When the caller arrives to the Conference Center, a welcome message will be played, followed by a prompt asking for the Conference ID.
User’s Guide – Release 7.5 4 My Extension The most commonly used routing of a personal extension is to ring the person's phone and if it is not answered, forward the call to the person's voicemail. However, other special purpose routing is possible in the Allworx system. Examples of these optional routes are: • Presence-Specific Routing: When on vacation, forward the call directly to voicemail. • Multiple Destinations: Ring multiple phones at the same time simultaneously.
User’s Guide – Release 7.5 4.1 Basic Routing The building blocks of a call route are the Connection Attempts, Destinations, and Finally route. In the typical call route mentioned before (ring phone, forward to voicemail), there is one Connection Attempt where the Destination is the handset of the primary extension and the Finally route is the voicemail inbox. Each of these building blocks can be changed in My Allworx Manager (See Section 2, My Allworx Manager for more information). 1.
User’s Guide – Release 7.5 Figure 4.2 4.2 Multiple Destinations To ring several phones at once, repeat section 4.1, Basic Routing procedure, not including step 7. 1. Under any connection attempt, click the add a destination link. This will create another destination drop down menu. 2. Pull down the menu and choose an additional phone to ring along with the phone that was previously chosen. 3. Repeat the steps above to add more phones to ring simultaneously for the connection attempt.
User’s Guide – Release 7.5 4. Once satisfied with the selections, click the Update Call Route button at the bottom of the page. To see the button, scrolling down may be required. Figure 4.3 4.3 Multiple Connection Attempts To have alternate phones ring when the handset(s) in the First connection attempt is not answered, create additional connection attempts to receive the calls. Repeat section 4.2, Multiple Destinations. 1.
User’s Guide – Release 7.5 Figure 4.5 4.4 On-Busy Routing To avoid having callers hear a busy signal, an alternative On Busy call route can be configured. 1. Follow section 4.1, Basic Routing procedure, to set up the initial call route for the presence. Once the main My Extensions page is displayed select the Modify link of the presence call route. 2. Select the Modify On Busy Route radio button. 3. Select the Use Call Route below: radio button. A new call route section will appear. 4.
User’s Guide – Release 7.5 Figure 4.6 4.5 Follow-Me-Anywhere Calls can be forwarded to other phones outside of the Allworx System such as cell or home phones. If the recipient does not answer the call, it will be directed back to the system in order to follow the rest of the configured call route. In following the rest of the call route, unanswered Follow Me calls may eventually be directed to the Finally route which permits callers to leave messages in the default voicemail inbox.
User’s Guide – Release 7.5 3. Select the desired number of rings. The Follow Me feature requires the recipient to listen to a message and enter a code. Therefore, increment the normal number of rings by two in order to give the recipient extra time to answer the call. 4. Once satisfied with the call route selections, click the Update Call Route button at the bottom of the page. To see the button, scrolling down may be required. Figure 4.
User’s Guide – Release 7.5 • While active on a call, the recipient can blind transfer the caller to their primary phone using *7. • Your primary phone for quick transfer is independent of your regular phone and must be set up, separately. See the System Administrator to designate the phone to be used for Quick Transfer. Note: The consult and transfer features are not available for certain outside lines. See the System Administrator for more information. 4.
User’s Guide – Release 7.5 4.7 Hot Desk Routing If you have ever logged into a shared phone as a Hot Desk user, your call route will include “Hot Desk” as a destination. If you intend to continue logging into phones using Hot Desking, do not modify these entries. Toll Free 1-866-ALLWORX • 585-421-3850 • www.allworx.com © 2013 Allworx Corp, a Windstream company. All rights reserved. All other names may be trademarks or registered trademarks of their respective owners.
User’s Guide – Release 7.5 5 My Presence The Presence setting controls the routing of calls to your extension and will display your status to other users in My Allworx Manager. Calls to your extension will automatically be routed based on your new Presence and your previously-configured Call Routes. 5.1 Changing Presence via the My Allworx Manager page 1. Log into My Allworx Manager using your password. 2. Select the My Presence tab. 3.