Allworx Call Assistant 2.
No part of this publication may be reproduced, stored in a retrieval system, or transmitted, in any form or by any means, electronic, mechanical, photocopy, recording, or otherwise without the prior written permission of Allworx. © 2013 Allworx Corp, a Windstream company. All rights reserved. All other names may be trademarks or registered trademarks of their respective owners.
Call Assistant 2.5 Quick Reference Guide Table of Contents 1 2 3 Introduction .................................................................................................................... 1 Logging In ...................................................................................................................... 2 Views ............................................................................................................................. 3 3.1 My Calls View .............................
Call Assistant 2.5 Quick Reference Guide - This page intentionally left blank - Toll Free 1-866-ALLWORX • 585-421-3850 • www.allworx.com © 2013 Allworx Corp, a Windstream company. All rights reserved. All other names may be trademarks or registered trademarks of their respective owners.
Call Assistant 2.5 Quick Reference Guide 1 Introduction The Allworx Call Assistant is a graphical application intended to be used by an individual functioning in the role of an operator or receptionist. Call Assistant allows operators and receptionists to monitor the state of every line in the system and dispatch calls by answering, transferring, parking or sending them to voicemail. Call Assistant is a fully-integrated PC software tool.
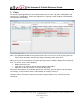
Call Assistant 2.5 Quick Reference Guide 2 Logging In When starting Call Assistant, log in with the username that was assigned to you on the Allworx server and with your password. Use the password that you would use to log into My Allworx Manager, not the PIN you would use to log into the Message Center. You must enter the IP address of your Allworx server. In most cases, you can find the IP address using the automatic Search button. If that is not successful, as your System Administrator.
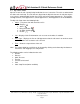
Call Assistant 2.5 Quick Reference Guide 3 Views The Call Assistant application has three distinct work areas or views: My Calls, Switchboard, and Outside Lines (if applicable). Each view, explained in a separate section, displays call information and expedites call handling. Note: The application window and each of the views can be resized. To resize the view, place the mouse on the boundary and click-and-drag the boundary to the desired size.
Call Assistant 2.5 Quick Reference Guide 3.1 My Calls View My Calls shows all calls currently being handled at the user’s extension. The calls are ordered with the oldest calls at the top. The calls that are directed to the My Calls view are all calls that ring the user’s phone’s programmable function keys (PFK) and Call Assistant Appearances. This includes Call Appearances, Line Appearances, Queue Appearances, ACD Appearances and Call Monitors.
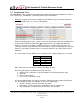
Call Assistant 2.5 Quick Reference Guide 3.2 Switchboard View The Switchboard view is a tabbed area showing the Company Directory, Auto Attendants, Parked Calls, Call Queues, Call Monitors, Call History, Active Calls and Favorites. • Directory – displays all extensions configured in the Allworx system. Each box shows the extension number and user’s name (or description). Extensions display phone icons when assigned as the internal caller ID of an Allworx IP or analog handset.
Call Assistant 2.5 Quick Reference Guide The Directory tab can be used to dial, answer a ringing call or transfer calls to the listed extensions. • Auto Attend – lists all of the Auto Attendants configured on the Allworx system. This allows for the transfer of calls by selecting Transfer on the toolbar then the desired Auto Attendant. • Parked Calls – lists all calls currently parked. Parked calls can be picked up by doubleclicking on them.
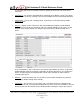
Call Assistant 2.5 Quick Reference Guide other various dialing methods. Only calls that were completed when Call Assistant was open are displayed. • Active Calls – lists active calls on the Allworx system. When the information is available, the active call information includes: start time, duration, originating caller ID and destination caller ID. The System Administrator can modify users’ access to the Active Calls display.
Call Assistant 2.5 Quick Reference Guide 4 Product Features / Toolbar Options Toolbar options are enabled or disabled based on the status of the call currently selected in the My Calls view or Call History tab. To perform any of the call options on the Call Assistant toolbar, a call must be selected. The selected call is indicated with a blue border. Inbound call unselected Active call selected 4.1 Answer An inbound call will be displayed in the My Call view as ringing.
Call Assistant 2.5 Quick Reference Guide 1. Click Transfer on the toolbar. 2. Click the targeted extension in the Directory, Auto Attend, Queues, Monitors or Favorites tab. Note: Alternatively, the Transfer operation can be performed by dragging the call to the destination on one of the five tabs. 3. The call status changes to ‘Ended’ in My Calls view and is eventually removed from the view. Attended transfer – transfer to a targeted extension with an announcement to the target user: 1.
Call Assistant 2.5 Quick Reference Guide 1. Select the targeted extension in the Directory view. 2. Select the Intercom toolbar option. 3. The phone will announce the connection by ringing. After the ring, begin speaking. 4. The person you called will hear you over the speaker. When the Intercom option is used with non-Allworx handsets, it places a call to the phone rather than acting as an intercom. 4.9 Page The Call Assistant user can broadcast a message to multiple phones using the Page option.
Call Assistant 2.5 Quick Reference Guide • • Set the audio file compression format (G.711 u-law or PCM) Set the recording volume level Switchboard Options – enable or disable the tabs displayed in the switchboard view. All tabs are displayed by default. At least one tab must be enabled. Enable or disabled the Dialpad display from this option. Favorites Selections – add or remove items displayed in the Favorites tab. No items are displayed by default. 4.