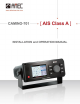
User's Manual
Manuals
Brands
Alltek Marine Electronics Manuals
Electronics
AIS Class A Transponder
1
2
3
4
5
6
7
8
9
10
3
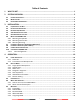
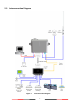
2.3
Interconnection Dia
gram
Figure 1
Inte
rconnection Diagr
am
1
...
...
7
8
9
10
11
...
...
112