NuDOG-MPT User’s Manual V 1.0.
Xtramus Technologies E-mail: sales@xtramus.com Web: http://www.xtramus.com Phone: +886-2-8227-6611 Fax: +886-2-8227-6622 Copyright Copyright © 2007 Xtramus Technologies. All Rights Reserved. The information contained in this document is the property of Xtramus Technologies. No part of this publication may be reproduced, stored in a retrieval system, or transmitted, in any form or by any means, without the prior written permission of Xtramus Technologies.
CONTENTS 1. Introduction................................................................................................................ 1 1.1 Specifications........................................................................................................1 1.2 Function Description.............................................................................................1 2. Software Installation and Uninstallation....................................................................2 2.1 Installation.
1. Introduction NuDOG-MPT makes NuDOG an accurate and efficient Ethernet tester for batch tasks. Various packet generation and reception testing items could be set for pre-defined testing modules. The utility of NuDOG-MPT is easy to load testing models. All simple and visualized results and detailed testing logs are available to access based on requirements. NuDOG-MPT is a powerful and convenient tool to apply on NuDOG for batch tests. 1.
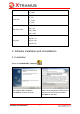
BC_100H BC_100F FT_10H FT_10F Filter Test FT_100H FT_100F CRC_10H CRC_10F CRC Error Test CRC_100H CRC_100F Ping (A→B) Ping (B→A) Ping Test Ping (A→N) Ping (B→N) 2. Software Installation and Uninstallation 2.1 Installation Double click NuDOG-MPT_setup.exe . Start NuDOG-MPT installation. Read License Agreement carefully before Click Next to continue next step. selecting to accept all terms and then click Next for next step. ® XTRAMUS TECHNOLOGIES 2 E-Mail: sales@xtramus.com Http://www.Xtramus.
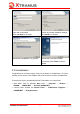
Input user’s information. Confirm and review installation settings. Then click Next for next step. Click Install for next step. NuDOG-MPT Installation is in progress. NuDOG-MPT has been Installed successfully. Click Finish to exit the Wizard. 2.2 Uninstallation If applications do not work properly, it may be necessary to uninstall them. Or before updating a new version of the software, the previous version must be uninstalled first.
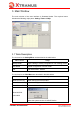
3. Main Window The main window of the user interface is illustrated below. The top-level menu includes the following major parts: Setting, View and Help. 3.1 Table Description The choices for the Setting Menu are described in the table below: Menu Choice Usage Modify Model Open a dialog to modify configurations of an existing model. New Model Create configuration of a new model.
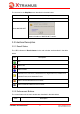
The choices for the Help Menu are described in the table below: Menu Choice Usage Read Me Open an introduction file about settings. About NuDOG-MPT Show information of NuDOG-MPT version. 3.2 Interface Description 3.2.1 Result Status The LED indicators of Result Status in the main window are described in the table below. Item Description Pass Frame Loss Frame Exceed Receives Error: CRC Error, Checksum Error, Alignment Error, Dribble Error, Oversize Frame, and Undersize Frame.
Loads settings of the model corresponding to DUT. Reloads the same model if the parameters have been modified. Connects to NuDOG. Starts testing. Stops testing. Exits the program. First, click button to open an .ini file. Click button to run the test. 3.2.3 Model Name Go to Setting menu and click New Model to bring out the window below. Input a name to create a new model, than click OK button to exit. 3.2.
3.2.5 Time Time table displays the clock (the current time), what time the test starts and finishes, and the total time the test takes. 3.2.6 Iteration Setting Input the total number of times the test to be run, including total loop, loop for current, pass time and fail time. 3.2.7 Memo Memo box on the upper right corner shows step by step as each process carries out. ® XTRAMUS TECHNOLOGIES 7 E-Mail: sales@xtramus.com Http://www.Xtramus.
3.2.8 Counter Window This table shows detailed transmit and receive counters and any error for Port A and Port B during every task. 3.2.9 Task Table The lower middle table shows which Task selected to be tested, and for each test loop, every relative task with Start (what time to start the test), End (what time to end the ® XTRAMUS TECHNOLOGIES 8 E-Mail: sales@xtramus.com Http://www.Xtramus.
test), Time Used (how much time totally used), and Remark states the task result in Pass, Fail or Stopped. 3.2.10 LED Panel LED panel on the lower right shows every task result. Gray light means frame is not chosen to be tested or not tested yet; green light means frame tests pass; red light means frame tests fail. 4. Function Setting 4.1 New Model Go to Toolbar to select Setting> New Model. Create and type in a new model name and then click OK to bring out the Window below.
4.1.1 Configuration Setup Configuration Setup includes two settings, Environment and Tasks. Environment refers to the surroundings and conditions of the configuration settings while Tasks refers to which task(s) selected to be tested. Task Setting contains two parts. The upper half is Test Scenarios and Task Selected. The lower half covers 3 tabs: Transmit (transmitting parameters), Media Type and Learning and Other. 4.1.2 Task Setting 4.1.2.
4.1.2.2 Task Selected # The column of Task Selected # shows what tests are chosen to be tested in order. or Down button Click the desired test and then click Up button arrange the selected tasks in order. Click Reset to button to clear all tasks selected. When the settings complete, make sure to click Apply button to enable all to save settings and go to the next the settings and then click Save button step. 4.1.2.3 Transmit ® XTRAMUS TECHNOLOGIES 11 E-Mail: sales@xtramus.com Http://www.
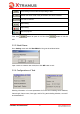
In Transmit tab, the main purpose is to edit frame settings to transmit. More details are elaborated below. There are two options for frame length: Random and Fixed. The bytes of frame length range from 60 to 1514 without CRC. There are eight types of frame pattern to choose from: 7 pre-set ones and Random as left display. Scroll down to click mouse to complete choosing. Set up the numbers of frame count in bit-time in this task. Set up frame gap in bit-time for the task.
4.1.2.4 Media Type Change Media Type allows changing media type in Nway or in Force. Or simply select OFF to stay with the default. Assign duration in seconds to wait for media type being changed. The time may vary with DUT type. There are three types for link status. OFF is to run the tasks without checking the link status, ON is to check if the link status is normal and then run the tasks, ON/Alarm means to check if the link status is normal and an error window as below would appear if not.
In LED Check Setting, check the box of Enable LED Check Reminder to activate the four default settings. A message window will pop up every time before test to inquire about LED indicators being accurate. 4.1.2.5 Learning and Other Select Learning and Other tab to set up Learning parameters and VLAN Tag setting. ® XTRAMUS TECHNOLOGIES 14 E-Mail: sales@xtramus.com Http://www.Xtramus.
In Learning Setting, check the box of Enable Learning to set up Frame Count, Frame Gap and Tx Pkt Timeout for sending learning packets before task. Halt on Error determines whether the test should be carried on or stopped when an error occurs. Allow Frame Loss determines the number of frame loss allowed to establish test criterion. In VALN Setting, check the box of Enable VLAN Tag to enables to set up VLAN Tag as the four listed items. ® XTRAMUS TECHNOLOGIES 15 E-Mail: sales@xtramus.com Http://www.
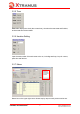
4.1.3 Task Ping When Ping task is selected, the lower half appears the settings for Ping. The connection directions are available from Port A to Port B, from Port B to Port A, or from Port A or B to a connected switch or a network device. 4.1.3.1 VLAN Setting Check the box of Enable VLAN Tag to activate and input the numbers. 4.1.3.2 IP Addresses, SubMask and Gateway Set up Port A and Port B’s IP addresses.
4.1.4 Environment Setting Environment setting includes Log File Setting, Check Link Wait Time and Check Result Wait Time to apply to the configuration. Assign Prefix and Suffix in Log File Setting. Prefix refers to put a header (default: Report) in a log filename. Time stamp indicates the time recorded for saving the log file, Serial number is the initial sequence number of a DUT, and Bar code is the barcode of a DUT. After the configuration settings are applied and saved, the tasks can be started.
A window as below will pop up if Bar code is chosen in Suffix. Input the bar code of the DUT in blank and click OK to exit. Assign the number of seconds to wait before checking the link status. Assign the number of seconds to wait to check with the result. When modify the settings through this dialog and save new settings. The new configurations will not be applied until clicking the Reload button ® XTRAMUS TECHNOLOGIES 18 . E-Mail: sales@xtramus.com Http://www.Xtramus.
File name config is usually set as default for a new file name. Remember to save the config file after renewing a model. 4.2 Load Model Load the model corresponding to DUT before test. Click the Open button to open a *.ini file. ® XTRAMUS TECHNOLOGIES 19 E-Mail: sales@xtramus.com Http://www.Xtramus.
4.3 Modify Model After loading a model, Click Setting on the top menu and choose Modify Model. Its main purpose is to bring out existing configuration files to choose and to modify previous frame settings. As the same with New Model, there are two sections in Configuration Setup: Environment and Tasks. ® XTRAMUS TECHNOLOGIES 20 E-Mail: sales@xtramus.com Http://www.Xtramus.
In Task Setting, there are Test Scenarios and Task Selected #. 4.4 Modify Configuration When the test is finished, the result is saved in a log file. Click Show Current Log to read the log information in notepad. There are two parts in log files: SUMMARY and DETAIL. Summary shows all information including model name, version, start time, use and end time, and all the tasks performed.
Show Current Config is to open a notepad for the current configuration file (*.ini) of a loaded model to show its environment and detailed parameters of each task. ® XTRAMUS TECHNOLOGIES 22 E-Mail: sales@xtramus.com Http://www.Xtramus.
Click Show Current Folder to open the current folder, which saves log files in the same model. to bring out the window for the list of *.log files. Click Open button Task results are directly footnoted in file names. 5. Testing After all the settings and configurations are modified, click Start button in the middle on the main window for the program to run tasks. If all the tasks complete and pass, the window of PASS will pop up as follows: ® XTRAMUS TECHNOLOGIES 23 E-Mail: sales@xtramus.
However, if any of the tasks fails, then the window of FAIL will pop up. ® XTRAMUS TECHNOLOGIES 24 E-Mail: sales@xtramus.com Http://www.Xtramus.