Telesyn™ AlliedView™ NMS System 9.0 Installation Guide Issue 3 Copyright © 2007 Allied Telesis, Inc. All rights reserved Information in this document is subject to change without notice.
Introduction Congratulations on your purchase of the AlliedView™ Network Management System product. This product allows users to query all aspects of Allied Telesis products in their network. Who Should Read This Guide? This document is for users who need to deploy the AlliedView NMS product on Windows1 or Solaris2 platforms. For in-depth knowledge of the NMS and its applications, refer to the AlliedView NMS AlliedView Administration Guide and the NMS User Guide.
Chapter 8 describes how to uninstall a Service Pack. Chapter 9 gives installation scenarios and includes references when needed to other sections or documents. The Appendix describes how to enable anonymous ftp. Reason for Update For AlliedView NMS release 9.
Copyright © 2007 Allied Telesis, Inc. All rights reserved Information in this document is subject to change without notice.
Table of Contents 1 Preparing for Installation - - - - - - - - - - - - - - - - - - - - - - - -1-1 1.1 Types of Installation - - - - - - - - - - - - - - - - - - - - - - - - - - - - - - - - - - - - - - - - - - - - - - - - 1-1 1.2 System Requirements - - - - - - - - - - - - - - - - - - - - - - - - - - - - - - - - - - - - - - - - - - - - - - - 1-2 1.3 Getting Started - - - - - - - - - - - - - - - - - - - - - - - - - - - - - - - - - - - - - - - - - - - - - - - - - - - 1-2 1.
5 Starting Up AlliedView NMS 9.0 - - - - - - - - - - - - - - - - - - - - 5-1 5.1 Starting the AlliedView NMS Server on Windows - - - - - - - - - - - - - - - - - - - - - - - - - - -5-1 5.1.1 Starting the NMS Server from the Start Menu - - - - - - - - - - - - - - - - - - - - - - - - - - -5-1 5.1.2 Starting the NMS Server from the Services Window - - - - - - - - - - - - - - - - - - - - - - -5-1 5.2 Starting the AlliedView NMS Server on Solaris - - - - - - - - - - - - - - - - - - - - - - - - - - - - -5-2 5.
10.2 Windows - - - - - - - - - - - - - - - - - - - - - - - - - - - - - - - - - - - - - - - - - - - - - - - - - - - - - - 10-1 10.3 Solaris - - - - - - - - - - - - - - - - - - - - - - - - - - - - - - - - - - - - - - - - - - - - - - - - - - - - - - - 10.3.1 Creating the Anonymous FTP Account - - - - - - - - - - - - - - - - - - - - - - - - - - - - 10.3.2 Create the FTP Directory Tree - - - - - - - - - - - - - - - - - - - - - - - - - - - - - - - - - - 10.3.
TOC-4 AlliedView NMS Installation Guide (Table of Contents)
1. Preparing for Installation 1.1 Types of Installation There are two basic types of AlliedView NMS installations: a full installation and an Upgrade Pack. A full installation is used when installing the NMS for the first time on a host machine. A full installation copies all of the files required to run the NMS to your hard drive. The software is delivered on a CD-ROM., which contains the necessary files, documentation, and an installer program that steps you through the installation process.
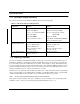
System Requirements 1.2 System Requirements The system requirements for the AlliedView NMS are listed in the following table. TABLE 1-1 AlliedView NMS System Requirements Requirement Windows Solaris AlliedView NMS 9.0 server OS: Windows 2003 OS: Solaris 8, 9, or 10 Machine: Dell, IBM, etc. Machine: Sun Fire V210 (V440) Processor: 1@3.4 GHz (2@3.6 GHz) Processor: UltraSparc llli 1.34 GHz RAM: 1 GB (4 GB) (2@1.
Preparing for a Full Installation 1.4 Preparing for a Full Installation Before starting the installation, you must verify that the host machine or machines on which you plan to install the AlliedView NMS meet the requirements described in Table 1-1. If any host machine upgrades are necessary, you must perform these upgrades prior to installing the AlliedView NMS. Upgrading host machines is not covered in this document.
Preparing for Allied Telesis Management Extensions for HP OpenView The Extension feature is not installed on the same machine as the AlliedView NMS. It should be installed on the machine having HPOV. Refer to the Installation Guide for AlliedView NMS Extensions for HP OpenView.
2. Installation - Single Server 2.1 Overview In the single server (default) configuration, the AlliedView NMS software is loaded on one server, which provides both Back End (BE) and Front End (FE) functionality. Note: Anonymous FTP is used by the NMS to manage certain devices, and therefore must be enabled on the server. Refer to Appendix A for instructions.
Installing on a Windows Platform 2.2 Installing on a Windows Platform To install the AlliedView NMS on a Windows platform, follow these steps. 1. Insert the Windows installation CD-ROM in the CD-ROM drive. After approximately 60 seconds, the InstallShield1 Wizard Installer screen will appear, as shown in the following figure. FIGURE 2-2 2. AlliedView NMS Installation Wizard Screen On the Installer screen, click Next. This will display the license agreement page shown in the following figure. 1.
Installing on a Windows Platform FIGURE 2-3 3. AlliedView NMS Installation Wizard License Agreement Carefully read the license agreement, click the I accept the terms of the license agreement radio button, and then click Next. Note: If you do not wish to proceed with the installation, click Cancel to exit. The next screen will specify the installation directory.
Installing on a Windows Platform 4. Although you can change this directory, it is highly recommended that you use the default directory provided. Click Next. 5. The next screen displays the selected installation directory and indicates the total size of the installation (in Mb). If you need to make a change, click Back and make the change. If you wish to exit, click Cancel. Otherwise, click Next. 6. This will display the installation progress window shown in the following figure.
Installing on a Windows Platform FIGURE 2-5 7. AlliedView NMS Installation Wizard File Installation This window prompts you to choose whether to install the AlliedView NMS as a Windows service, which allows the AlliedView NMS to automatically start up on Windows startup and shut down on Windows shutdown. Note: It is highly recommended that you install the AlliedView NMS as a Windows Service.
Installing on a Solaris Platform Select Yes if you want the AlliedView NMS as a service. Otherwise select No. Click Next. The next window will appear. 8. The next screen will confirm the successful installation of the AlliedView NMS. Complete the process as follows: 1. Click Next. The next window will appear. 2. The next window will ask you whether you want to restart your computer now or at a later time. If you want to restart now, select Yes. Otherwise, select No.
Installing on a Solaris Platform Note: The default installation directory for the AlliedView NMS on the Solaris platform is /opt/ AlliedViewNMS. Although you can change this directory, it is highly recommended that you use the default directory provided. Note: Prior to release 7.0 the path was /opt/TelesynNMS. 5. Once installation is complete, start the AlliedView NMS. Refer to Chapter 5.
Installing on a Solaris Platform 2-8 AlliedView NMS Installation Guide (Installation - Single Server)
3. Installing the AlliedView NMS - Distributed Front End Server 3.1 Overview The AlliedView NMS is deployed by default in a single server, or non-distributed environment. There are therefore certain scalability limits, such as the number of devices or users. Starting in release 4.0, the AlliedView NMS can be deployed in a multiple Front End server, or distributed, environment.
Installing on a Windows Platform Initial Installation on a Front End Server Note: The Front-End configuration is available only upon request. Please contact your Allied Telesis representative for details. Note: Anonymous FTP is used by the NMS to manage certain devices, and therefore must be enabled on the Backend server. Refer to Appendix A for instructions. 3.
Initial Installation on a Front End Server FIGURE 3-2 Installing on a Windows Platform AlliedView NMS Installation Front End Wizard Install Directory 4. Although you can change this directory, it is highly recommended that you use the default directory provided. Click Next. 5. After clicking Next, a confirmation window shows the directory and indicates the total size of the installation (in Mb). If you need to make a change, click Back and make the change. If you wish to exit, click Cancel.
Installing on a Windows Platform FIGURE 3-3 7. AlliedView NMS Installation Back End Host Form The window prompts you to enter the IP address for the Back End server. This address must be correct to ensure the Front End can download the appropriate files back End configuration files. Note: 8. Initial Installation on a Front End Server If you input an incorrect address, the Front End server, at start up, will not download the appropriate Back End configuration files, and an error will occur.
Accessing the Front End Server from a Remote Client Installing on a Solaris Platform 9. The last form confirms you have successfully installed the Front End software. Click Finish. 10. There is no need to restart the server. Therefore, select Start -> Programs -> Start Server. A progress window appears and lists the back end configuration files as they are loaded.
Installation Scenarios Installing the FE Configuration on an Existing 3.4 Installation Scenarios Since both the one BE and FE server(s) are loaded separately, it is important to ensure that the software loads are compatible both when the system is set up as well as when upgrades are performed. This is particularly important when the administrator has an existing single server NMS and wants to change to the distributed server configuration.
4. Installing an Upgrade Pack 4.1 Overview The upgrade pack is used to bring your AlliedView NMS to the next major software release. The process is identical for both Windows and Solaris. In 9.0 the same upgrade pack is used for Solaris and Windows. Note: Prior to this procedure, perform a server backup as documented in 3.4. 4.2 Upgrading the Single Server NMS Back-End 1. Shut down the NMS Server. Refer to Chapter 8.
Upgrading the Single Server NMS Back-End FIGURE 4-1 FIGURE 4-2 3. AlliedView NMS Update Manager AlliedView NMS Update Manager Installation Wizard In the Installation Wizard window, click Browse. This will bring up the Select a File window. Refer to the following figure.
Upgrading the Single Server NMS Back-End FIGURE 4-3 AlliedView NMS Select a File Window 4. In the Select a File window, navigate to the Service Pack file located on the installation CD-ROM. This file will have a .ppm file extension. Double-click this file, or select the file and then click Open. This will close the Select a File window. 5. In the Installation Wizard window, if you wish to view the Readme file for this update, click Readme. 6. Click Install to apply the update.
Upgrading the Single Server NMS Back-End FIGURE 4-4 AlliedView NMS Update Manager Installation Wizard Update In Progress 7. Allow the installation to complete, and then click Close. 8. The AlliedView NMS Update Manager window will now show the installed Service Pack as shown in the following figure. 9. The Service Pack is now installed. Click Exit to exit the AlliedView NMS Update Manager.
Upgrading the Distributed NMS FE Servers FIGURE 4-5 Update Manager Showing the Installed Service Pack 10. Start the NMS Server. Refer to Chapter 6. 11. The installation is now complete. 4.3 Upgrading the Distributed NMS FE Servers To upgrade a distributed NMS FE server follow these procedures: 1. Follow the FE uninstallation procedure in Section 7. 2. Follow the FE installation procedure in Section 3.
Upgrading the Distributed NMS FE Servers 4-6 AlliedView NMS Installation Guide (Installing an Upgrade Pack)
5. Starting Up AlliedView NMS 9.0 5.1 Starting the AlliedView NMS Server on Windows If you chose to install the AlliedView NMS as a Windows automatic Service, the AlliedView NMS Server will start automatically when your computer is restarted. If you left the AlliedView NMS Client menu item in your Windows Startup menu, the AlliedView NMS Client will also start automatically when your computer is restarted.
Starting the AlliedView NMS Server on Solaris Starting the NMS Server from the Services Win2. In the Control Panel, double-click the Administrative Tools folder. 3. In the Administrative Tools folder, double-click Services. The Services window will appear. 4. In the Services window, scroll down until you find item Telesyn NMS. This item is the AlliedView NMS Service. Refer to the following figure for an example.
Overview 4. Starting the Client Allow the server to initialize. 5.3 Starting the Client 5.3.1 Overview The AlliedView application client may be run locally on the AlliedView NMS server, or remotely on any javaenabled Windows, Solaris, or Linux system, The local installation is installed during the normal AlliedView NMS server installation process (Section 2) and the Remote Client is installed using the Java Web Start technology via the remote client’s java-enabled web browser.
Starting the Client Remote Client - Java Web Start 5.3.3 Remote Client - Java Web Start 5.3.3.1 Overview Java Web Start is a helper application that allows the AlliedView NMS client to run the AlliedView NMS remotely via the Internet as a user application rather than as an HTML client. Java Web Start is installed from the AlliedView NMS Server via HTTP and must be installed on the client machine before the user can use it.
Remote Client - Java Web Start FIGURE 5-3 1. Starting the Client AlliedView NMS HTML Client Logon Screen Click Web Start Client from the Java Web Start Interface panel and allow the application to load. This will download Java Web Start from the AlliedView NMS as shown in the following figure. AlliedView NMS Installation Guide (Starting Up AlliedView NMS 9.
Starting the Client HTML Client FIGURE 5-4 2. Java Web Start Download If Java Web Start is not installed, you will be given the option of installing it from the Sun Web site. You can also install it from the AlliedView NMS Login screen (refer to Figure 5-3) by clicking on Download Java. Note: Installing from the AlliedView NMS Login screen (refer to Figure 5-3) is preferred since it will always contain the correct version of the jre software.
Client Limitations 2. Enter root as the username and public as the password, and then click HTML Client. The HTML Client view will appear. Note: 3. Starting the Client It is highly recommended that you change your password immediately upon first logging in. The root username and public password are known defaults for the AlliedView NMS. Leaving the default password may make your NMS vulnerable to unauthorized access. Refer to the NMS Administration Guide for information on changing the password.
Starting the Client 5-8 AlliedView NMS Installation Guide (Starting Up AlliedView NMS 9.
6. Shutting Down the AlliedView NMS 6.1 Shutting Down a AlliedView NMS Client 6.1.1 Application Client For an NMS client running as a user application, to shut down the client, simply select File -> Exit from the Panel-Specific Menu, or click the X in the upper-right-hand corner of the screen. The Confirmation Message dialog box will appear. Click Yes in the dialog box to shut down the client. 6.1.
Shutting Down the AlliedView NMS Server 6.2.2 Solaris To shut down the AlliedView NMS Server on a Solaris platform, follow these steps: 1. Log in as root or as a user with root privileges. 2. Change your current directory (cd) to /bin. 3. Execute file ShutDown.sh.
7. Uninstalling the AlliedView NMS 7.1 Overview The process for uninstalling the AlliedView NMS is identical for both the single server and distributed server FE(s). 7.2 Windows To uninstall the AlliedView NMS from a computer running Windows, follow these steps: 1. Shut down any client connections and the server. Refer to Section 6. 2. Select Start -> Programs -> AlliedView NMS_load->Tools -> Uninstall. The AlliedView NMS InstallShield will appear. 3. Click Next. This will display the next window. 4.
Solaris 1. Log in as root or as a user with root privileges. 2. Change your current directory (cd) to /_uninst. 3. Execute file uninstaller.bin.
8. Uninstalling an AlliedView NMS Service Pack Note: Uninstalling an NMS Service Pack is only necessary if the Service Pack is determined to be faulty and must be removed. Note: The uninstallation procedure is identical for Windows and Solaris. To uninstall a AlliedView NMS Service Pack, perform the following steps: 1. Shut down the NMS Server. Refer to Chapter 6. 2. Navigate to your /bin directory and locate file reinitialize_nms. Execute this file. Note: Use file reinitialize_nms.
FIGURE 8-1 5. NMS Update Manager Window Showing Installed Service Packs Click on the Service Pack you want to remove, and then click Uninstall. The Uninstall window will appear as shown in the following figure.
FIGURE 8-2 6. NMS Update Manager Uninstall Window Click Finish. The uninstallation process will begin. The Uninstall window will track the progress as shown in the following figure.
Note: If you want the Uninstall window to close after the uninstallation is complete, check the Automatically close after uninstallation checkbox. You can do this during the uninstallation process. 7. Allow the uninstallation process to complete. If the Uninstall window did not close automatically, click Close to close it. The AlliedView NMS Update Manager window will no longer show the uninstalled Service Pack. 8. In the AlliedView NMS Update Manager window, click Exit to exit the NMS Update Manager.
9. Installation Steps - Overview The previous sections of this Guide have shown how the various components of the AlliedView NMS are installed on the server and clients, as well as provisioning extensions for HP OpenView. The NMS Administration Guide explains how the NMS programs and configuration discover the network devices so that they are displayed and managed by the AlliedView NMS interface.
Configuring a New NMS with New Devices 9.2 Configuring a New NMS with New Devices If the AlliedView NMS is being installed for the first time and a new network is being configured, the network, the devices, and the network interface to other networks need to be configured, as well as the AlliedView NMS. Caution: Ensure the AlliedView NMS and the devices have layer 3 connectivity; if this is not done, the devices will not be able to communicate with the AlliedView NMS server.
Configuring a New NMS with New Devices TABLE 9-1 Steps for a New AlliedView NMS with New Devices (Continued) Step 8. Use the Discovery Configurator to Prepare for the Discovery Process Details / Reference Notes Select Tools -> Discover Configurator to bring up the Discovery Configurator Window. Then follow the tabs: The Discovery Configurator is used to configure the attributes of the discovery process, and so it is critical that these be set up correctly.
Configuring a New NMS with New Devices 9-4 AlliedView NMS Installation Guide (Installation Steps - Overview)
10. Appendix A - Enabling Anonymous FTP 10.1 Overview Use the following steps to enable anonymous FTP on the Backend Server. Refer to the AlliedView NMS Administration Guide for how this works. 10.2 Windows 1. Control Panel -> Add/Remove Programs -> Add/Remove Windows Components 2. Select (without checking) Internet Information Services (IIS) Note: For Windows 2003, Internet Information Services is under Application Server -> Details. 3. Click on Details 4.
Solaris Creating the Anonymous FTP Account 10.3 Solaris Configuring FTP on Solaris can be a complex and difficult task if your system has been altered from the original installation. On the other hand, it's a relatively straight-forward task if your system does not deviate from the default Solaris installation. Due to variations among UNIX and Solaris systems, however, this procedure cannot be reliably automated.
Create the FTP Directory Tree 1. Solaris Create the following subdirectories under the ftp root: /opt/ftp /opt/ftp/bin /opt/ftp/pub /opt/ftp/usr /opt/ftp/lbin /opt/ftp/lib /opt/ftp/usr/bin /opt/ftp/usr/lib 2. Set up the “ls” command for the anonymous user: ln s /usr/bin/ls /opt/ftp/bin/ls cp /usr/bin/ls /opt/ftp/usr/bin 3.
Solaris 4. Configure Upload Permission on Solaris 9-10 Set file permissions to allow read-execute to all directories, read-only to the ls command, and read-write-execute to pub: chmod 555 /opt/ftp/bin chmod 777 /opt/ftp/pub chmod 555 /opt/ftp/usr chmod 555 /opt/ftp/usr/bin chmod 111 /opt/ftp/usr/bin/ls chmod 555 /opt/ftp/usr/lib 10.3.3 Configure Upload Permission on Solaris 9-10 1.
Shell Commands Solaris 10.3.6 Shell Commands The following shell commands will configure anonymous FTP service suitable for AlliedView NMS on most Solaris installations. Due to variations in system administration from one system to another, this procedure cannot be guaranteed to work on all Solaris systems. You are advised to create and configure the ftp account interactively in case errors occur.
Solaris 10-6 Shell Commands AlliedView NMS Installation Guide (Appendix A - Enabling Anonymous FTP)
11. Appendix B - Activating NMS Software License 11.1 Obtaining the License Activator Key In order to convert your Evaluation copy to a fully licensed NMS, provide your Allied Telesis Representative with the License Key Request Form (Appendix C). This form must include the server unique identifier, which is obtained as follows: 11.1.1 Obtain Server Identifier The following command must be executed on the NMS server to obtain the Unique ID. • Solaris: % /opt/AlliedView NMS/bin/UniqueIDSolaris.
Obtaining the License Activator Key Applying License Activator Key 11.1.3 Applying License Activator Key Once the license activator key is delivered to you it must be copied to the NMS server and the AT_Update program must be run. This procedure may be applied to a running NMS server and it will take effect immediately without the need of a system restart. Note: This procedure must be run on the NMS Server with Administrator (W2003) or root (Solaris) privileges. 1.
Applying License Activator Key Obtaining the License Activator Key FIGURE 11-2 File Update Tool Form 4. Use the Select File to locate the License.upd file 5. Select Apply and the key will activate the NMS as a fully licensed system. 6. When success message is received, select Cancel to close the window.
Obtaining the License Activator Key 11-4 Applying License Activator Key AlliedView NMS Installation Guide (Appendix B - Activating NMS Software License)
11. Appendix C - License Key Form 11.1 License Activation Form - AlliedView NMS The license key will allow converting your evaluation copy to a fully licensed AlliedView NMS. Please provide your Telesyn Sales Representative with all information on this form by either printing and sending a hard copy, fax or email.
License Activation Form - AlliedView NMS License Key Form - Please fill out and send to your Allied Telesis representative Date: ______________________ Company Information Your Name: ________________________________________________________________________ Your Title: _________________________________________________________________________ Your E-mail Address: _________________________________________________________________ Company Name: _____________________________________________________________________