
Installation Guide
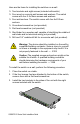
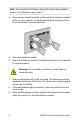
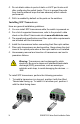

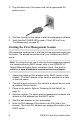
Table Of Contents

12 GS950PS V2 Series Quick Installation Guide
Note: If you need to drill holes in the wall for the screws, perform
steps 4 to 8. Otherwise, go to step 9.
4. Have a person hold the switch on the wall at the selected location
while you use a pencil to mark the wall with the locations of the
four screw holes in the two brackets.
5. Place the switch on a table.
6. Use a stud finder to check for hot electrical wires at the locations
of the screw holes.
7. Use an appropriate drill to drill the holes. The dimensions of the
supplied anchors are 4x22.2mm. The dimensions of the supplied
screws are 3.5x16mm.
8. If the wall material requires anchors, insert the anchors into the
screw holes.
9. Have another person hold the switch at the selected wall location
while you secure it to the wall with four screws.
Warning: Do not install the switch on a wall near hot
electrical wires.